


Community over COVID-19

Blok Studio will be closed for the month of April in order to comply with Gov. Ducey’s shelter-in-place order. We’re taking these measures to help protect our community, both our clients and our employees. Nothing is more important to us. Full refunds will be given to all existing appointments. We know that the Phoenix creative community is resilient, and we are looking forward to serving you again as soon as it’s deemed safe.
It’s through these unfortunate times that community is vital and supporting each other is even more vital. We’ve listed a few helpful links below that explain the recently approved CARES Act. This bill gives us small businesses and freelancers more resources to survive through this uncertain time. Things such as freelancers, gig workers, and contractors being eligible for unemployment benefits, forgivable business loans, and payroll tax deferral. Please read through the information below and seek professional counsel when necessary.


The Power of a Picture
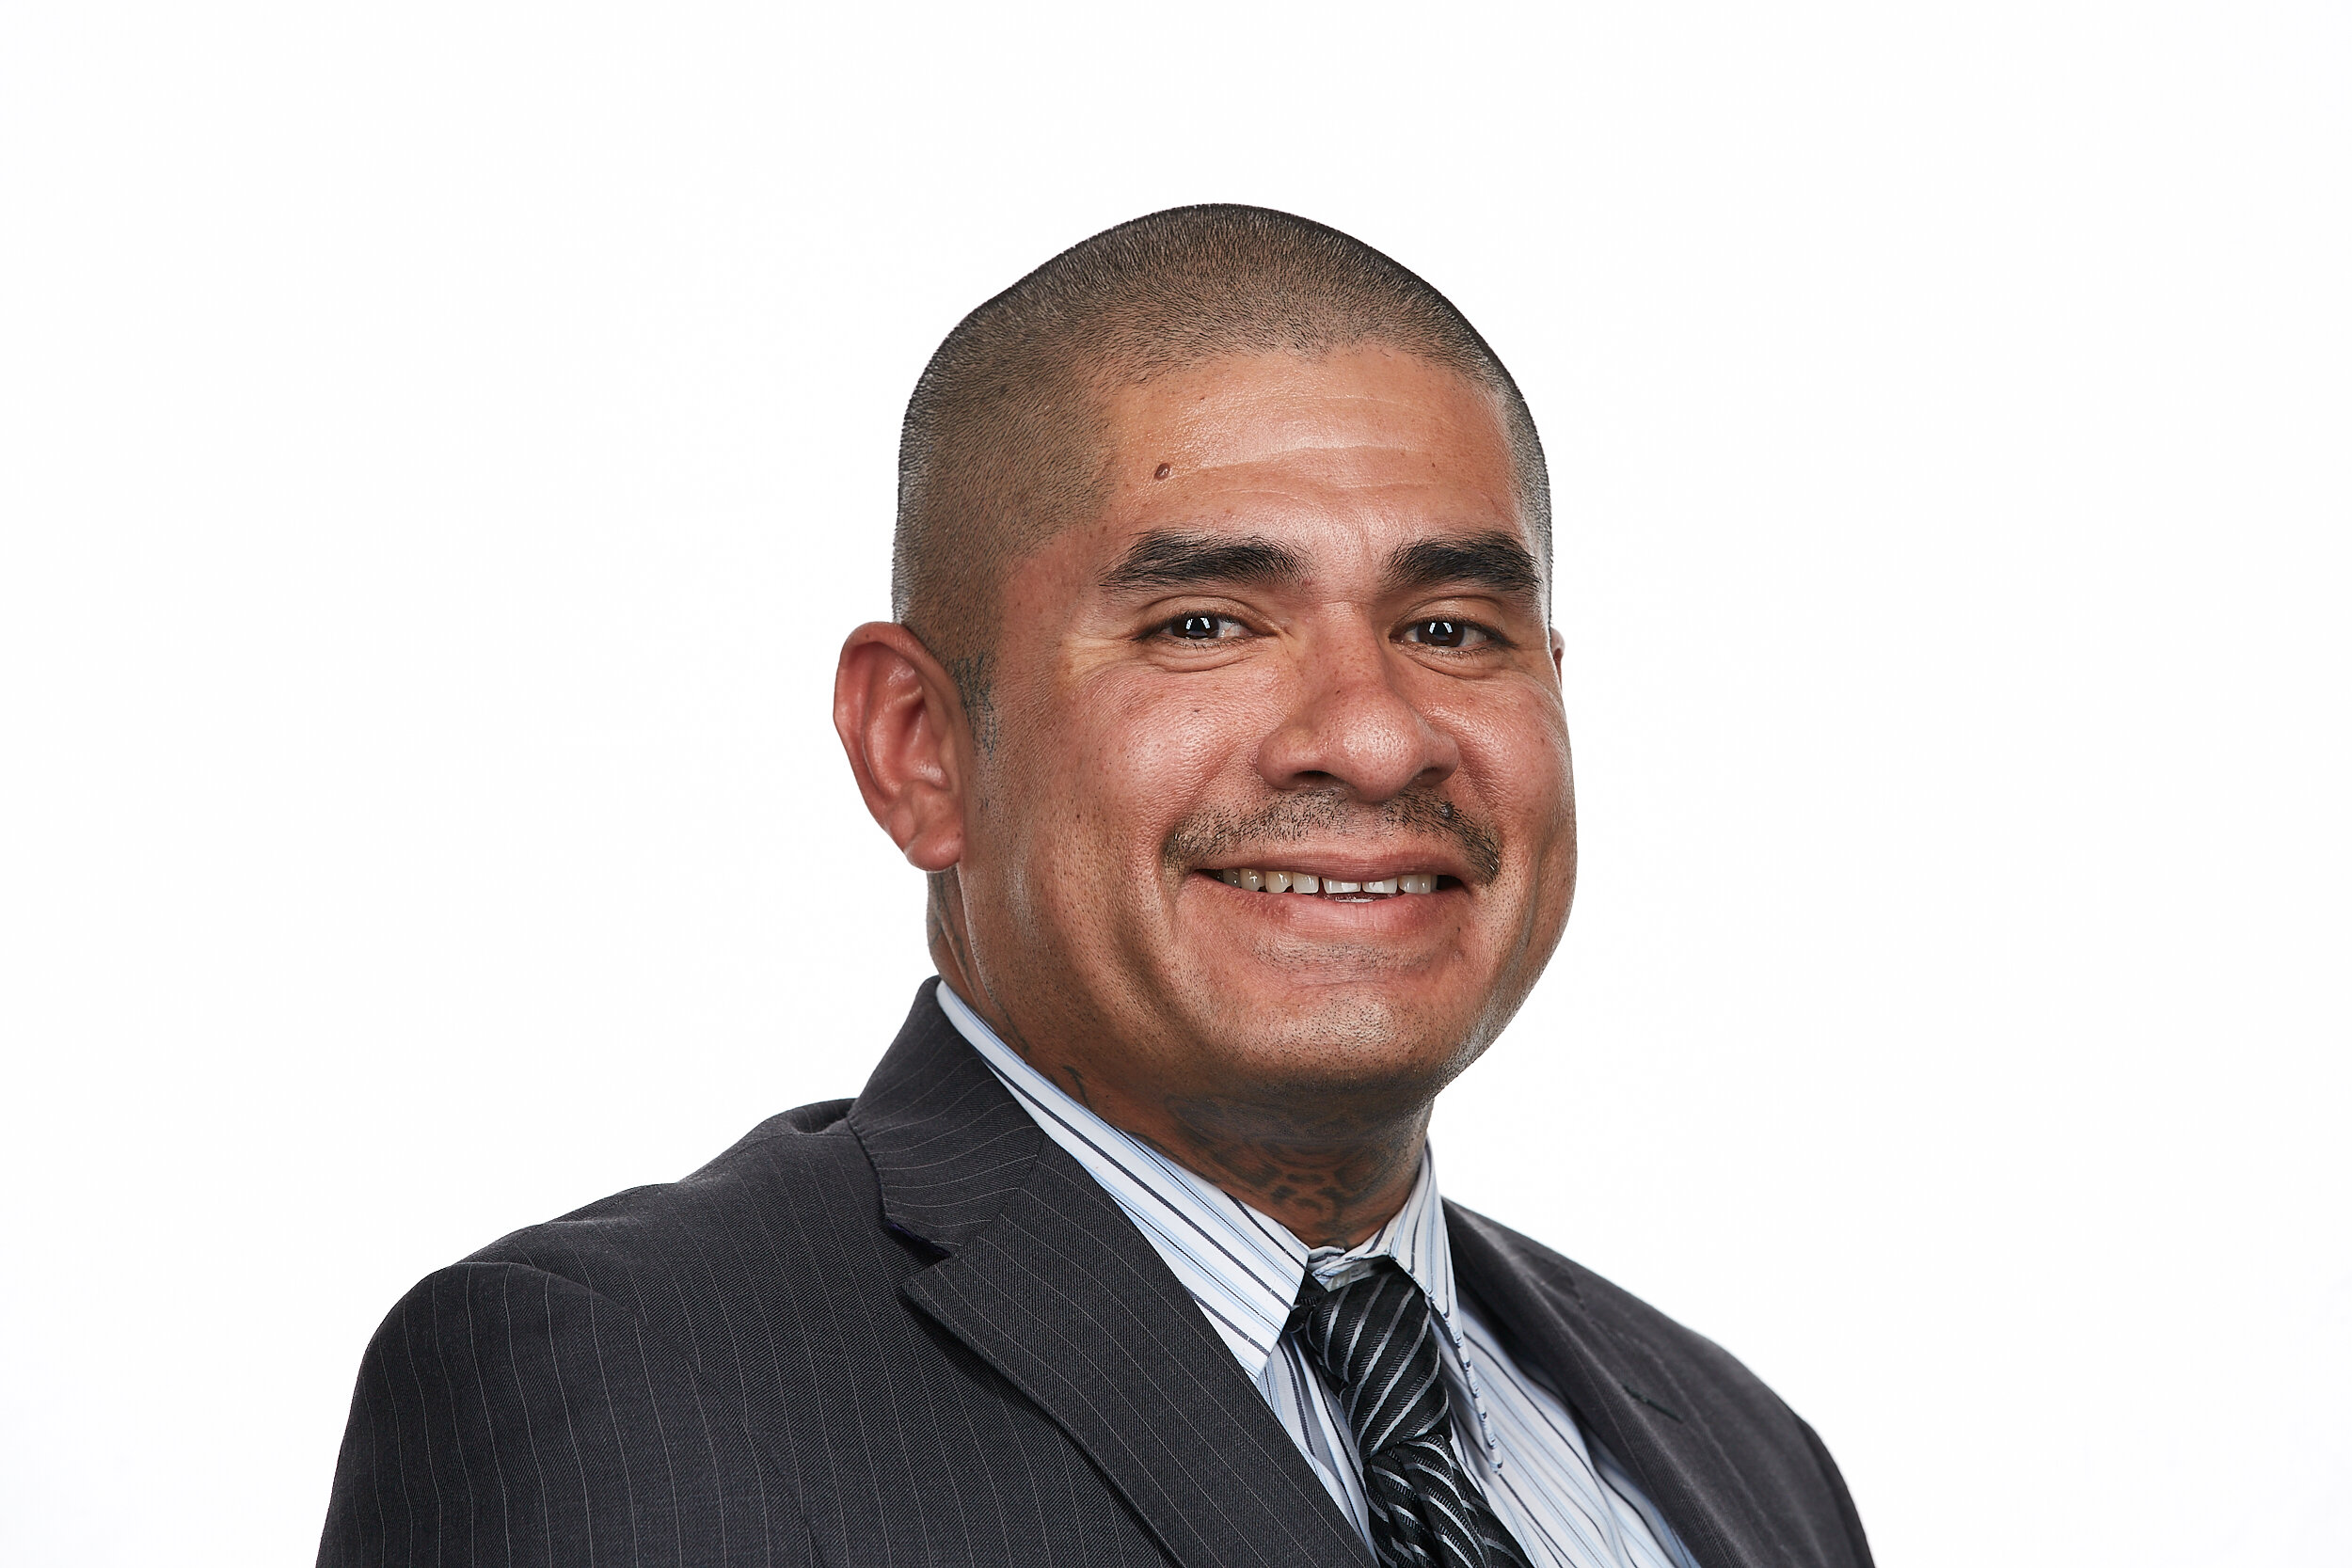
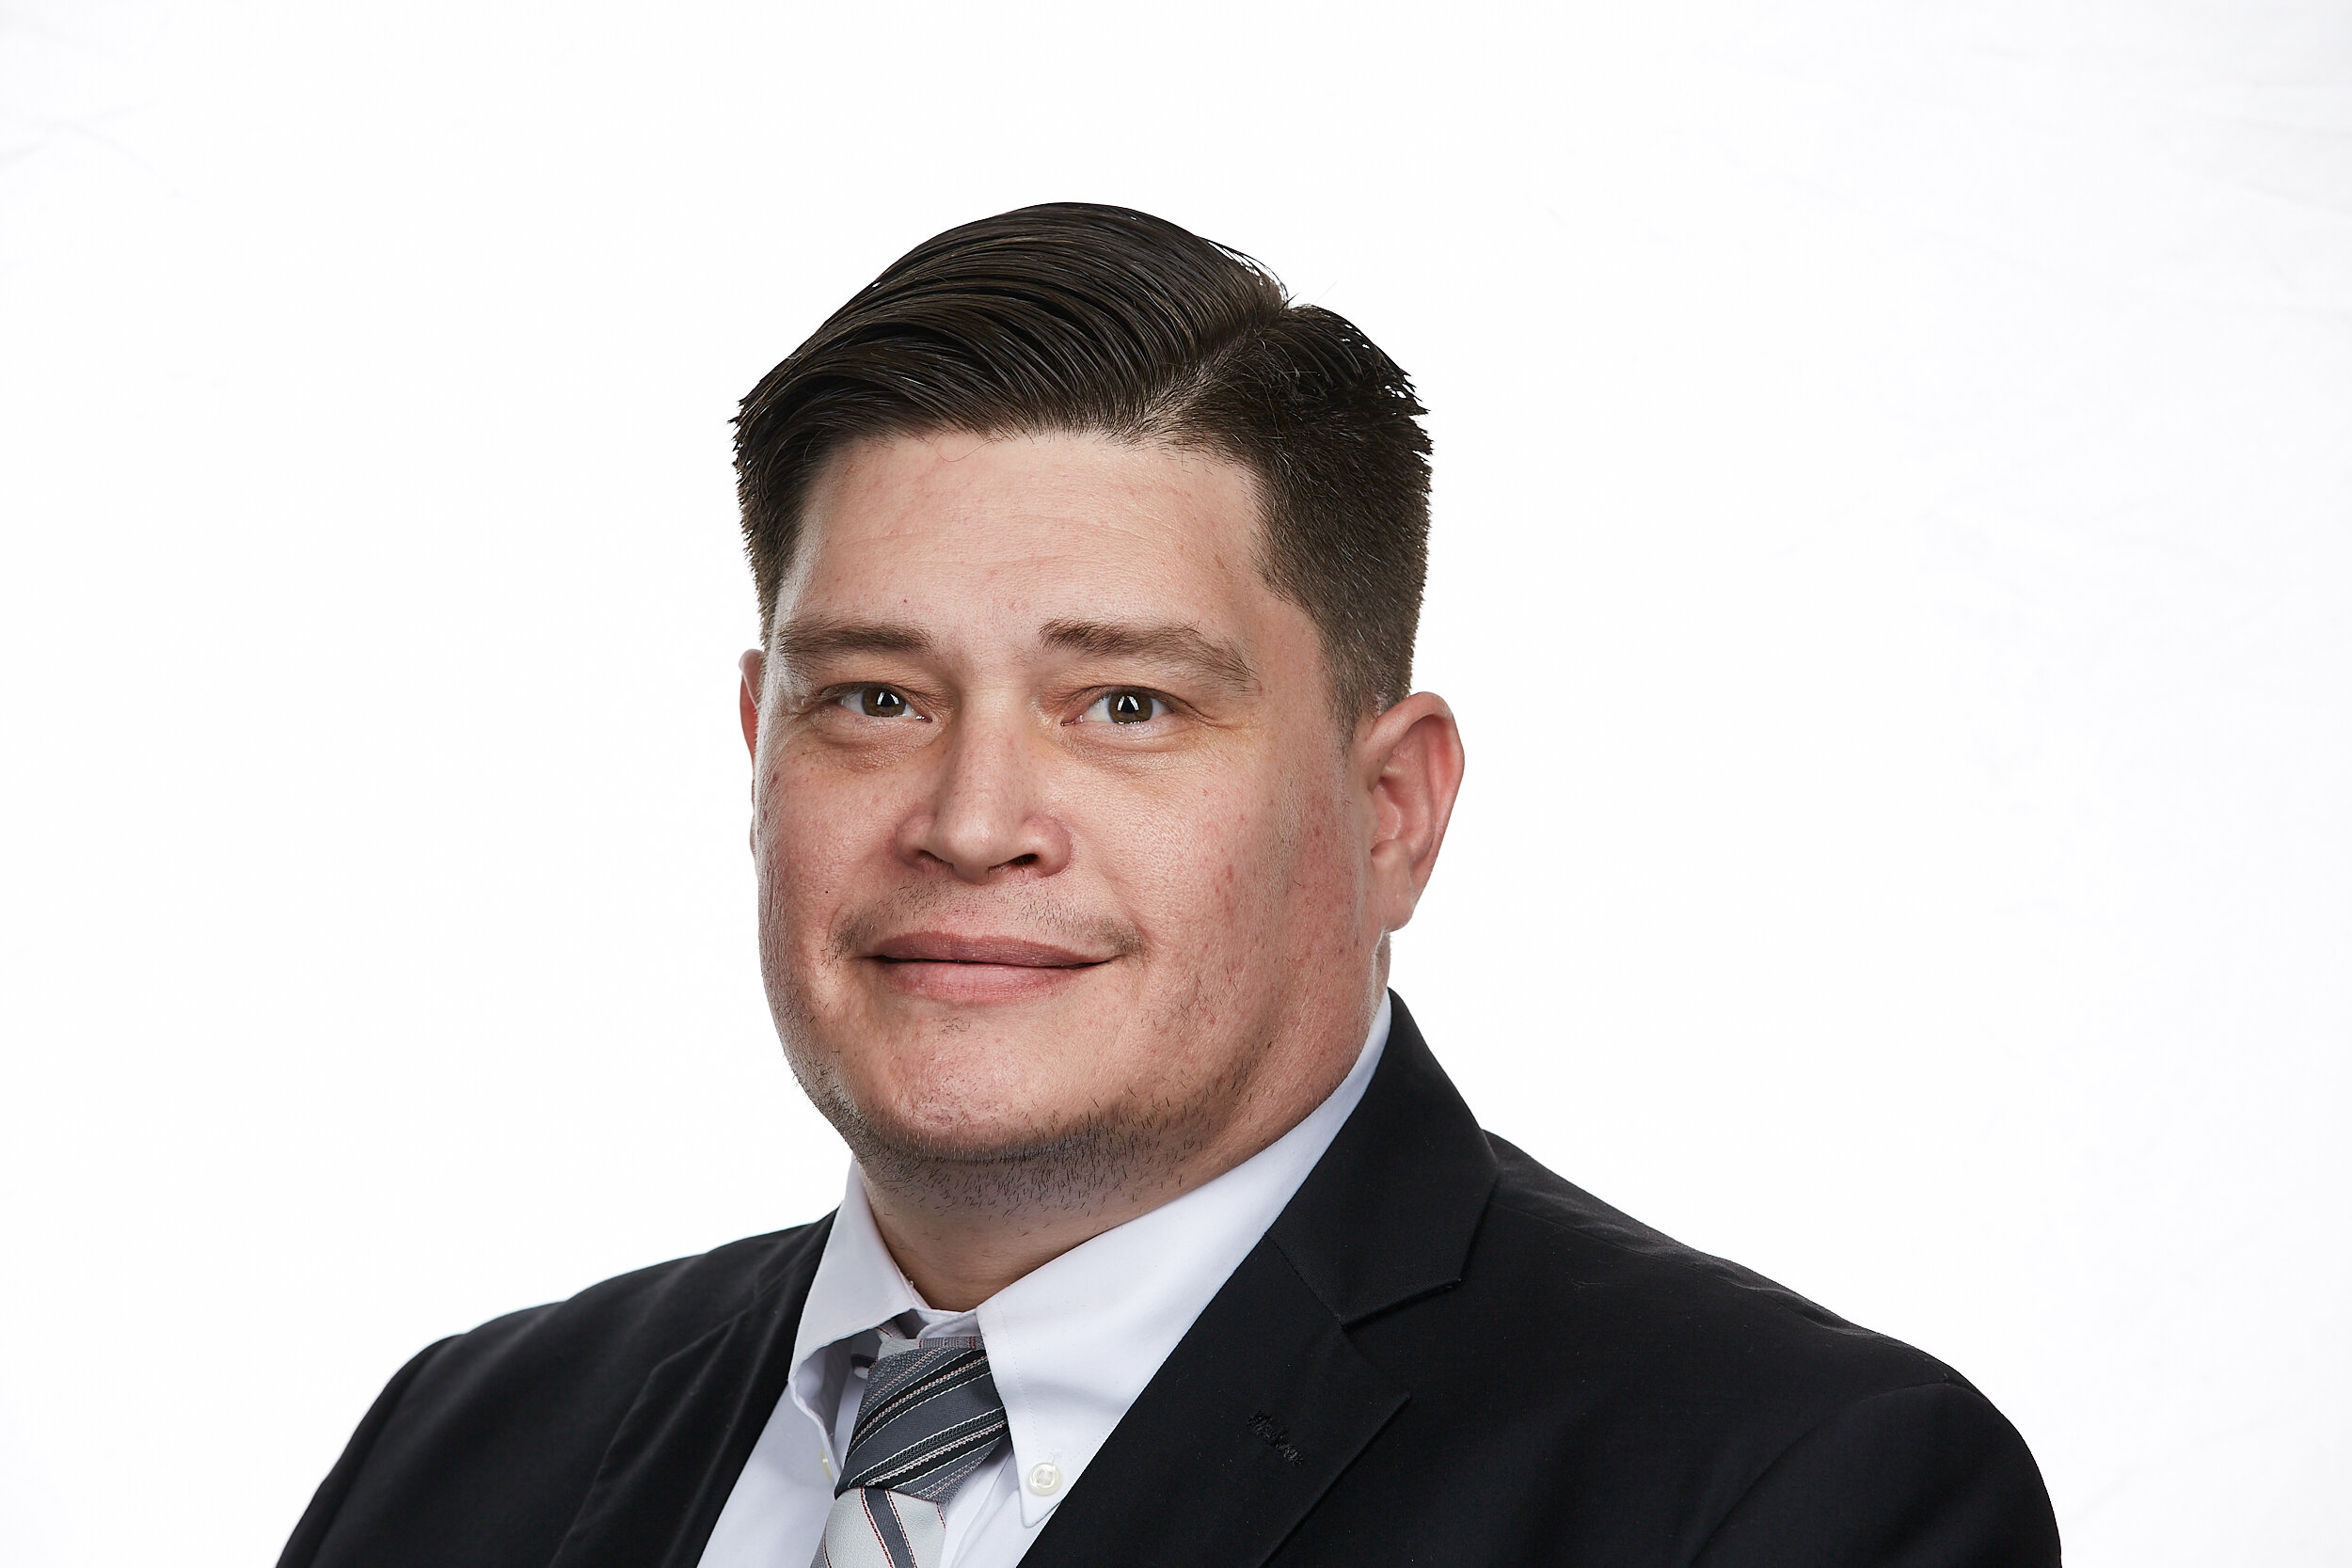
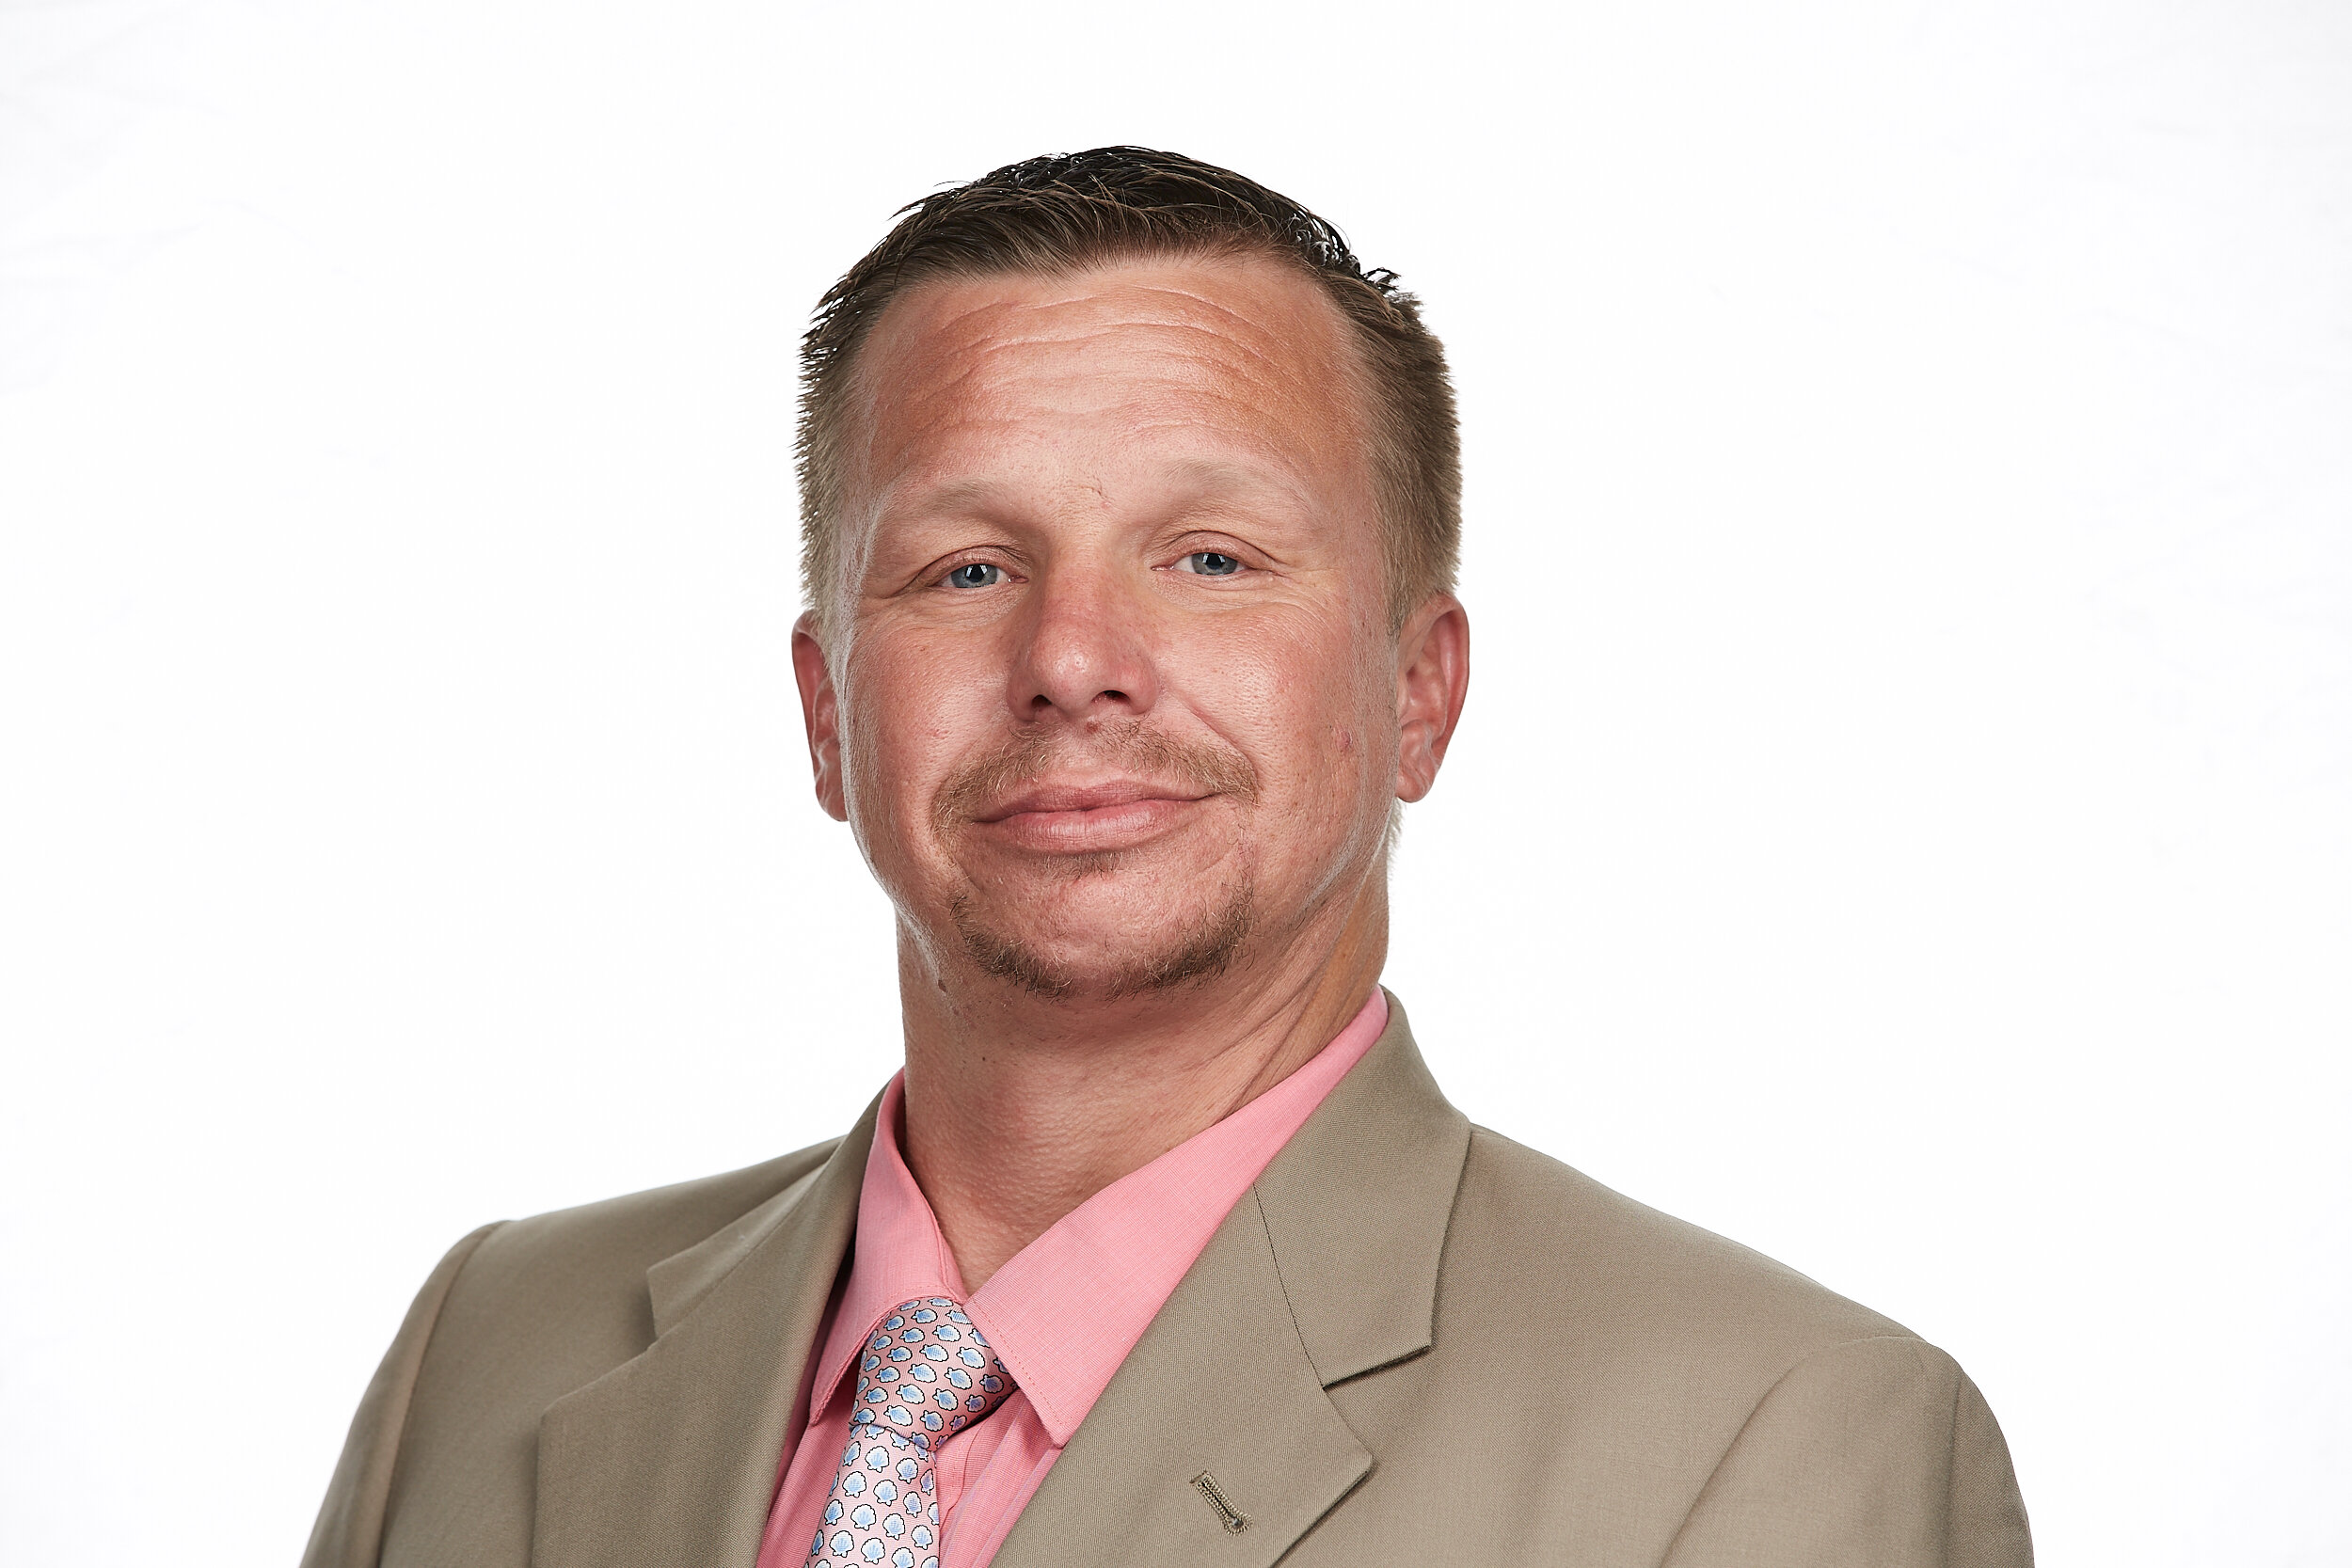
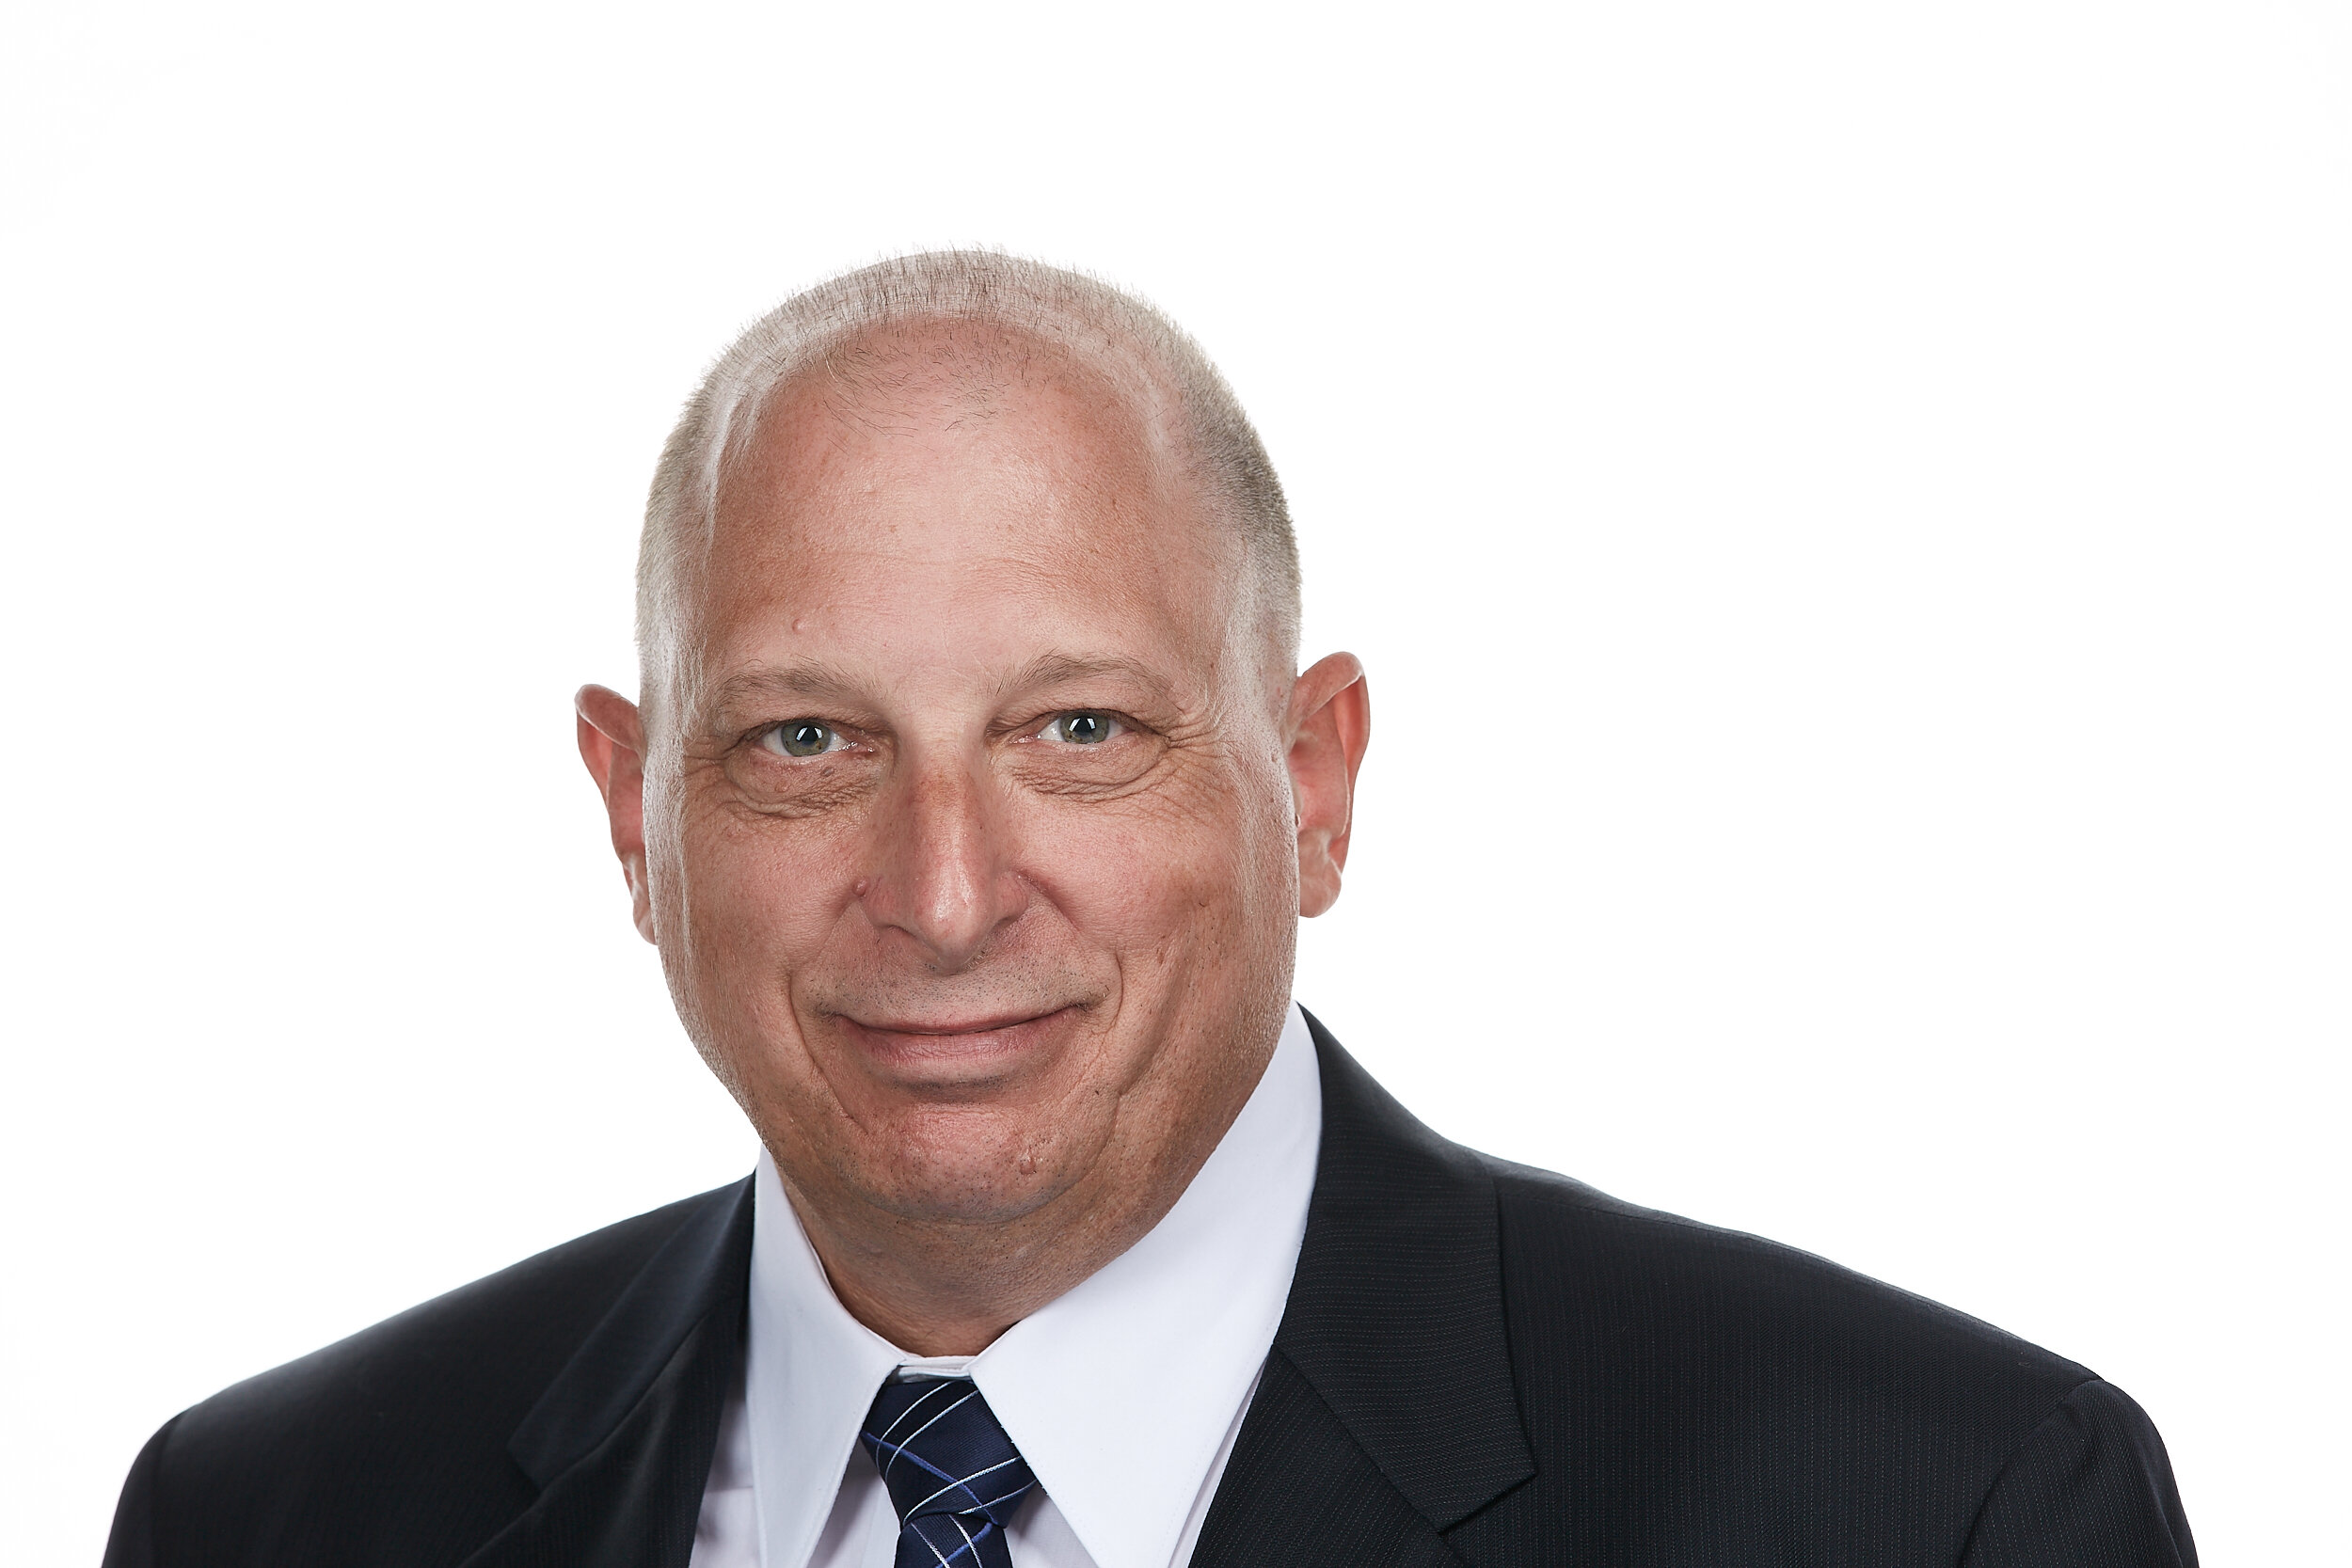
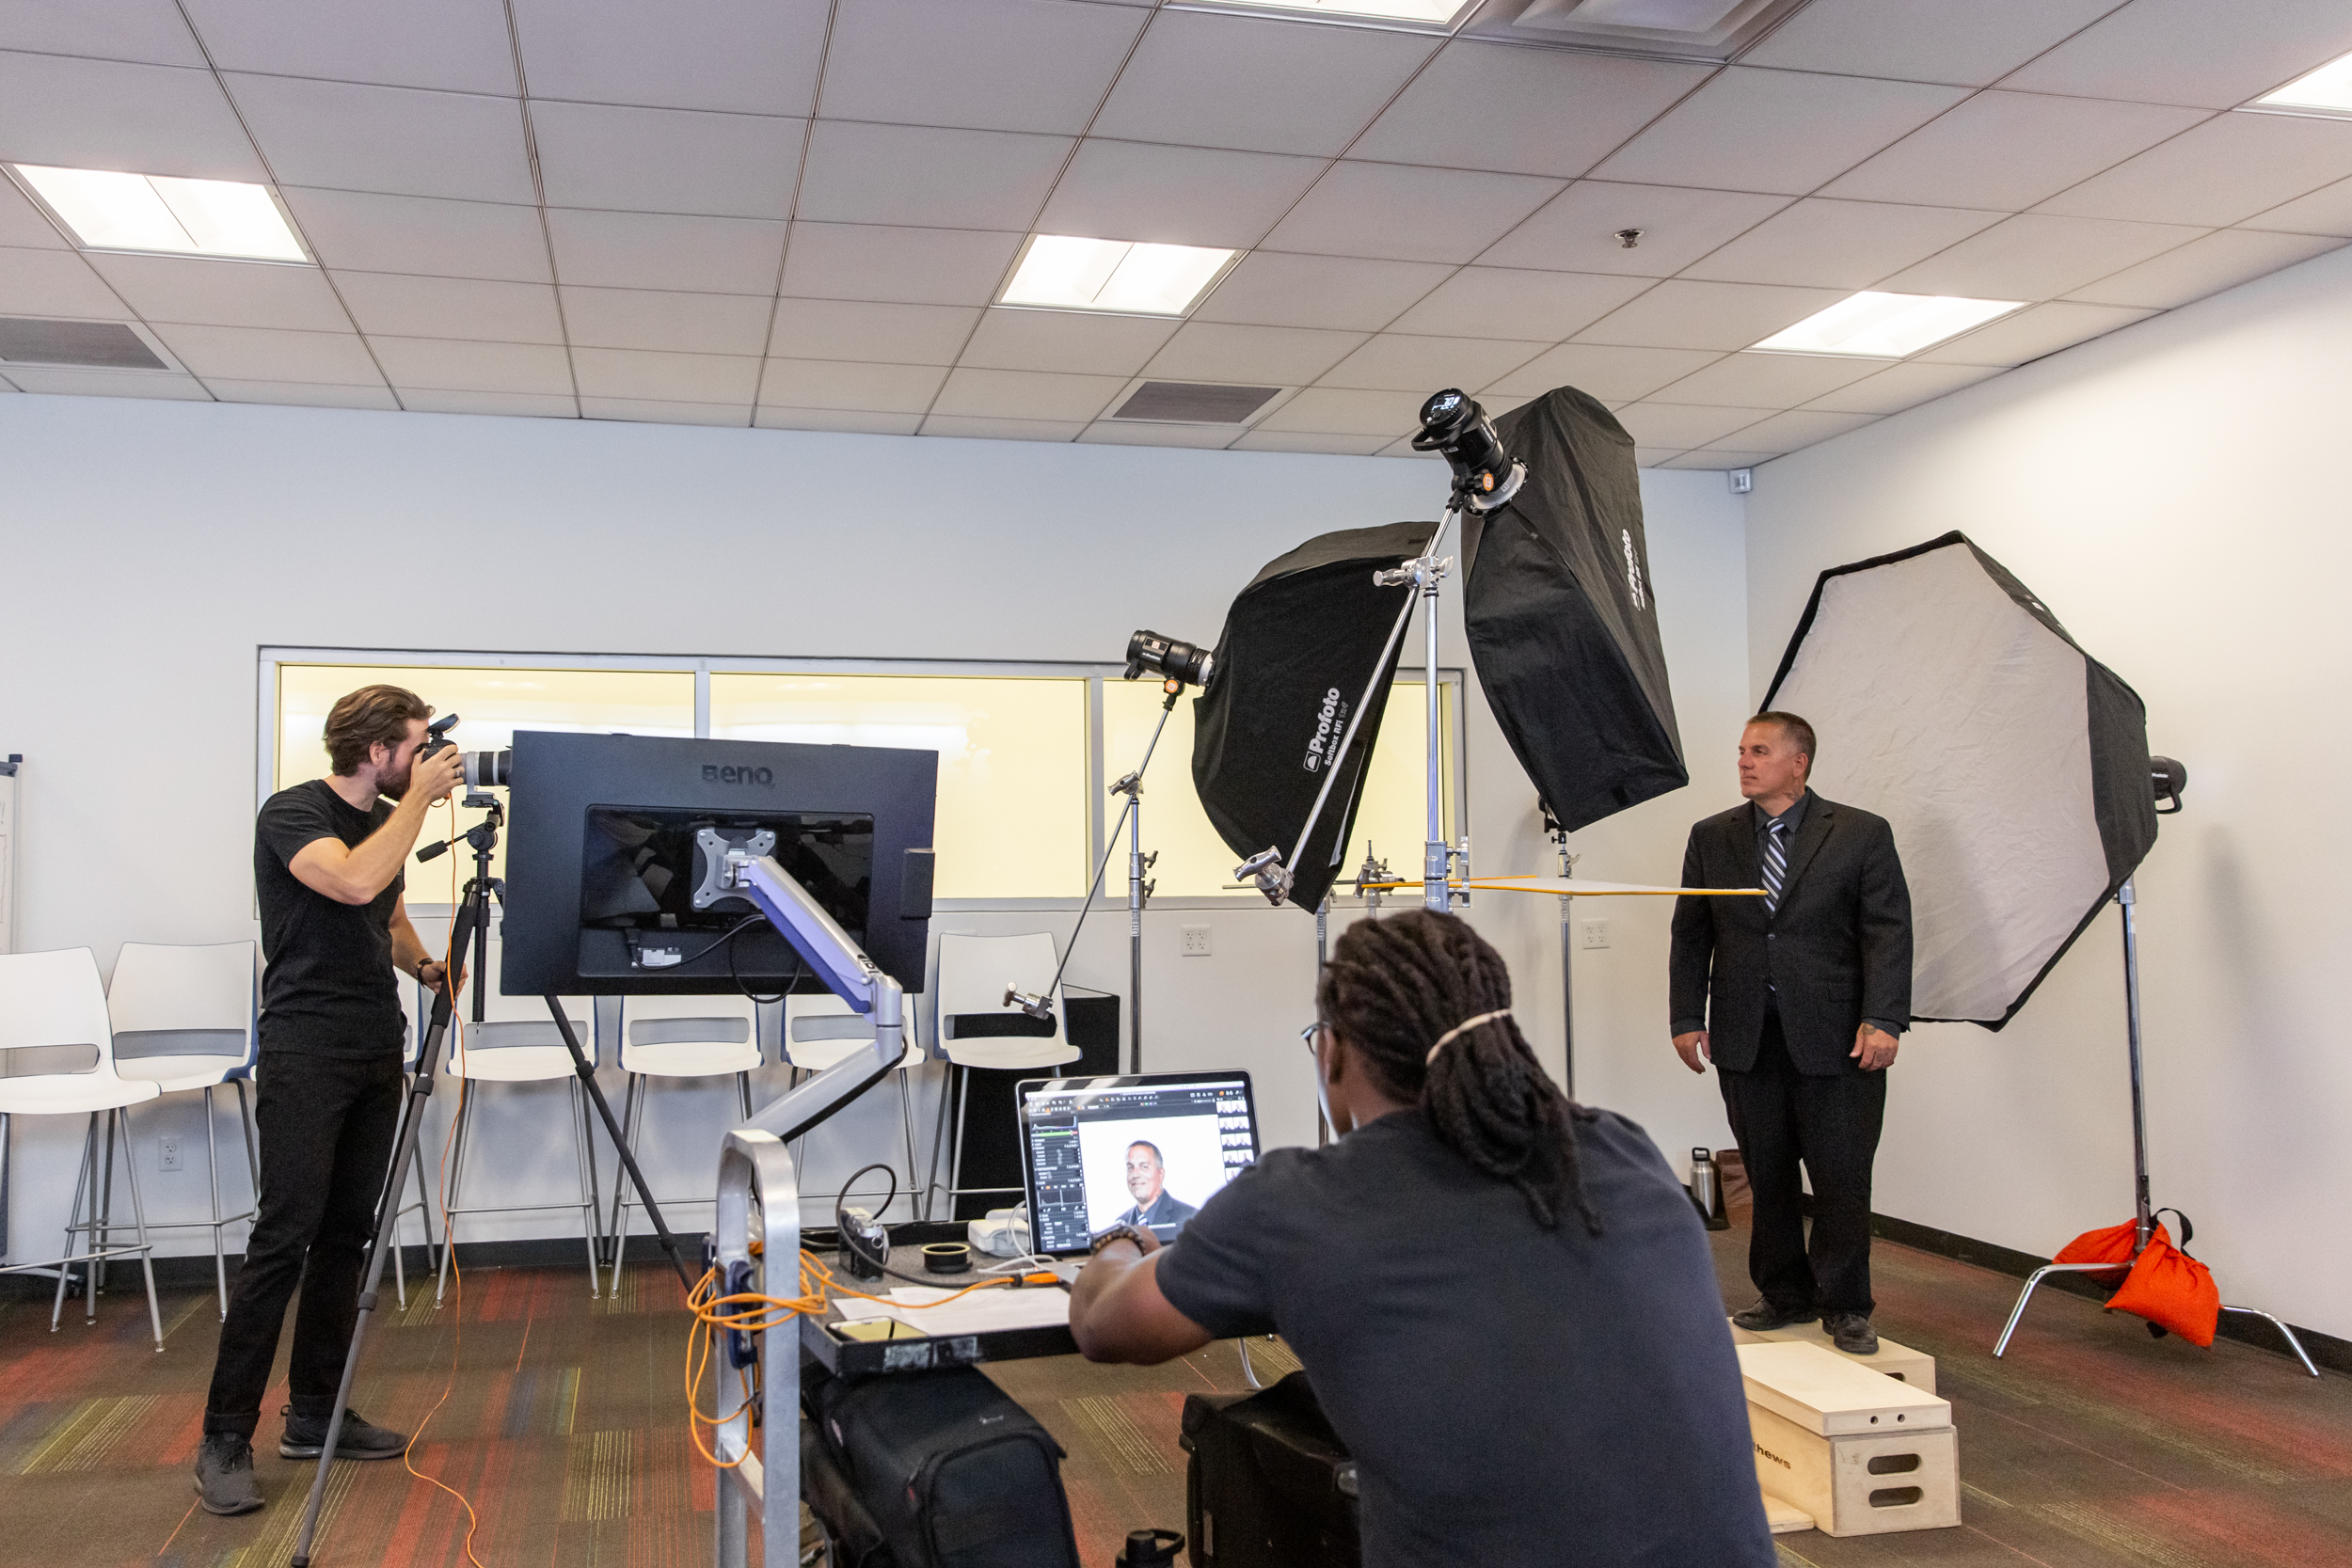
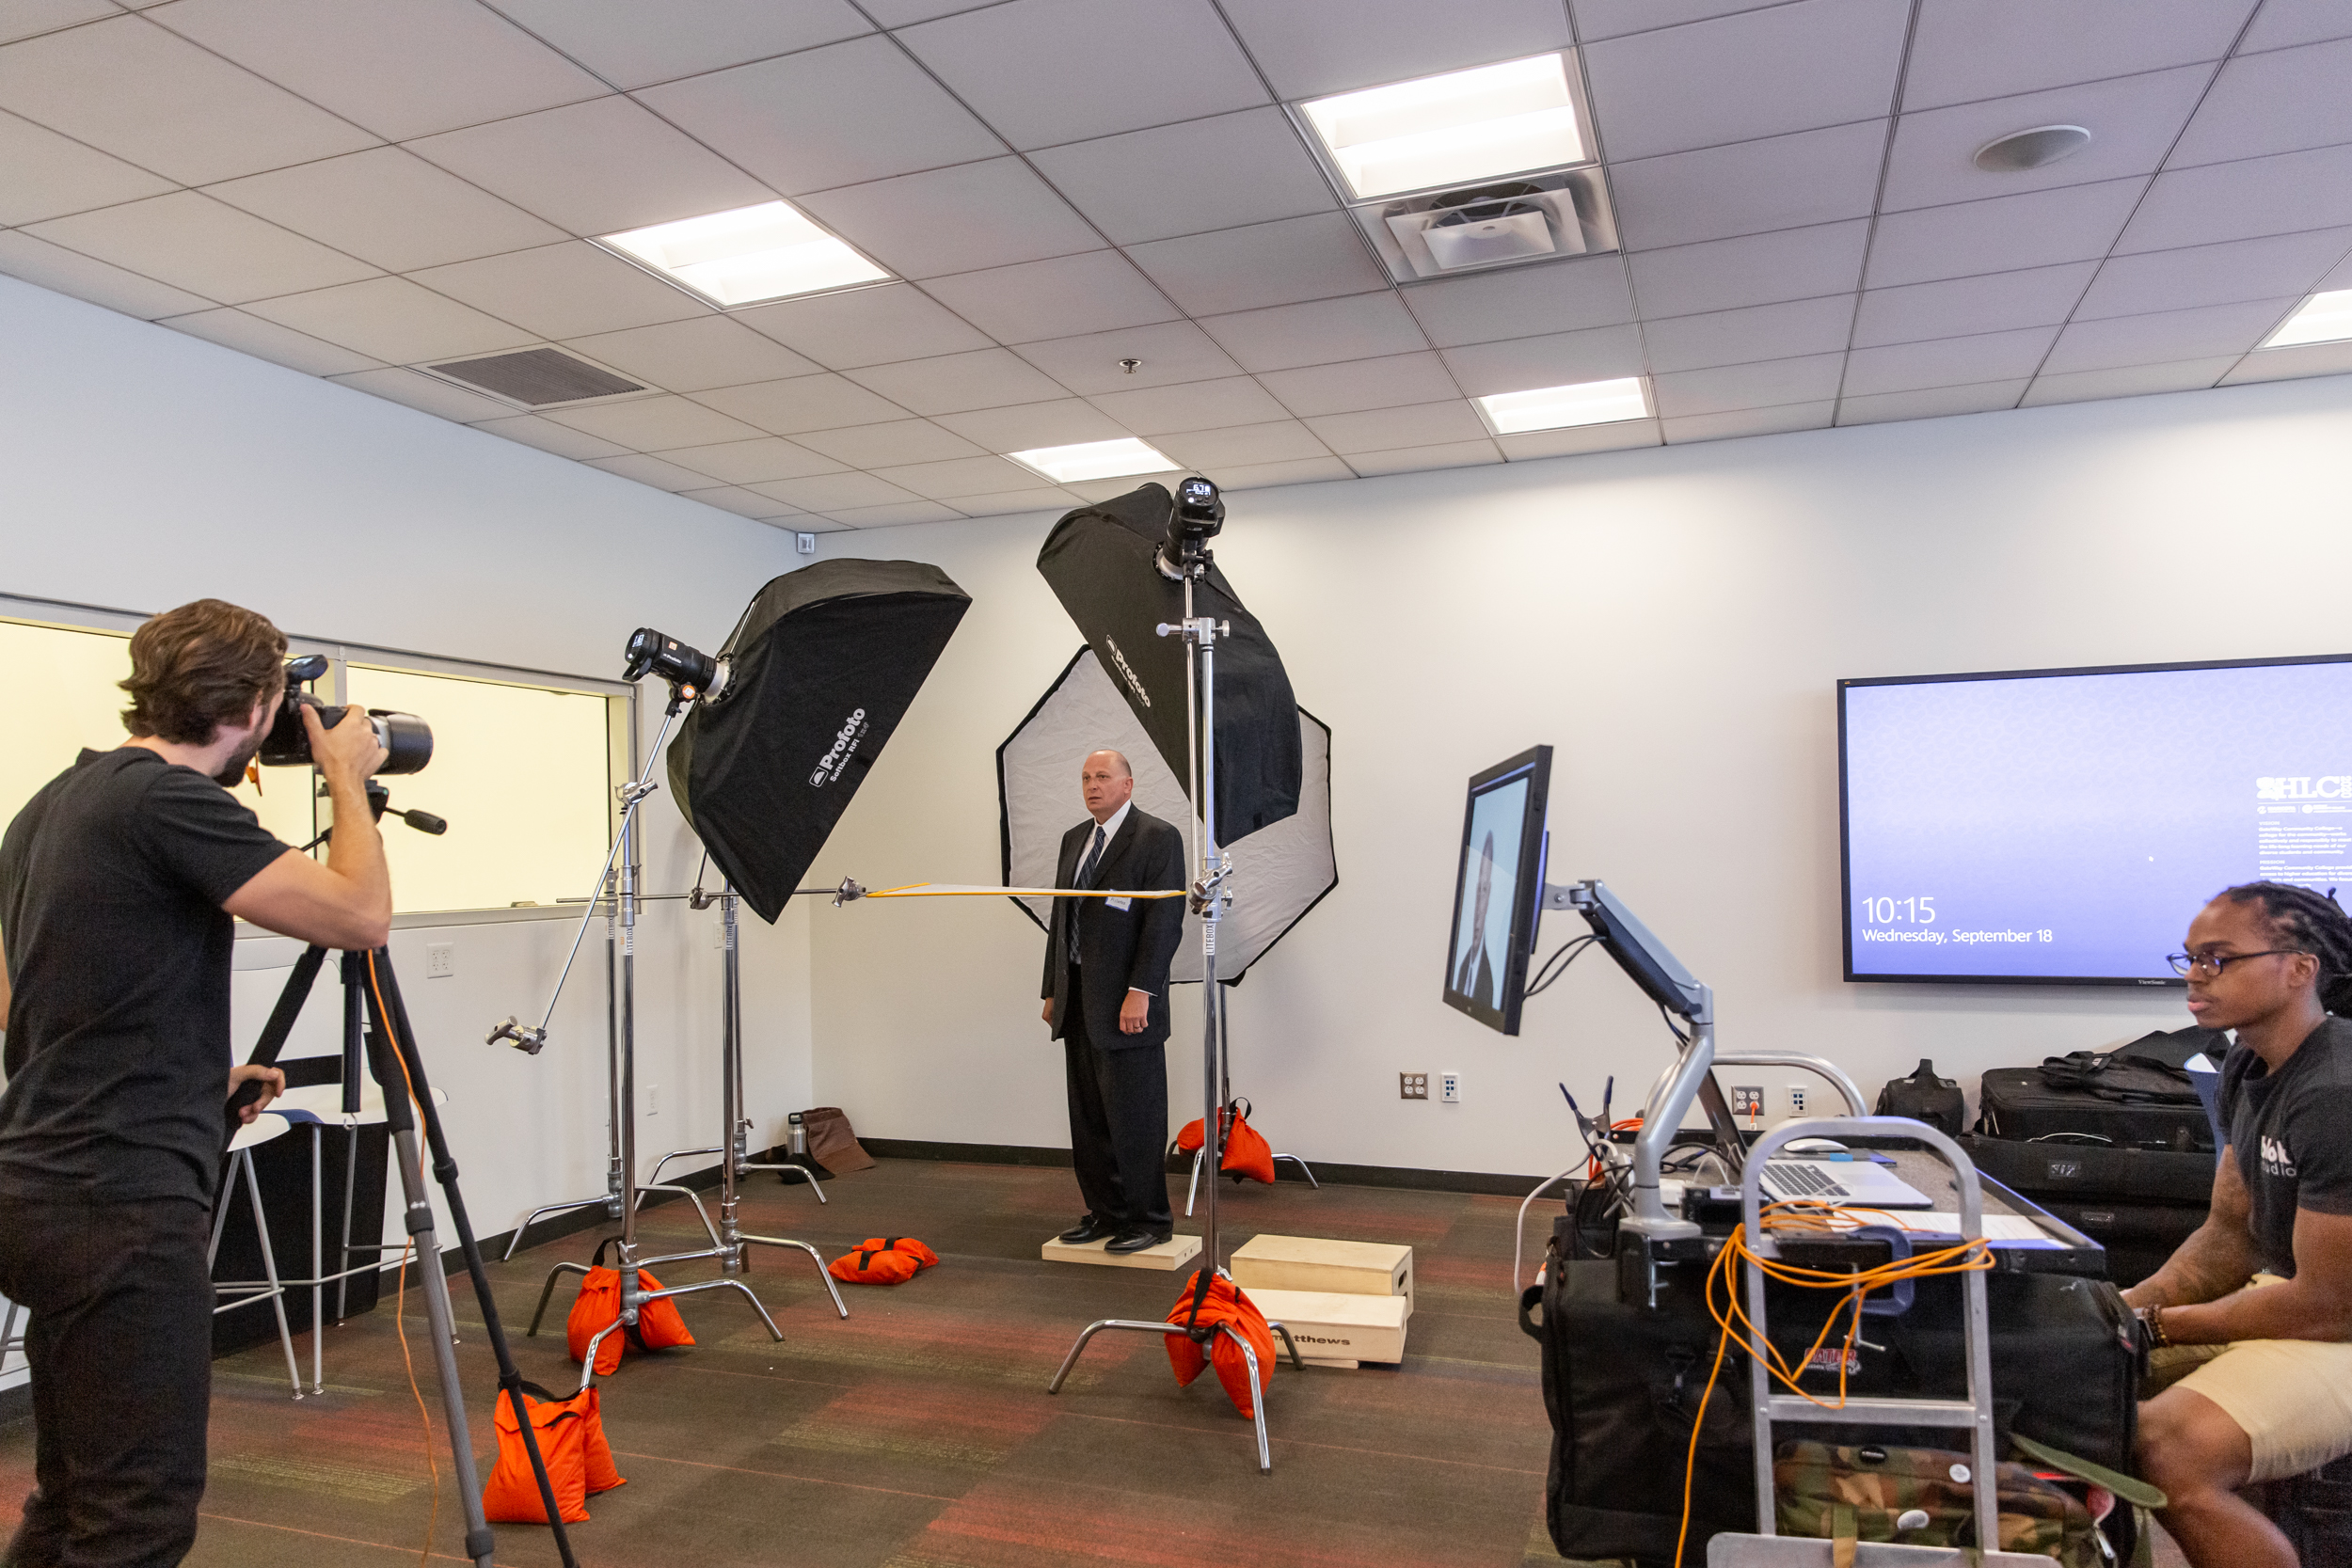
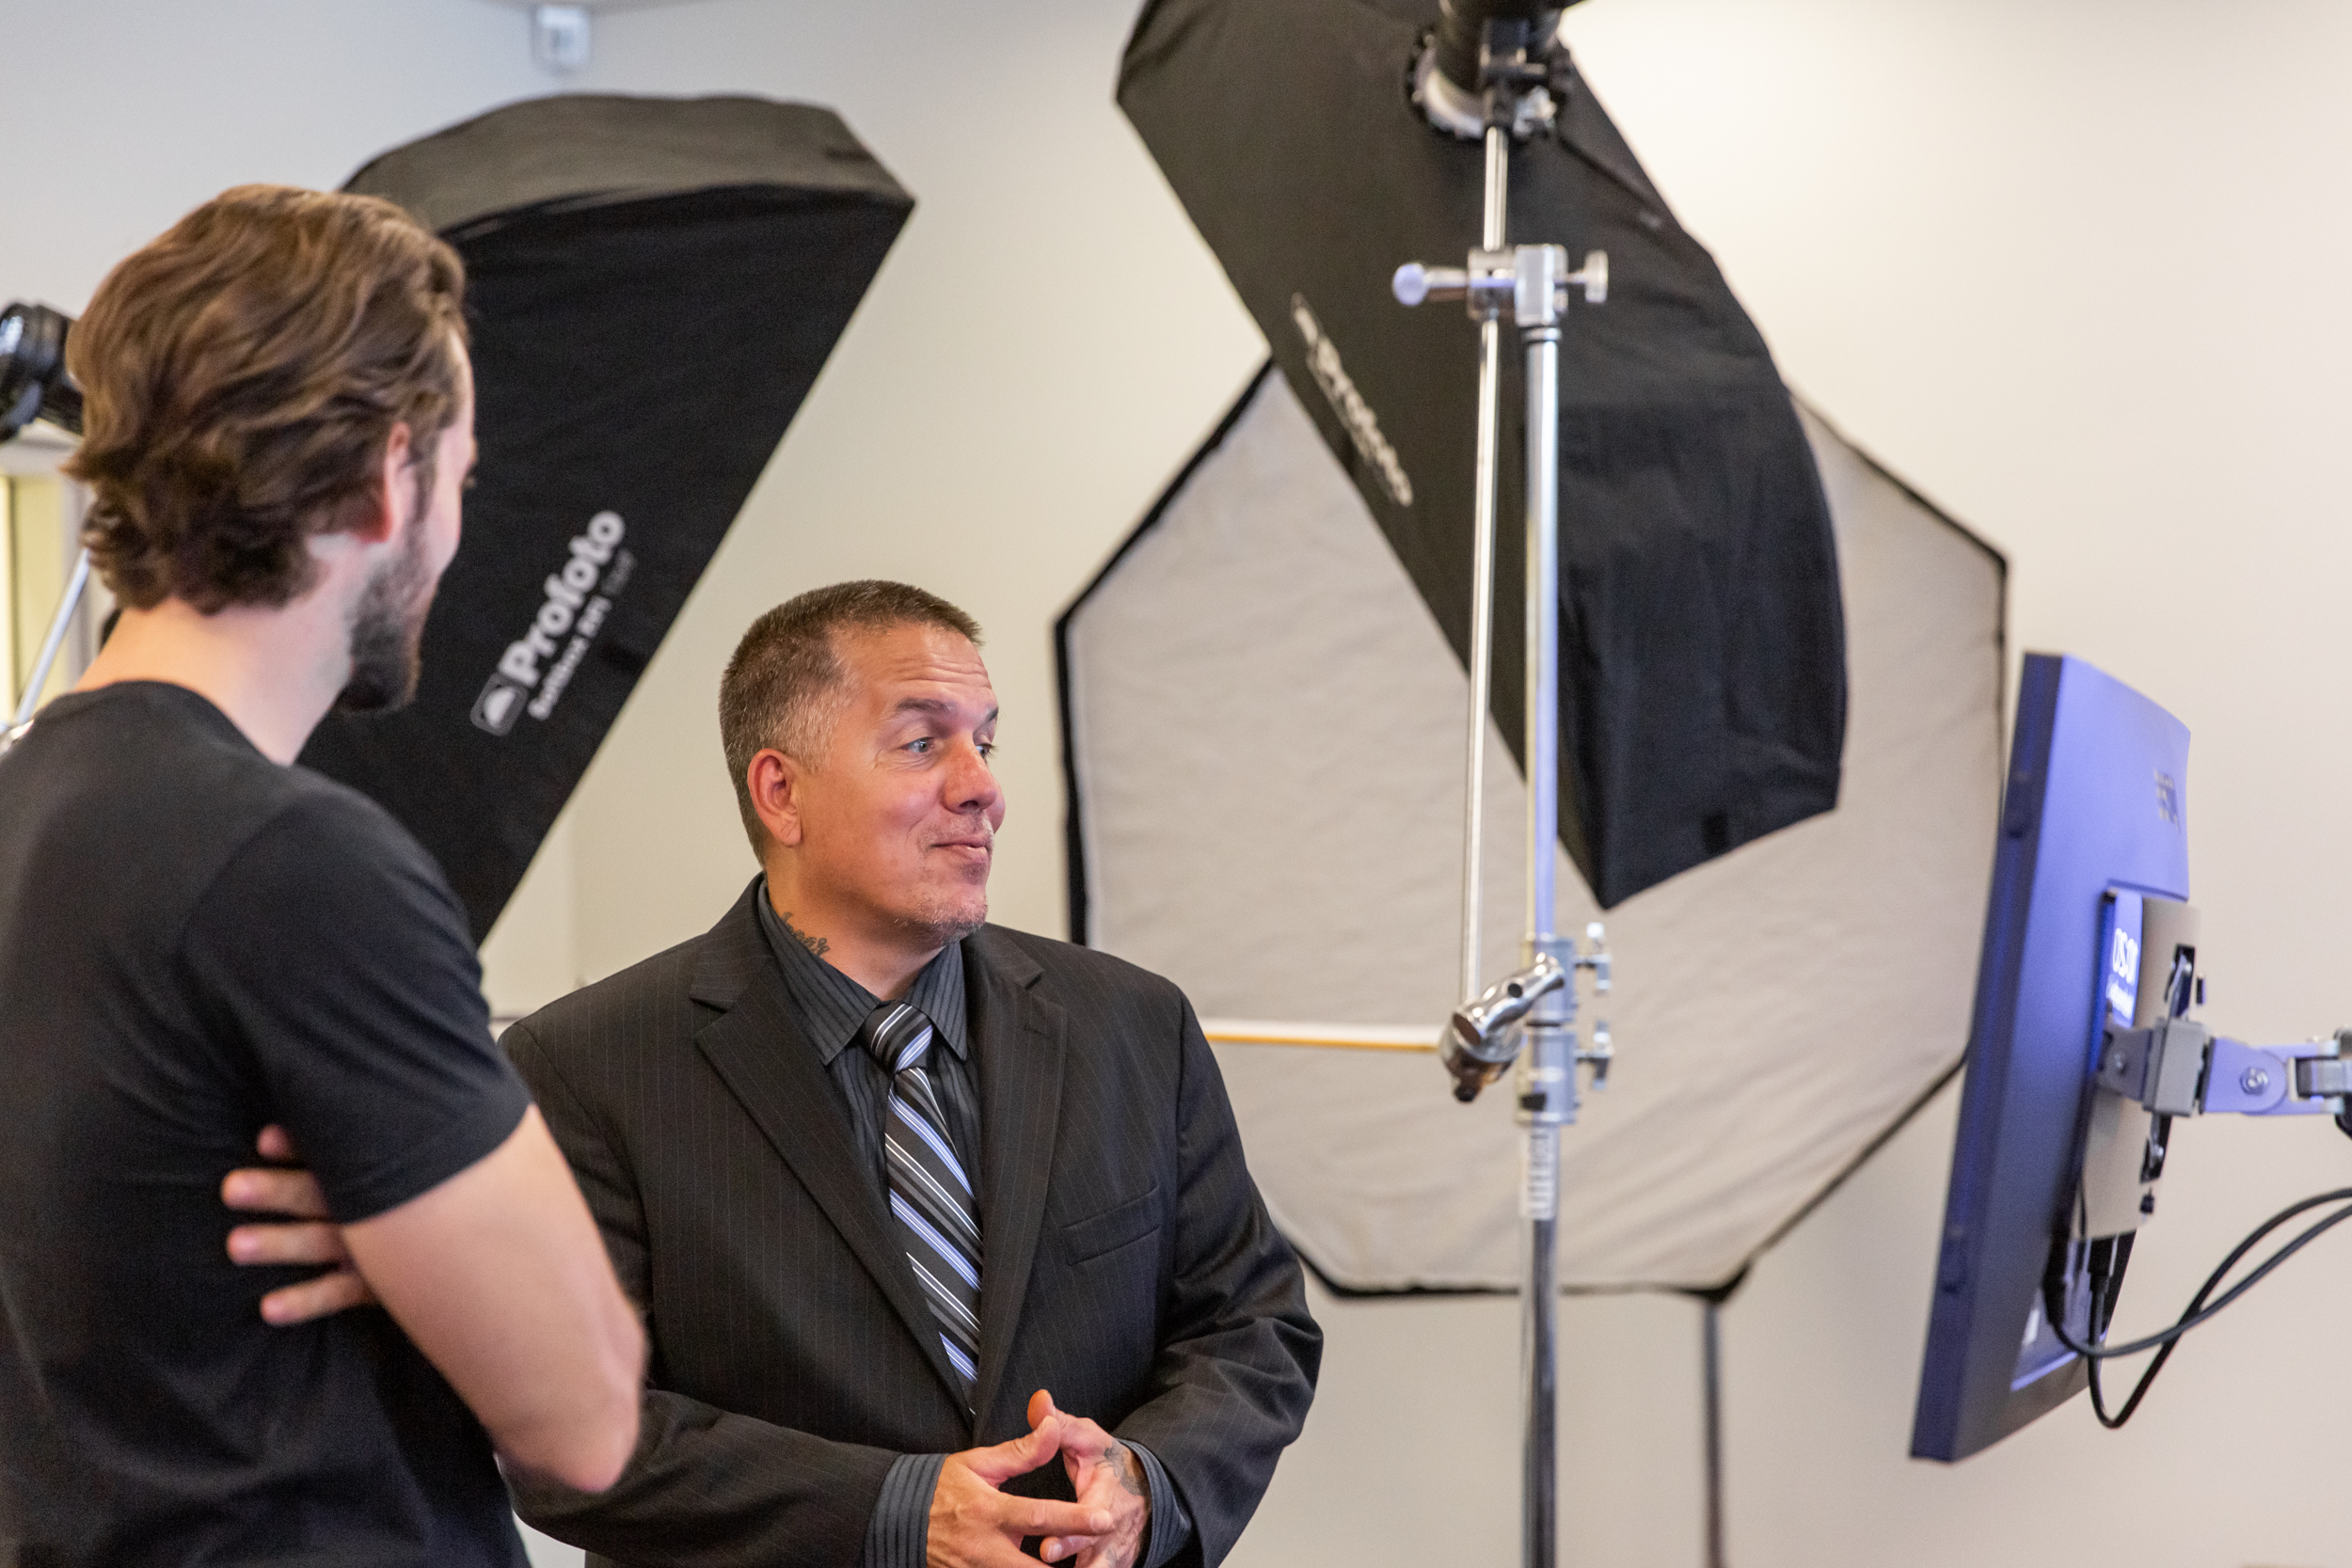
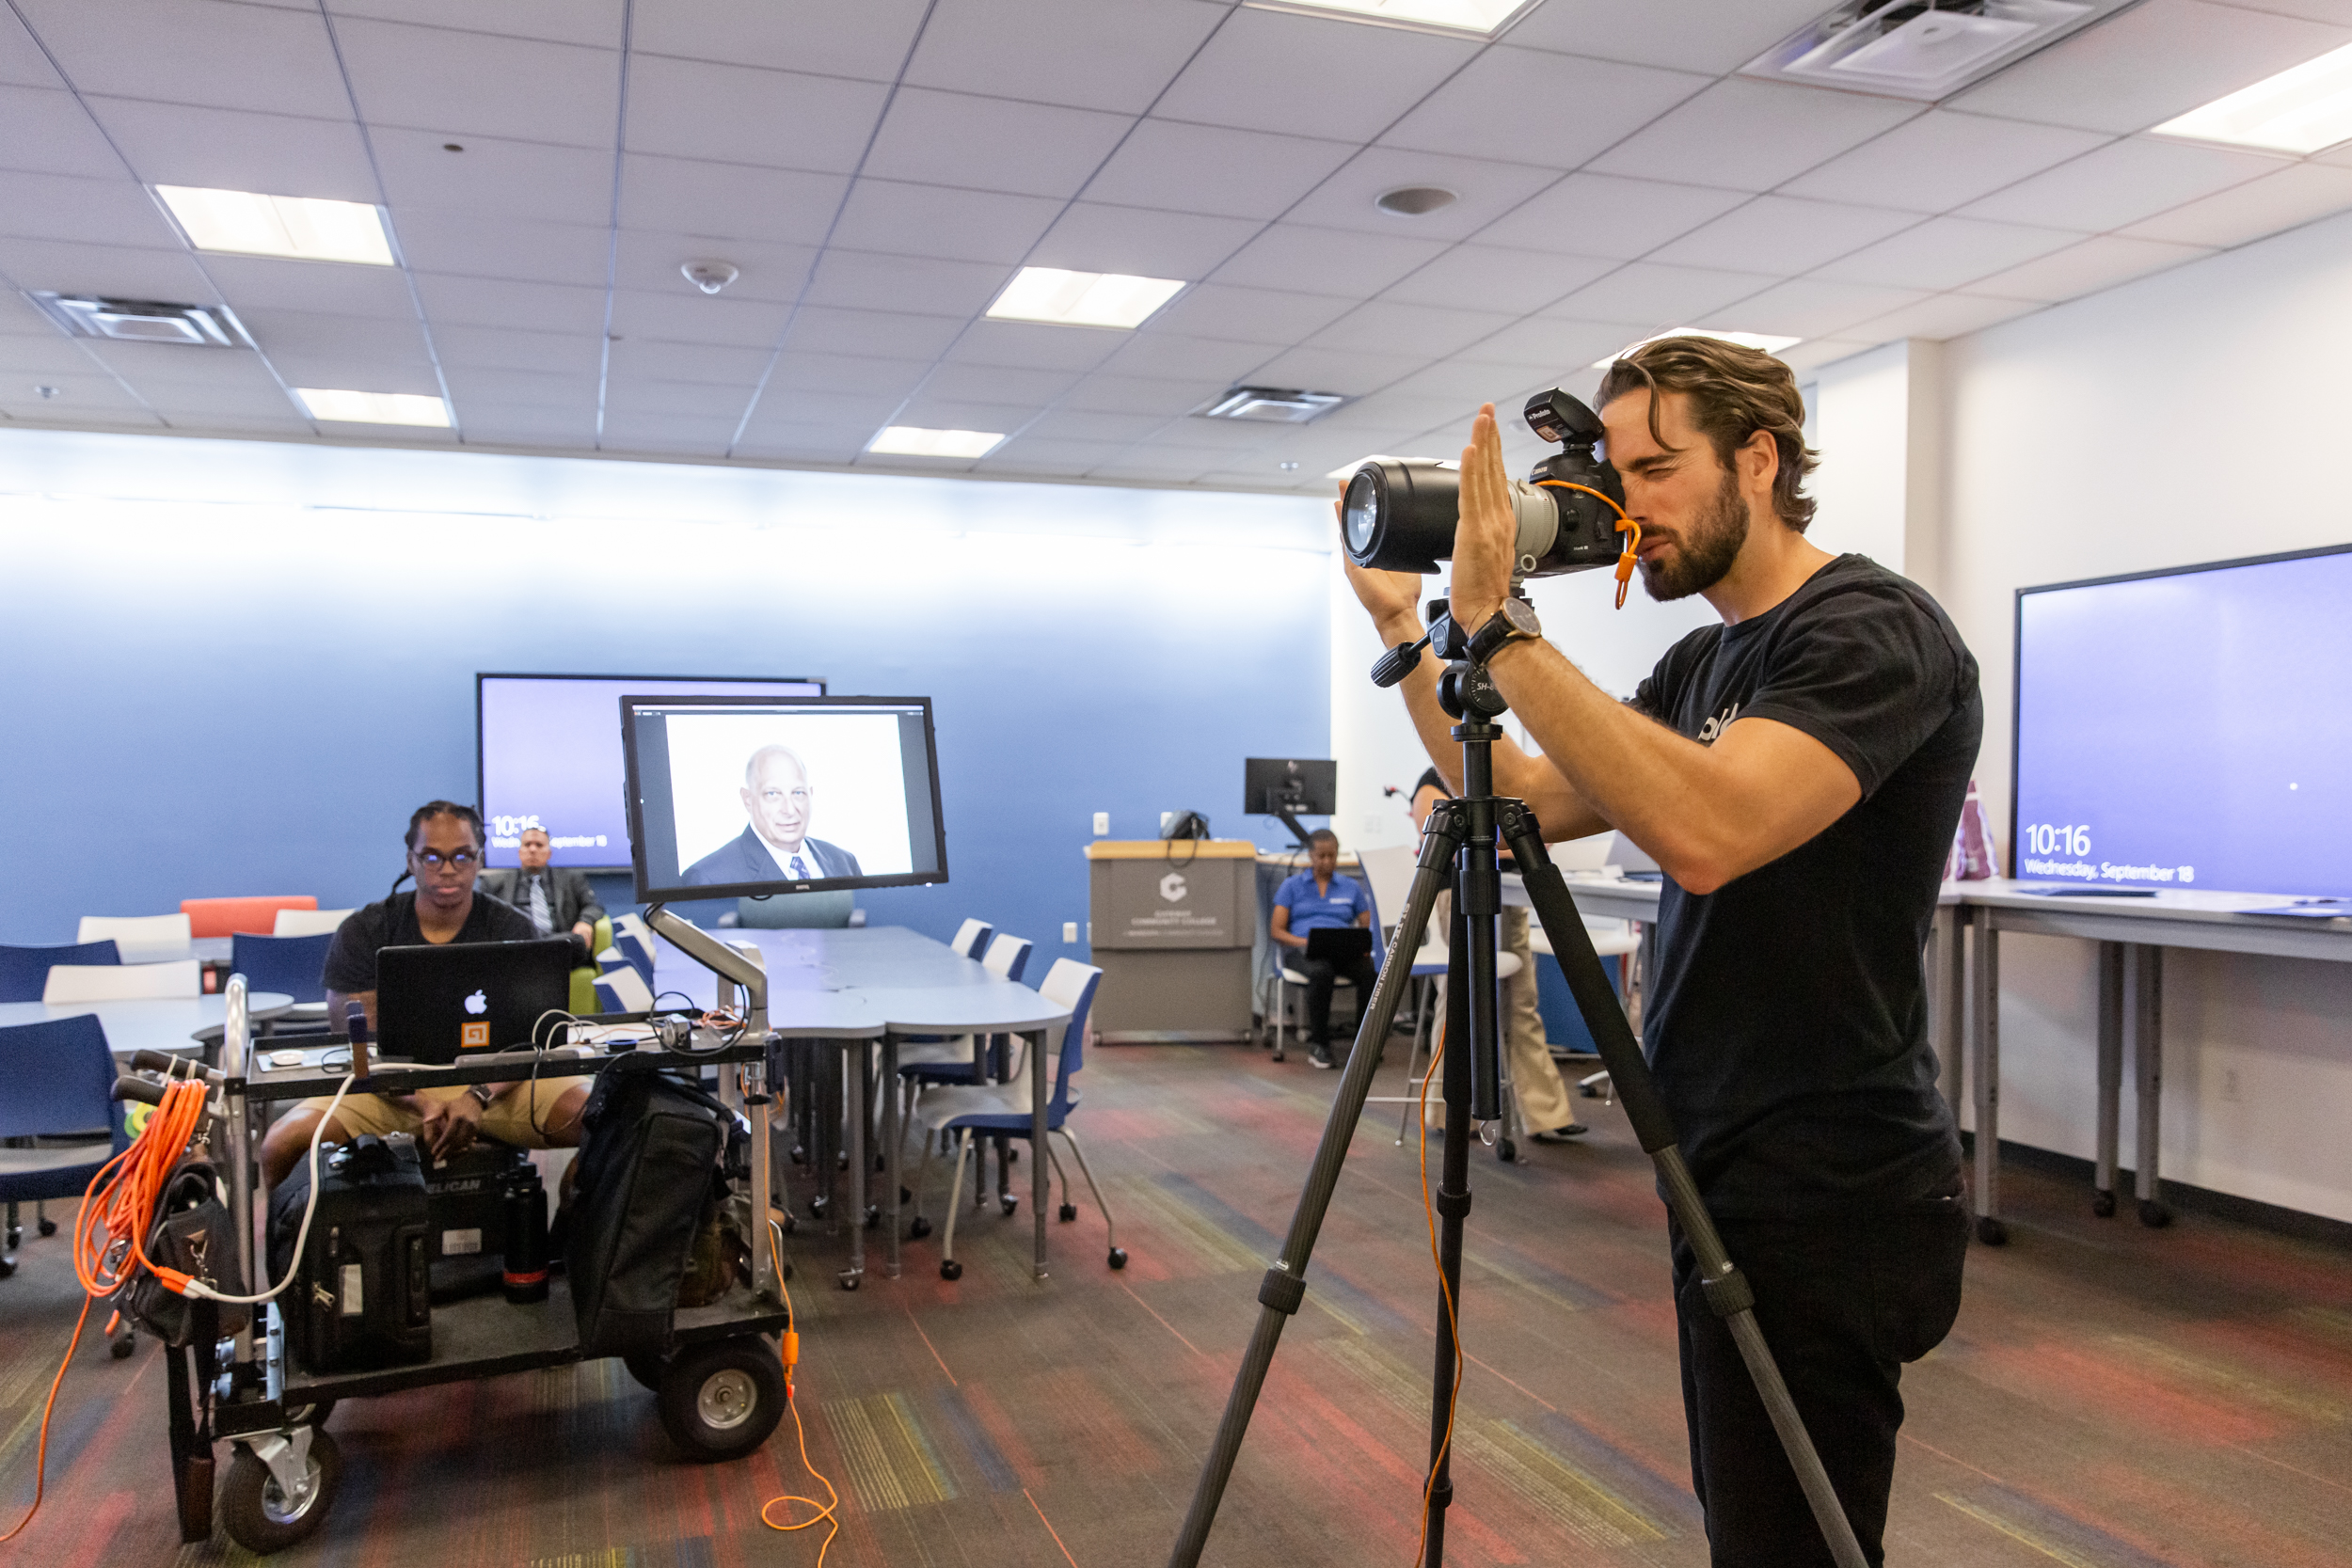
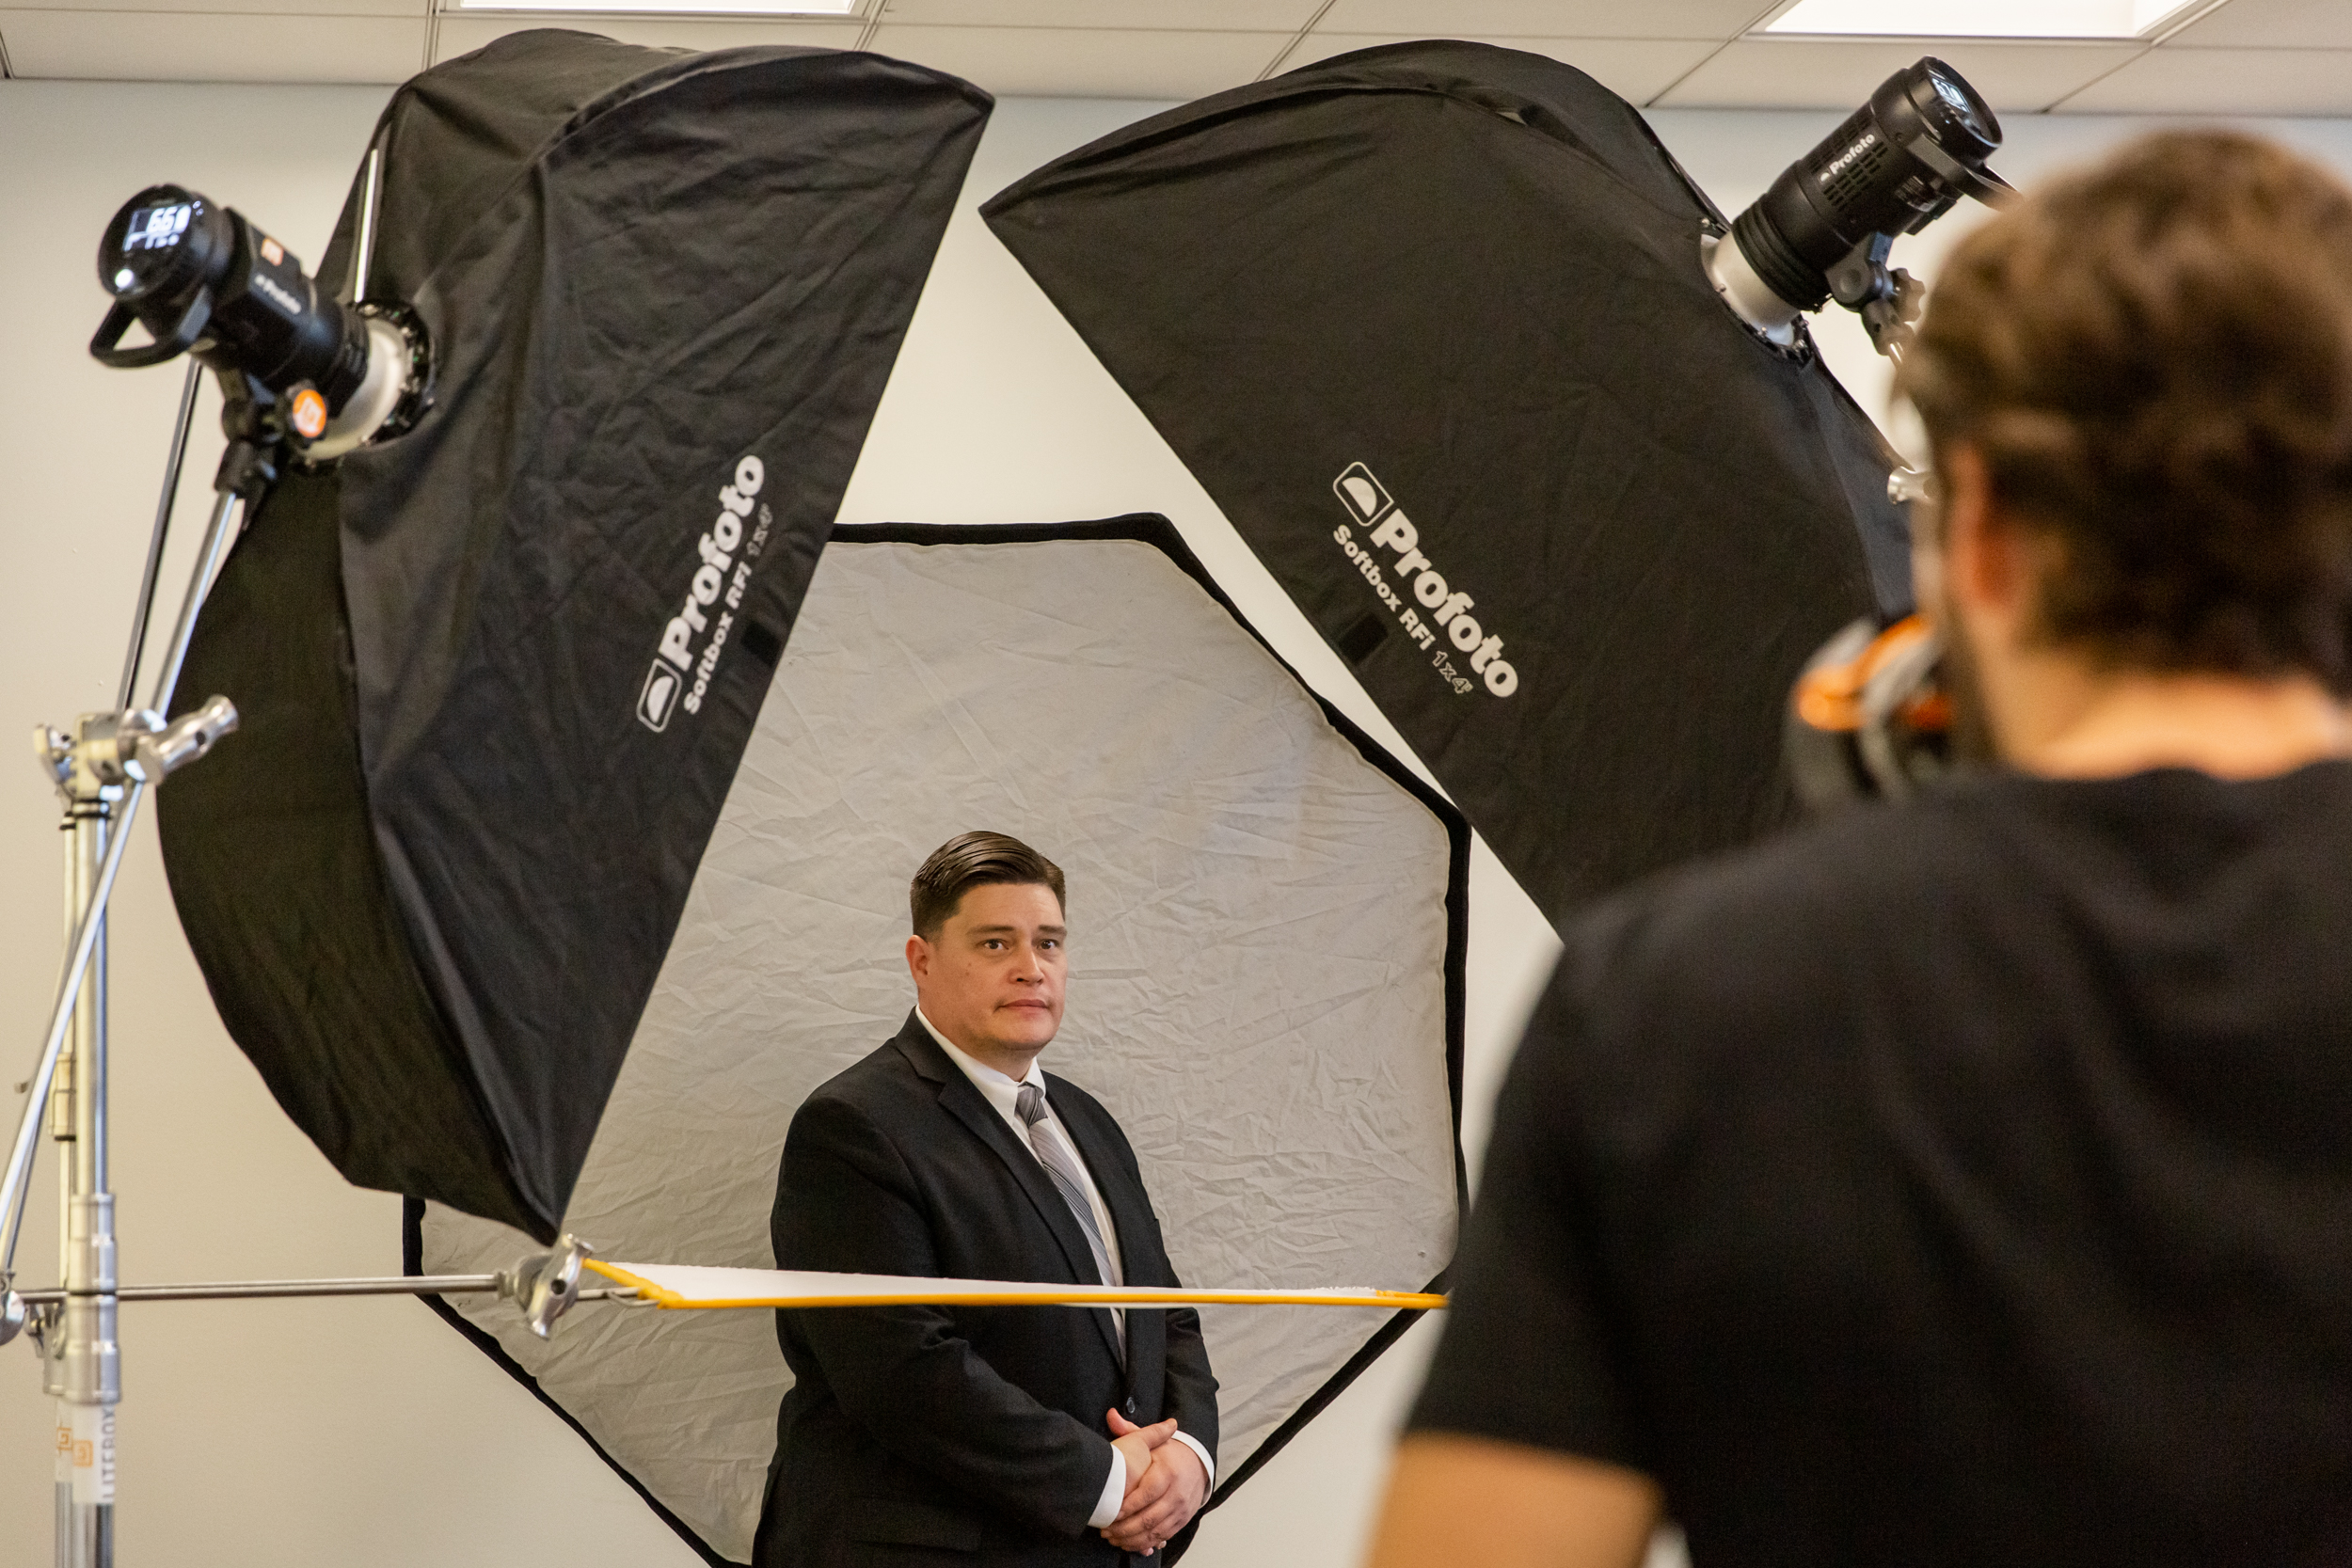
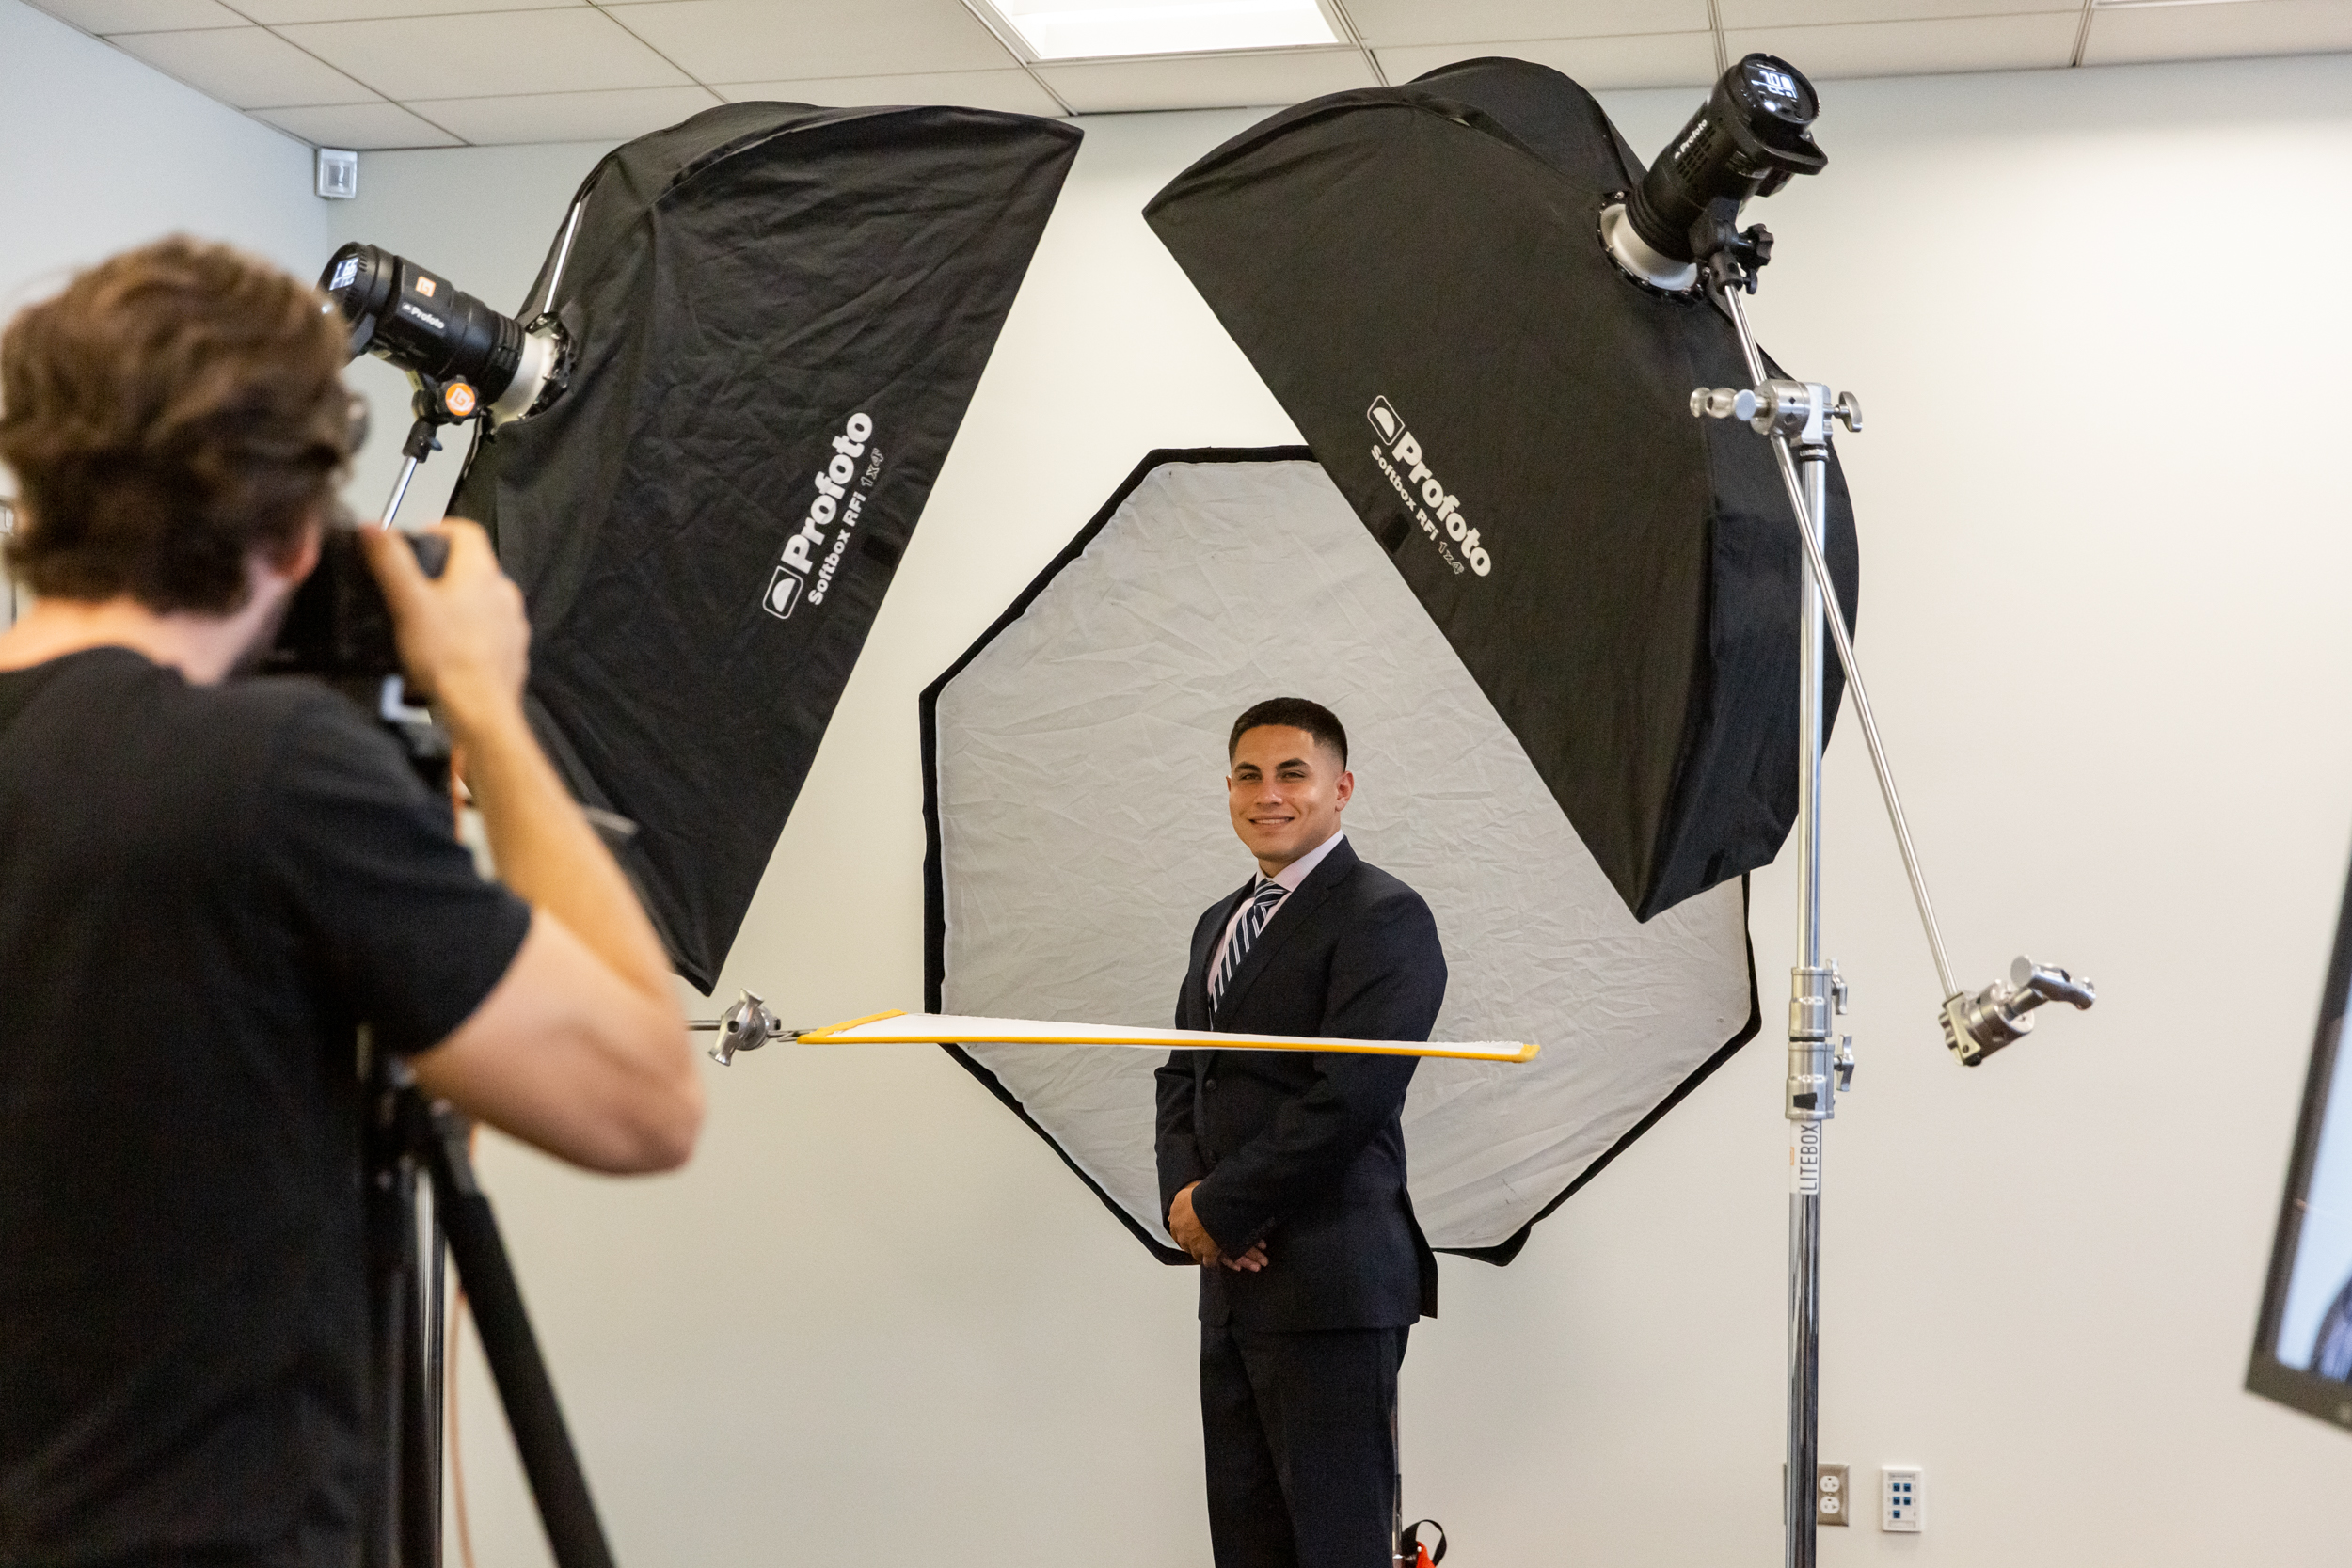
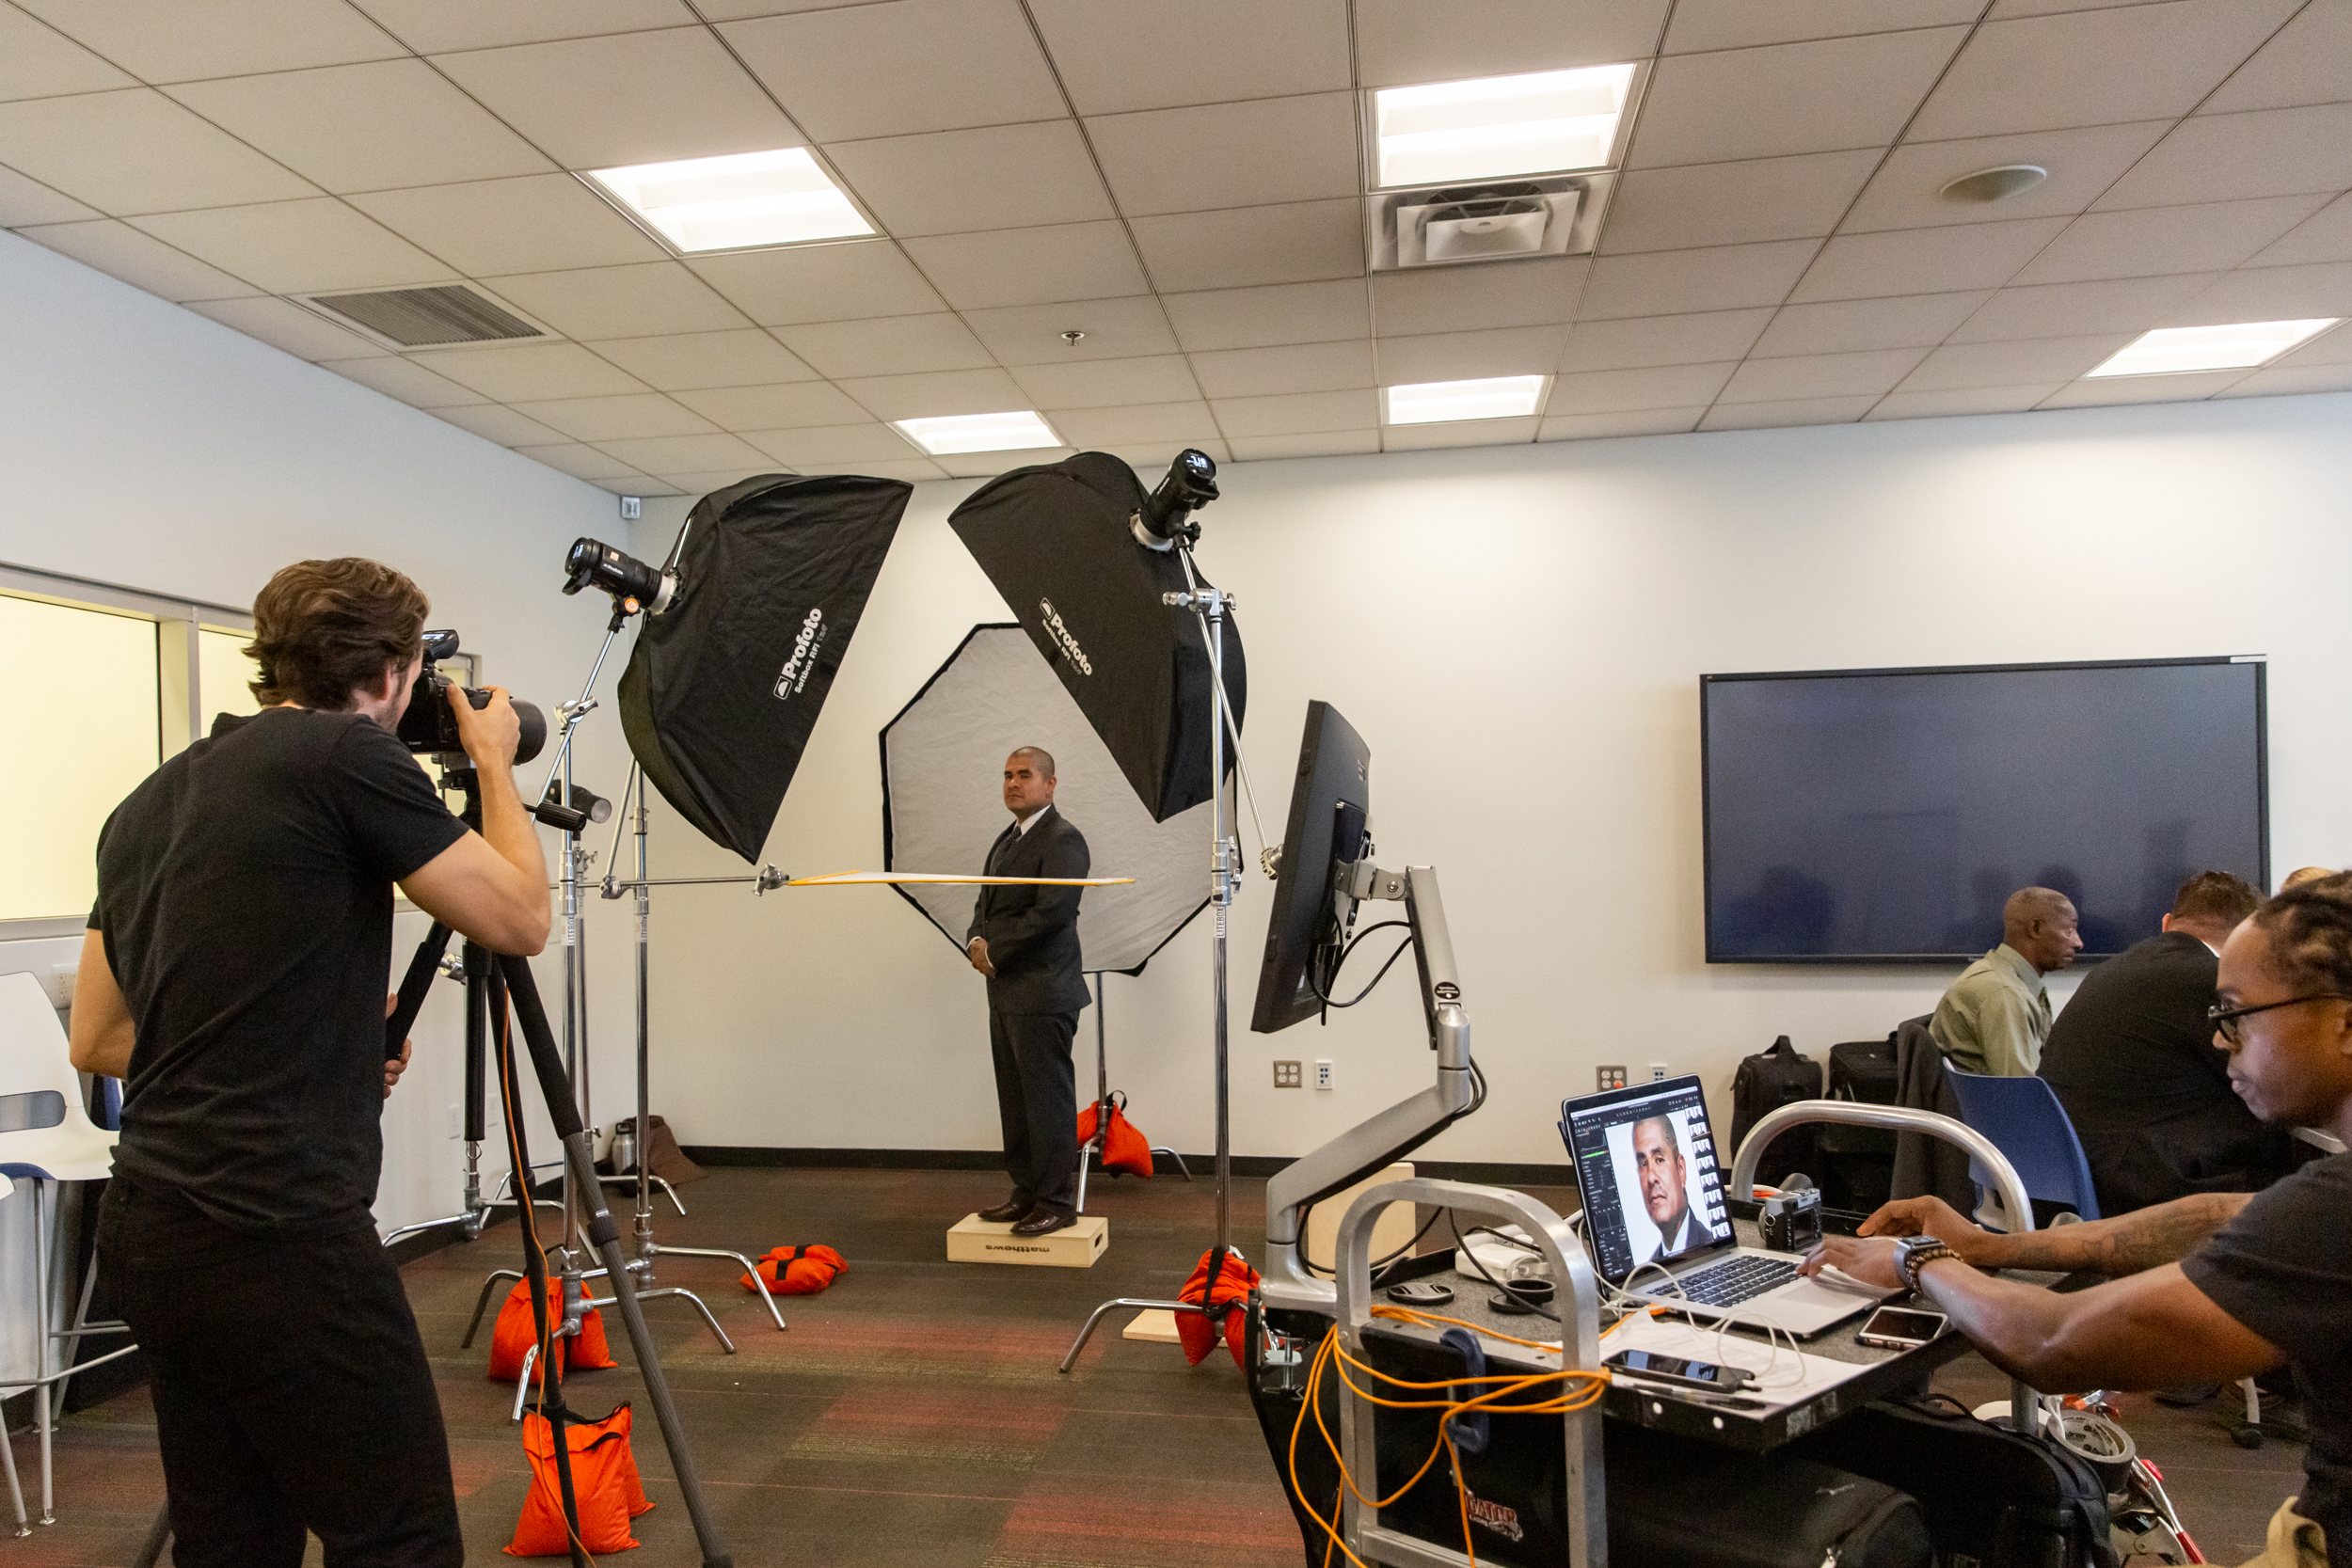
Blok Studio was built with the idea of community in mind, and it has always been our mission to give back and inspire others to do the same. At Blok, we know the power of a photograph and the impact it can have on a person’s self-image and confidence. That’s why we are excited to have recently teamed up with St. Joseph the Worker (SJW) to provide complimentary headshots for Fast Track, a one-day seminar program created by SJW to help less fortunate men gain the resources they need to build their careers.
SJW has been helping homeless, low-income and other disadvantaged people become self-sufficient through quality employment opportunities for over 30 years. The people SJW help are the ones who want to be in the workforce but may not have the necessary knowledge or tools available to them. SJW works to help individuals secure quality employment by offering a variety of resources, including resume preparation, mock interviews, communication tips, internet access for job applications, professional clothing and bus passes for interview transportation.
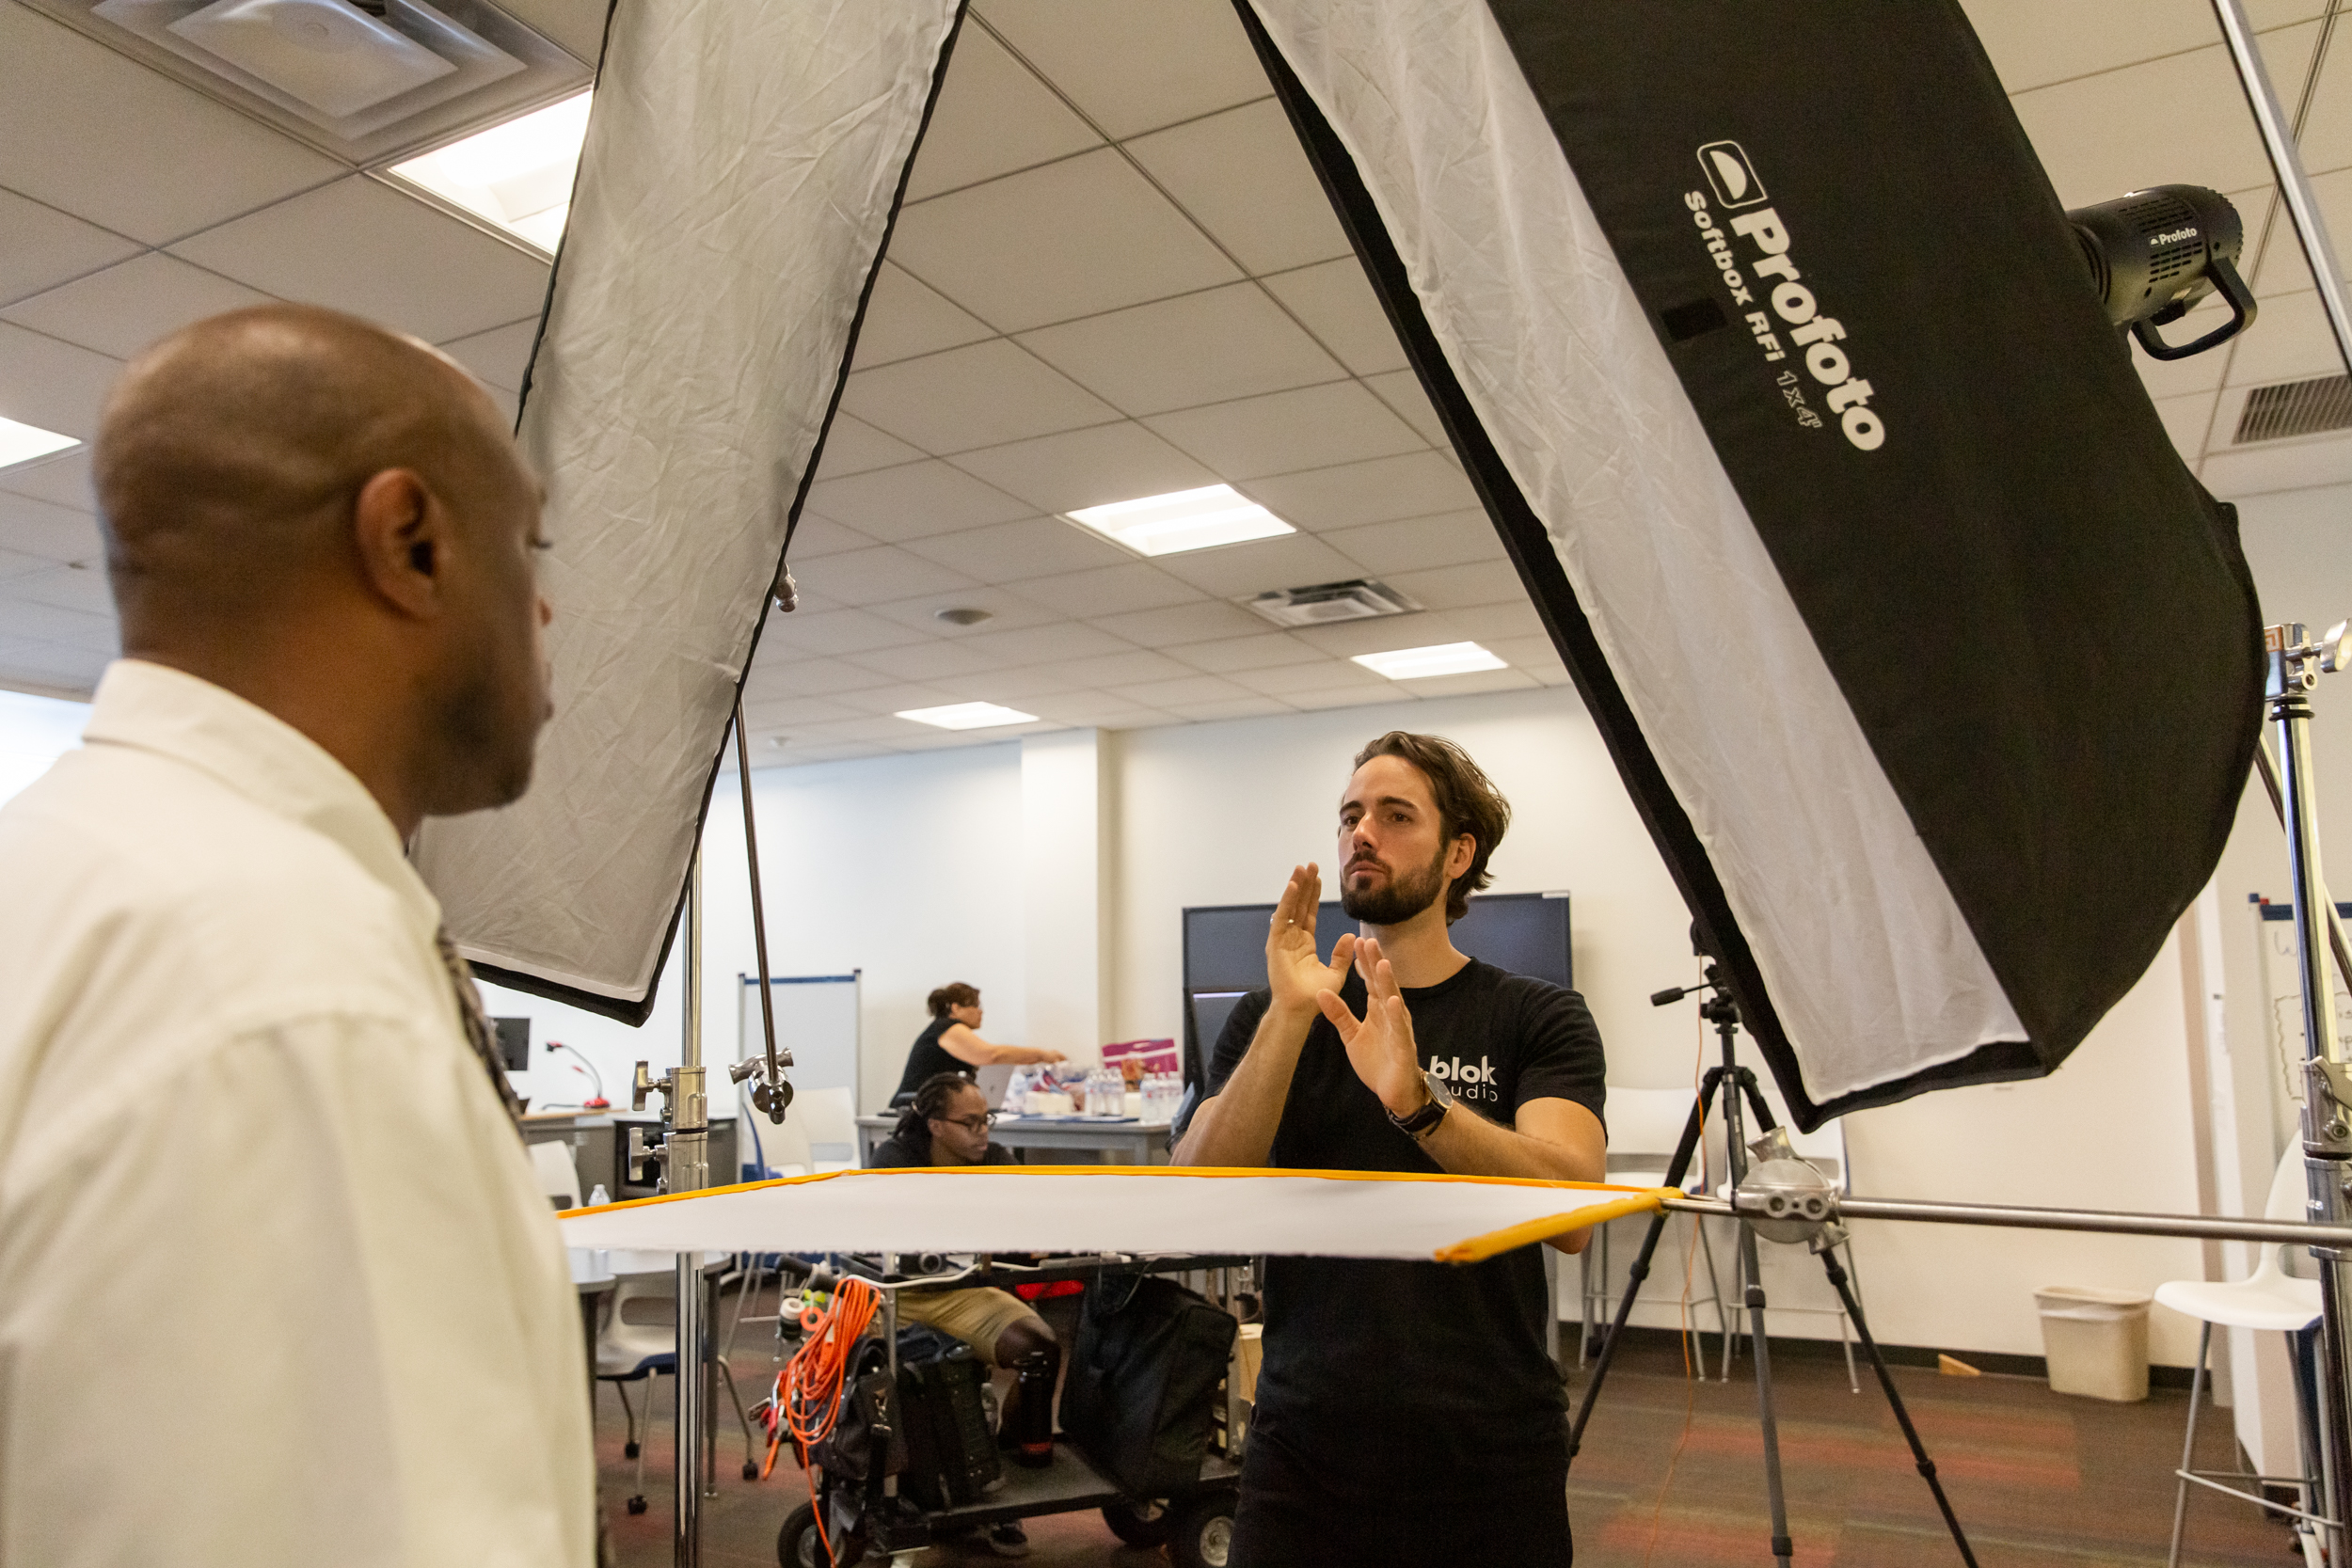
With SJW’s Fast Track program, they take it a step further by working with local businesses to give these men additional resources. The people who participate in the Fast Track program start their day by getting fitted for a suit they can wear to interviews, often the first suit these men have ever owned. Throughout the day the participants get a crash course in resume writing, interview strategies and a LinkedIn seminar to gain insight on the digital world of employment. LinkedIn brings along the visual aspect of the job hunt, where companies now can put a face to a name when looking at a person’s online profile. That’s where Blok Studio comes in.

“Wow, I have never seen myself look this nice in a photo before, I can’t believe that’s me. I think this photo can definitely help me get a job. ”

“I’ve never had my headshot taken before. It doesn’t seem like thats me. I’m hoping this leads to better employment opportunities. ”
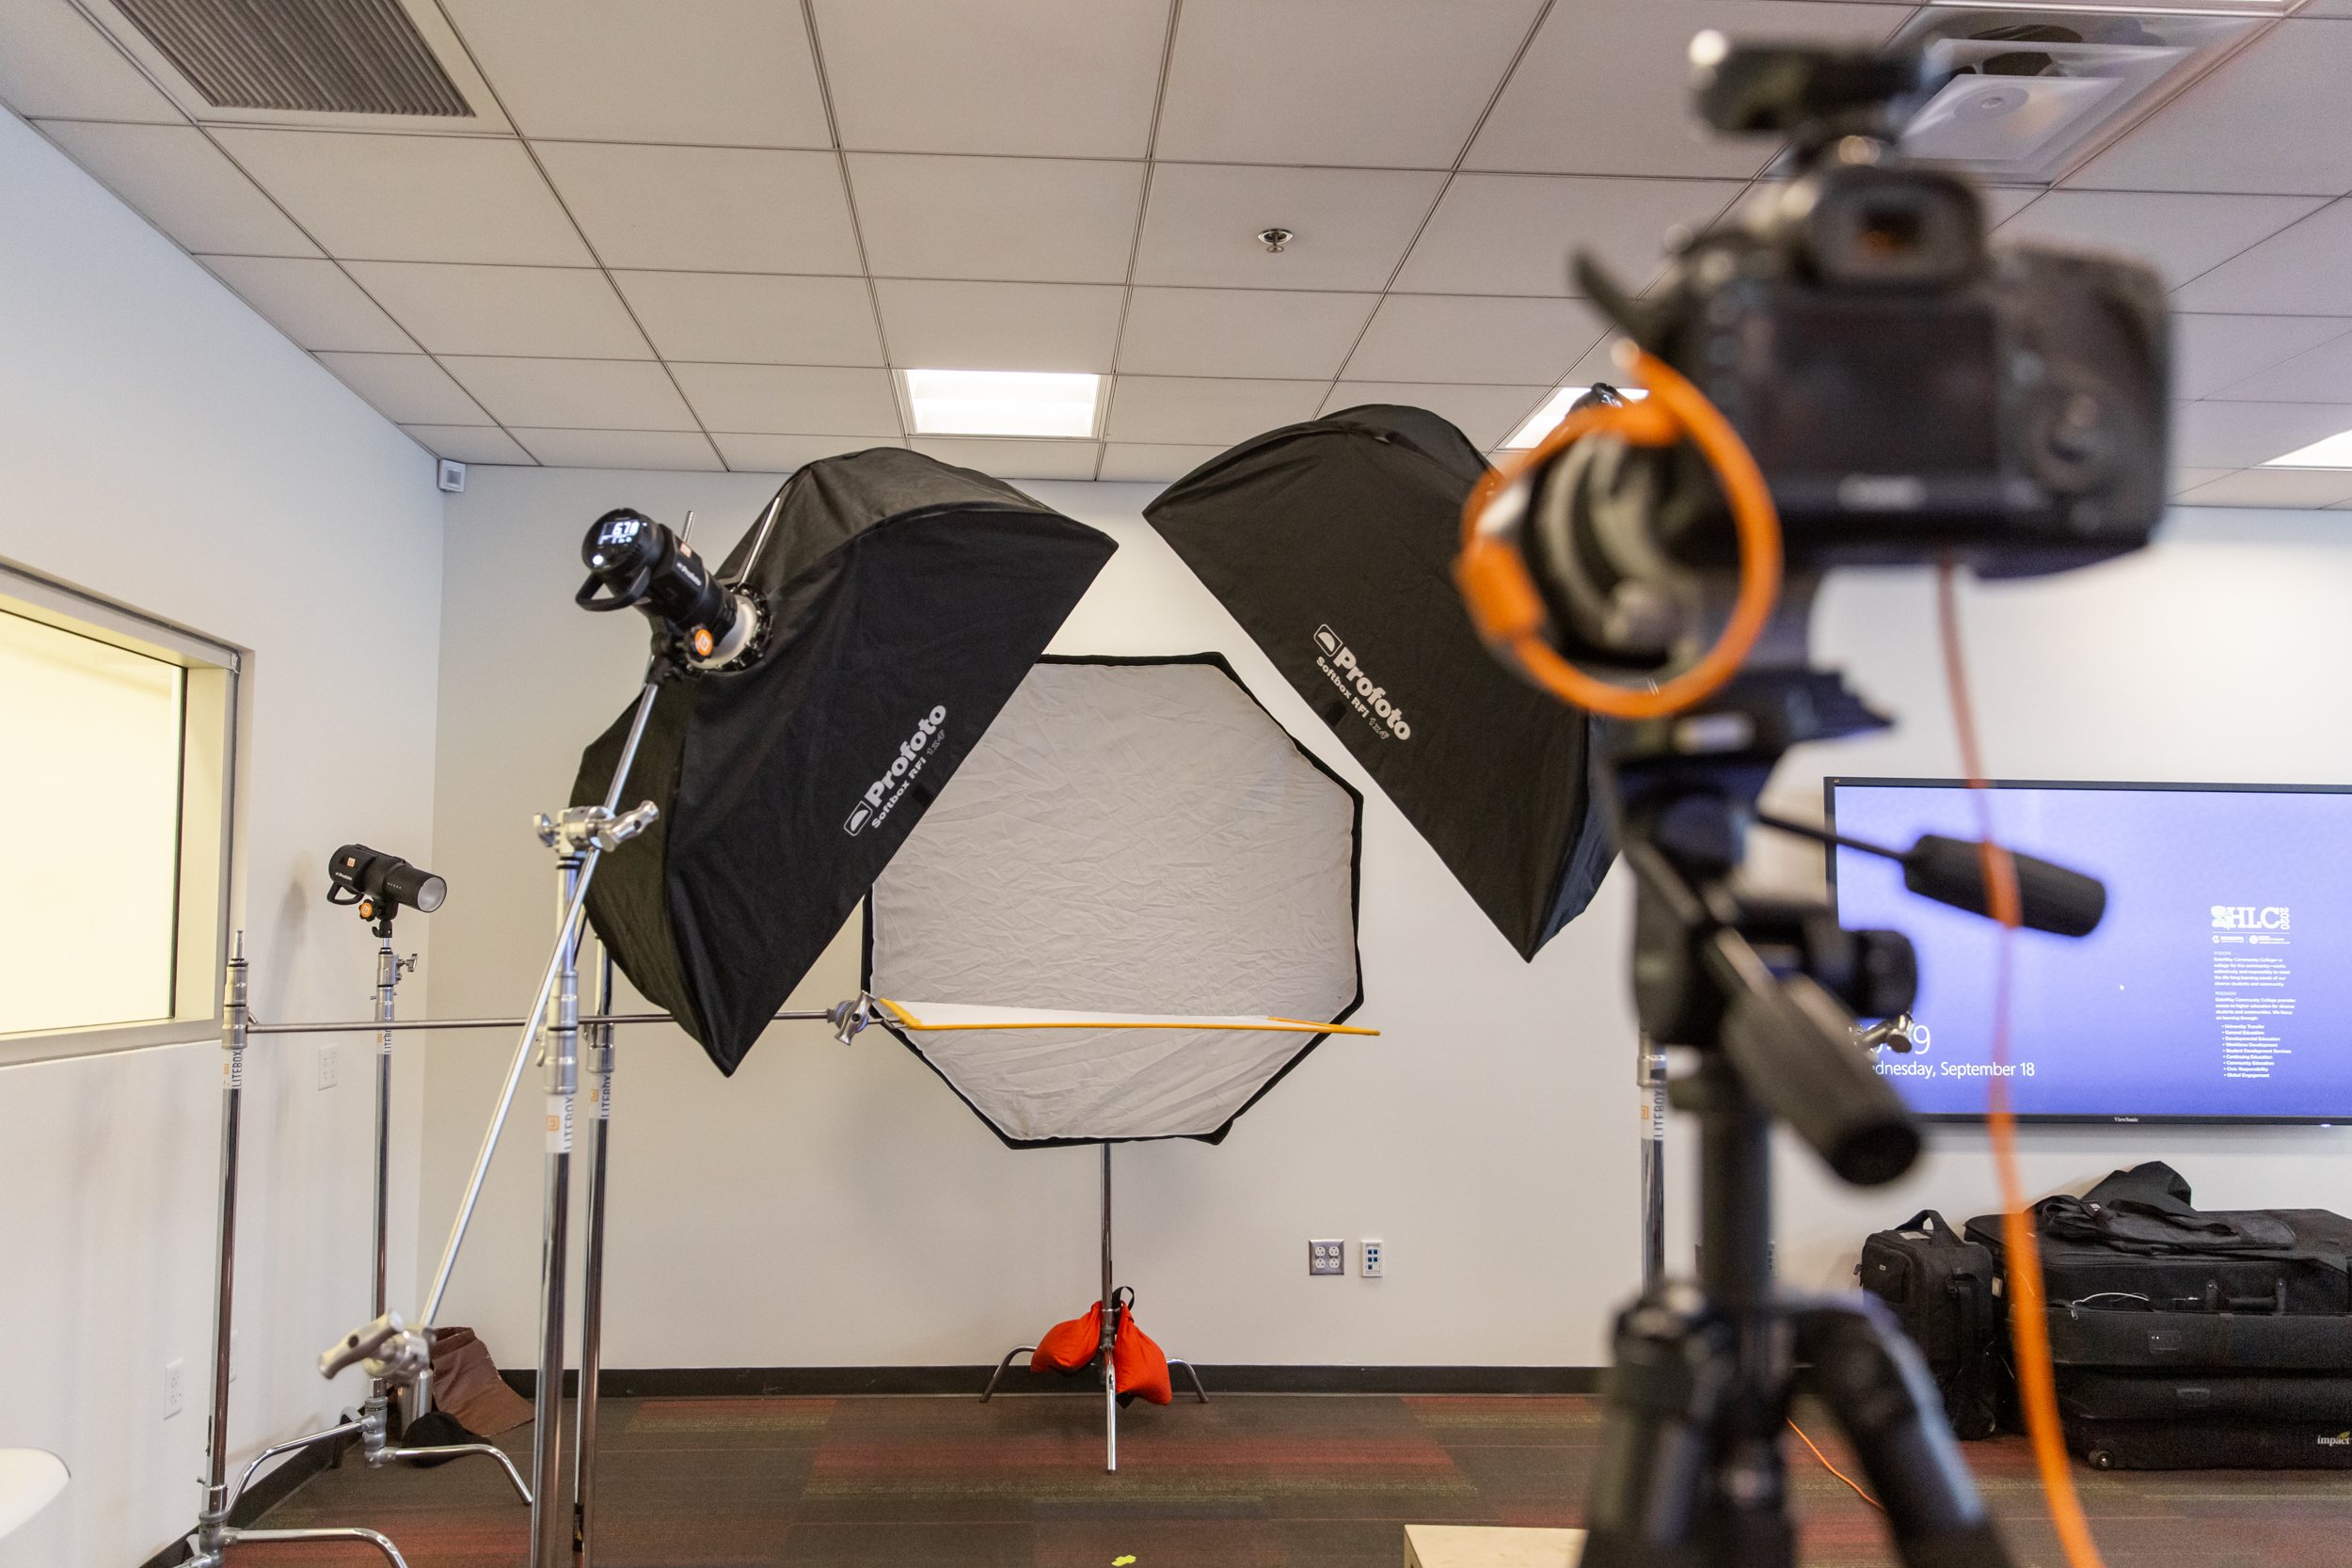
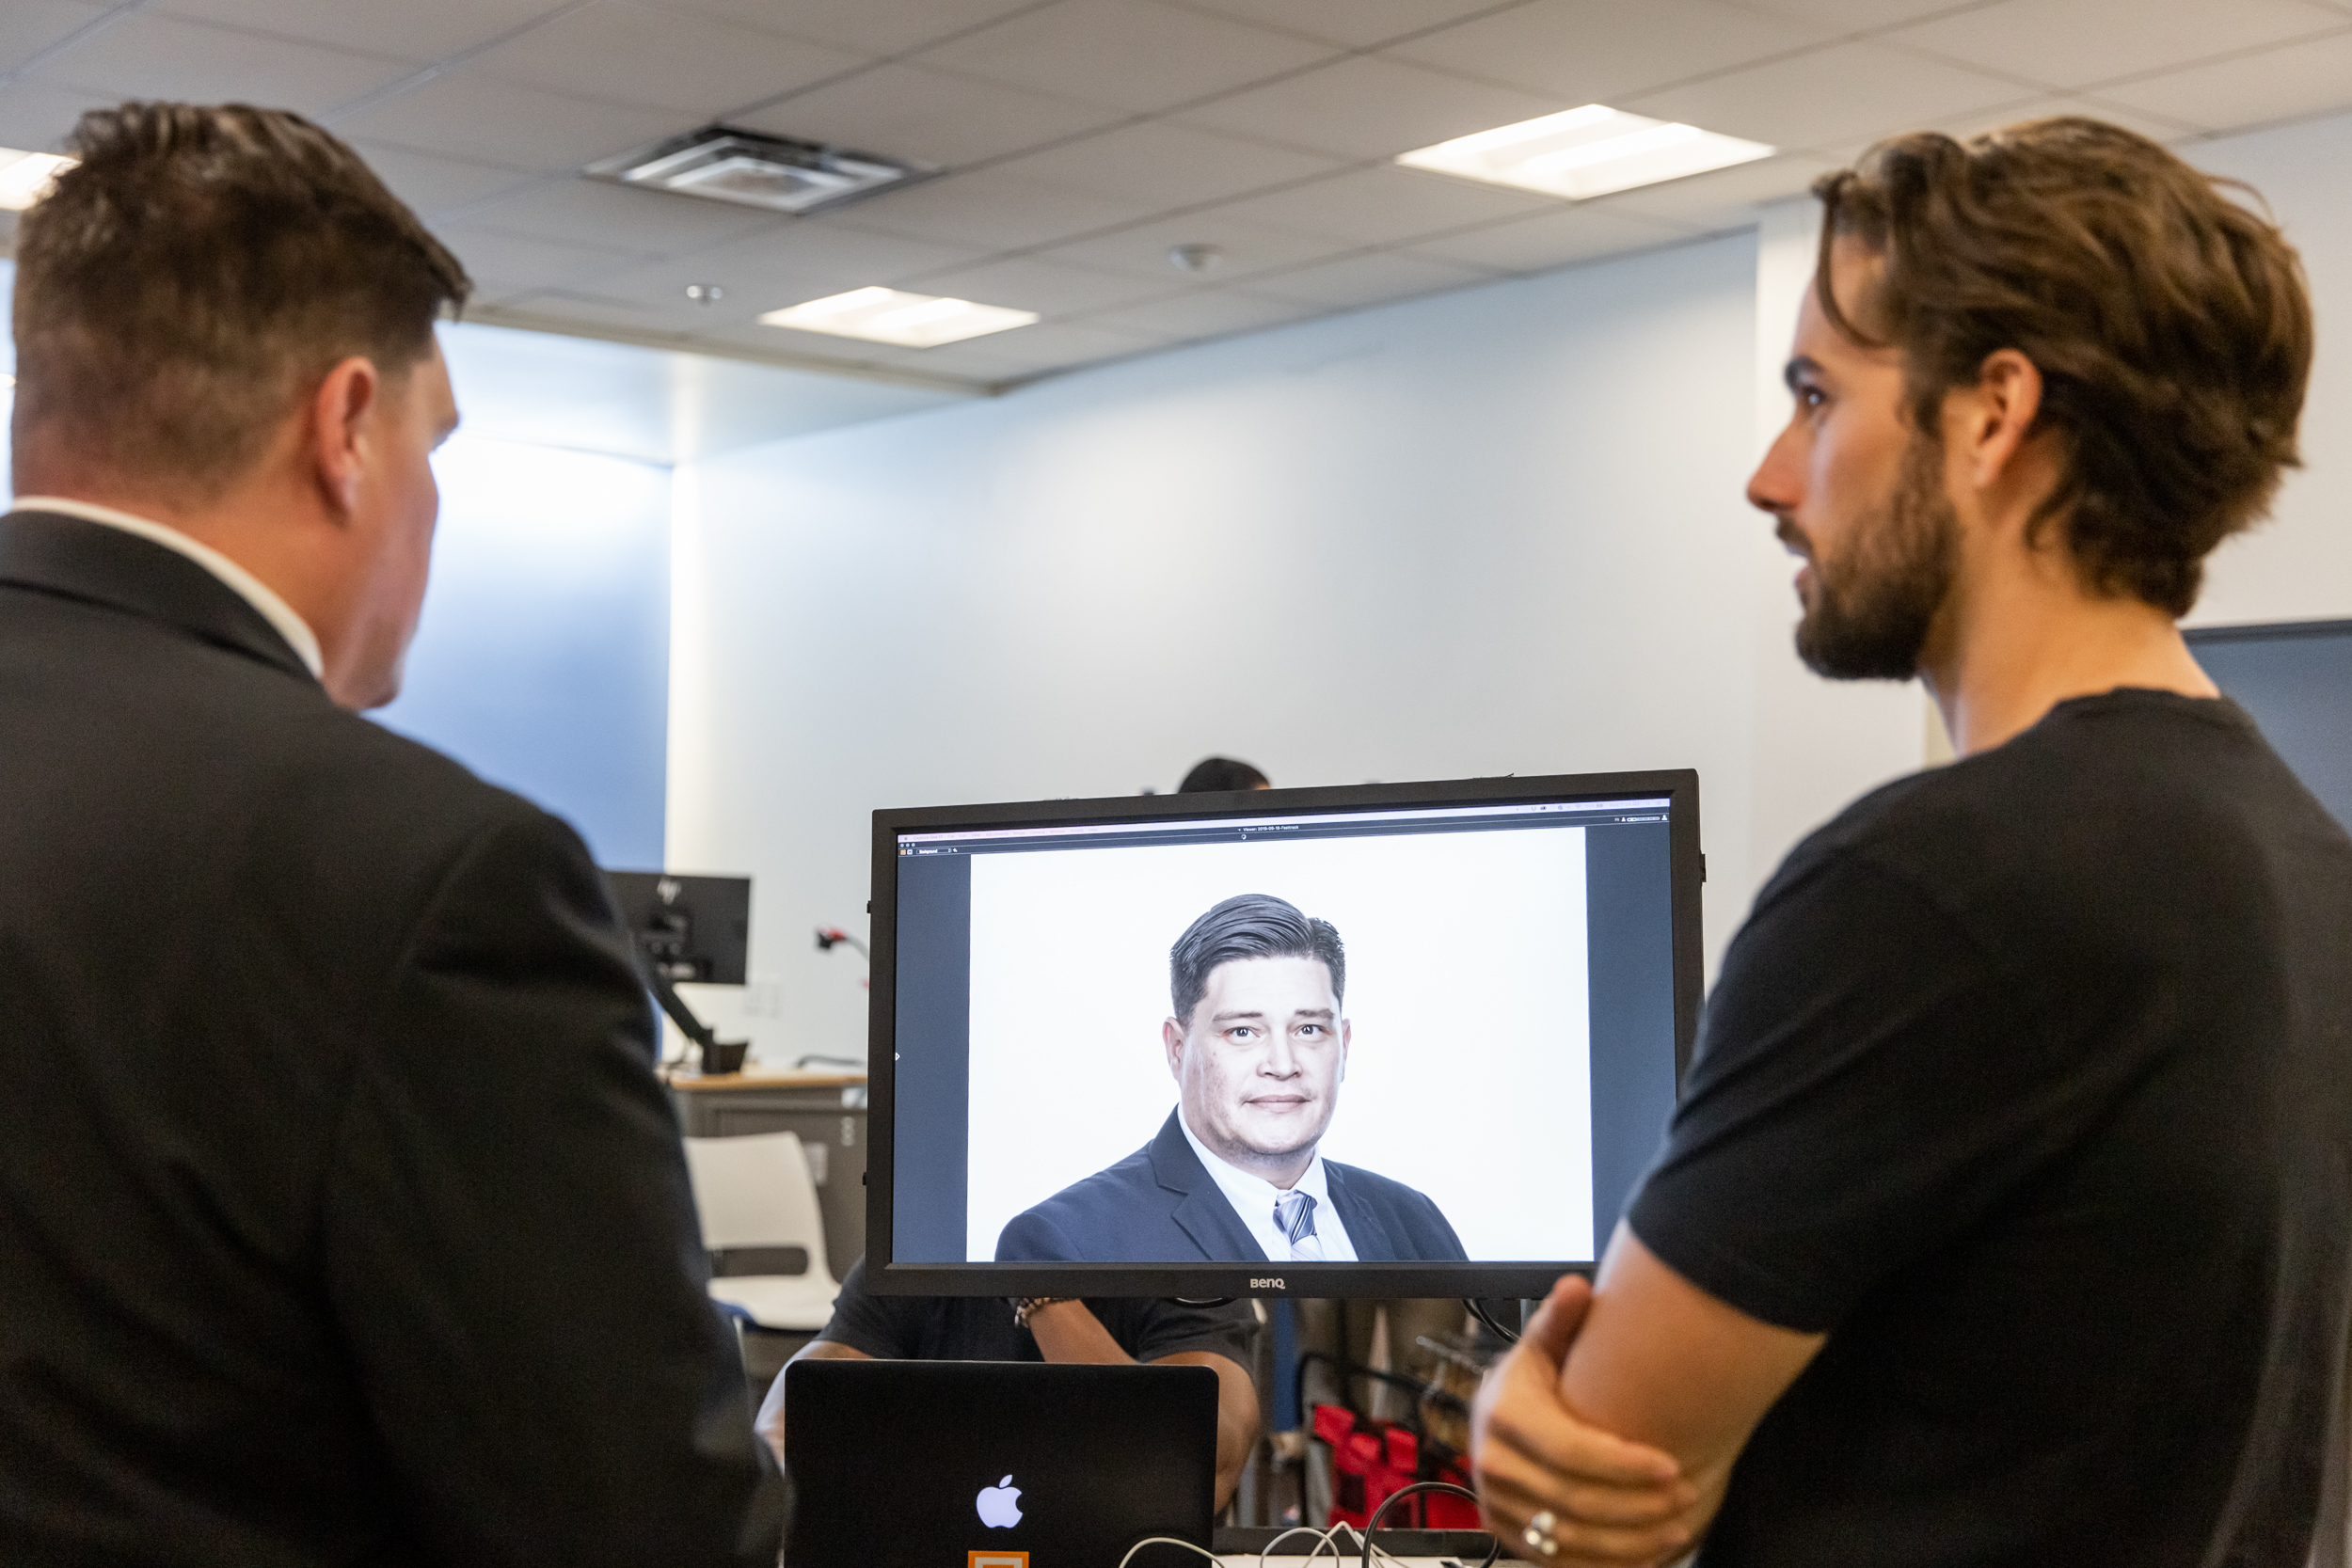
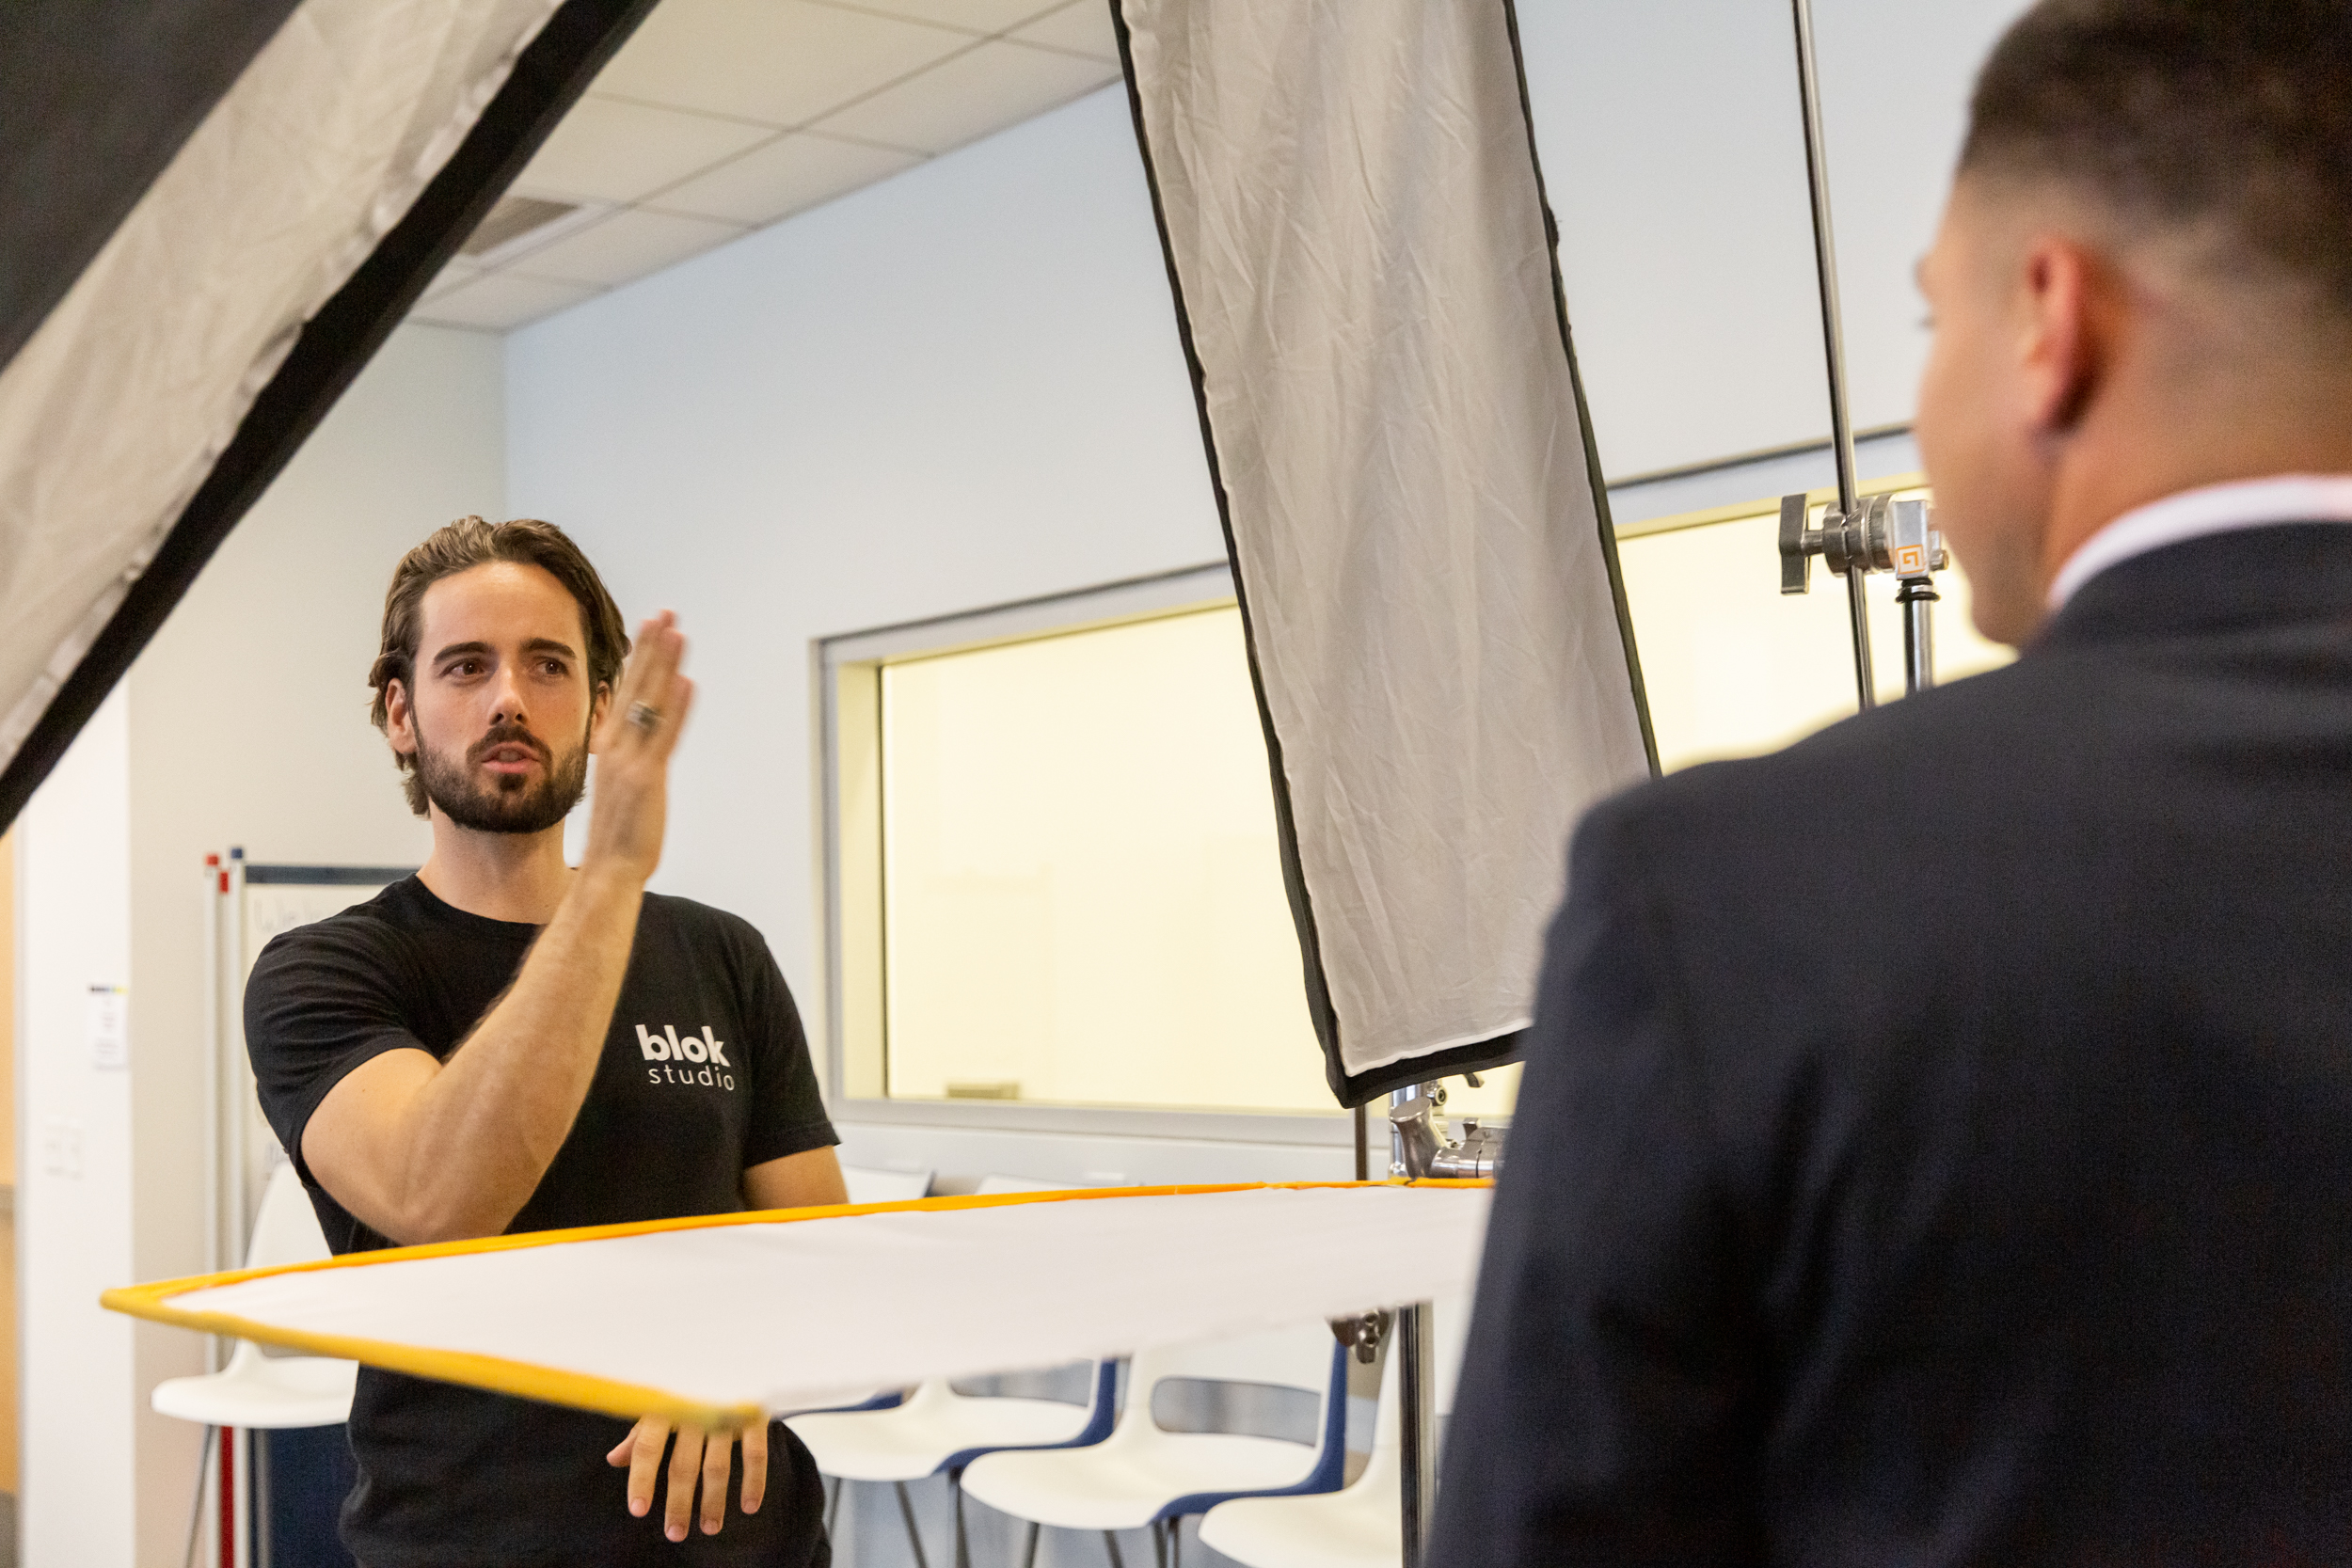
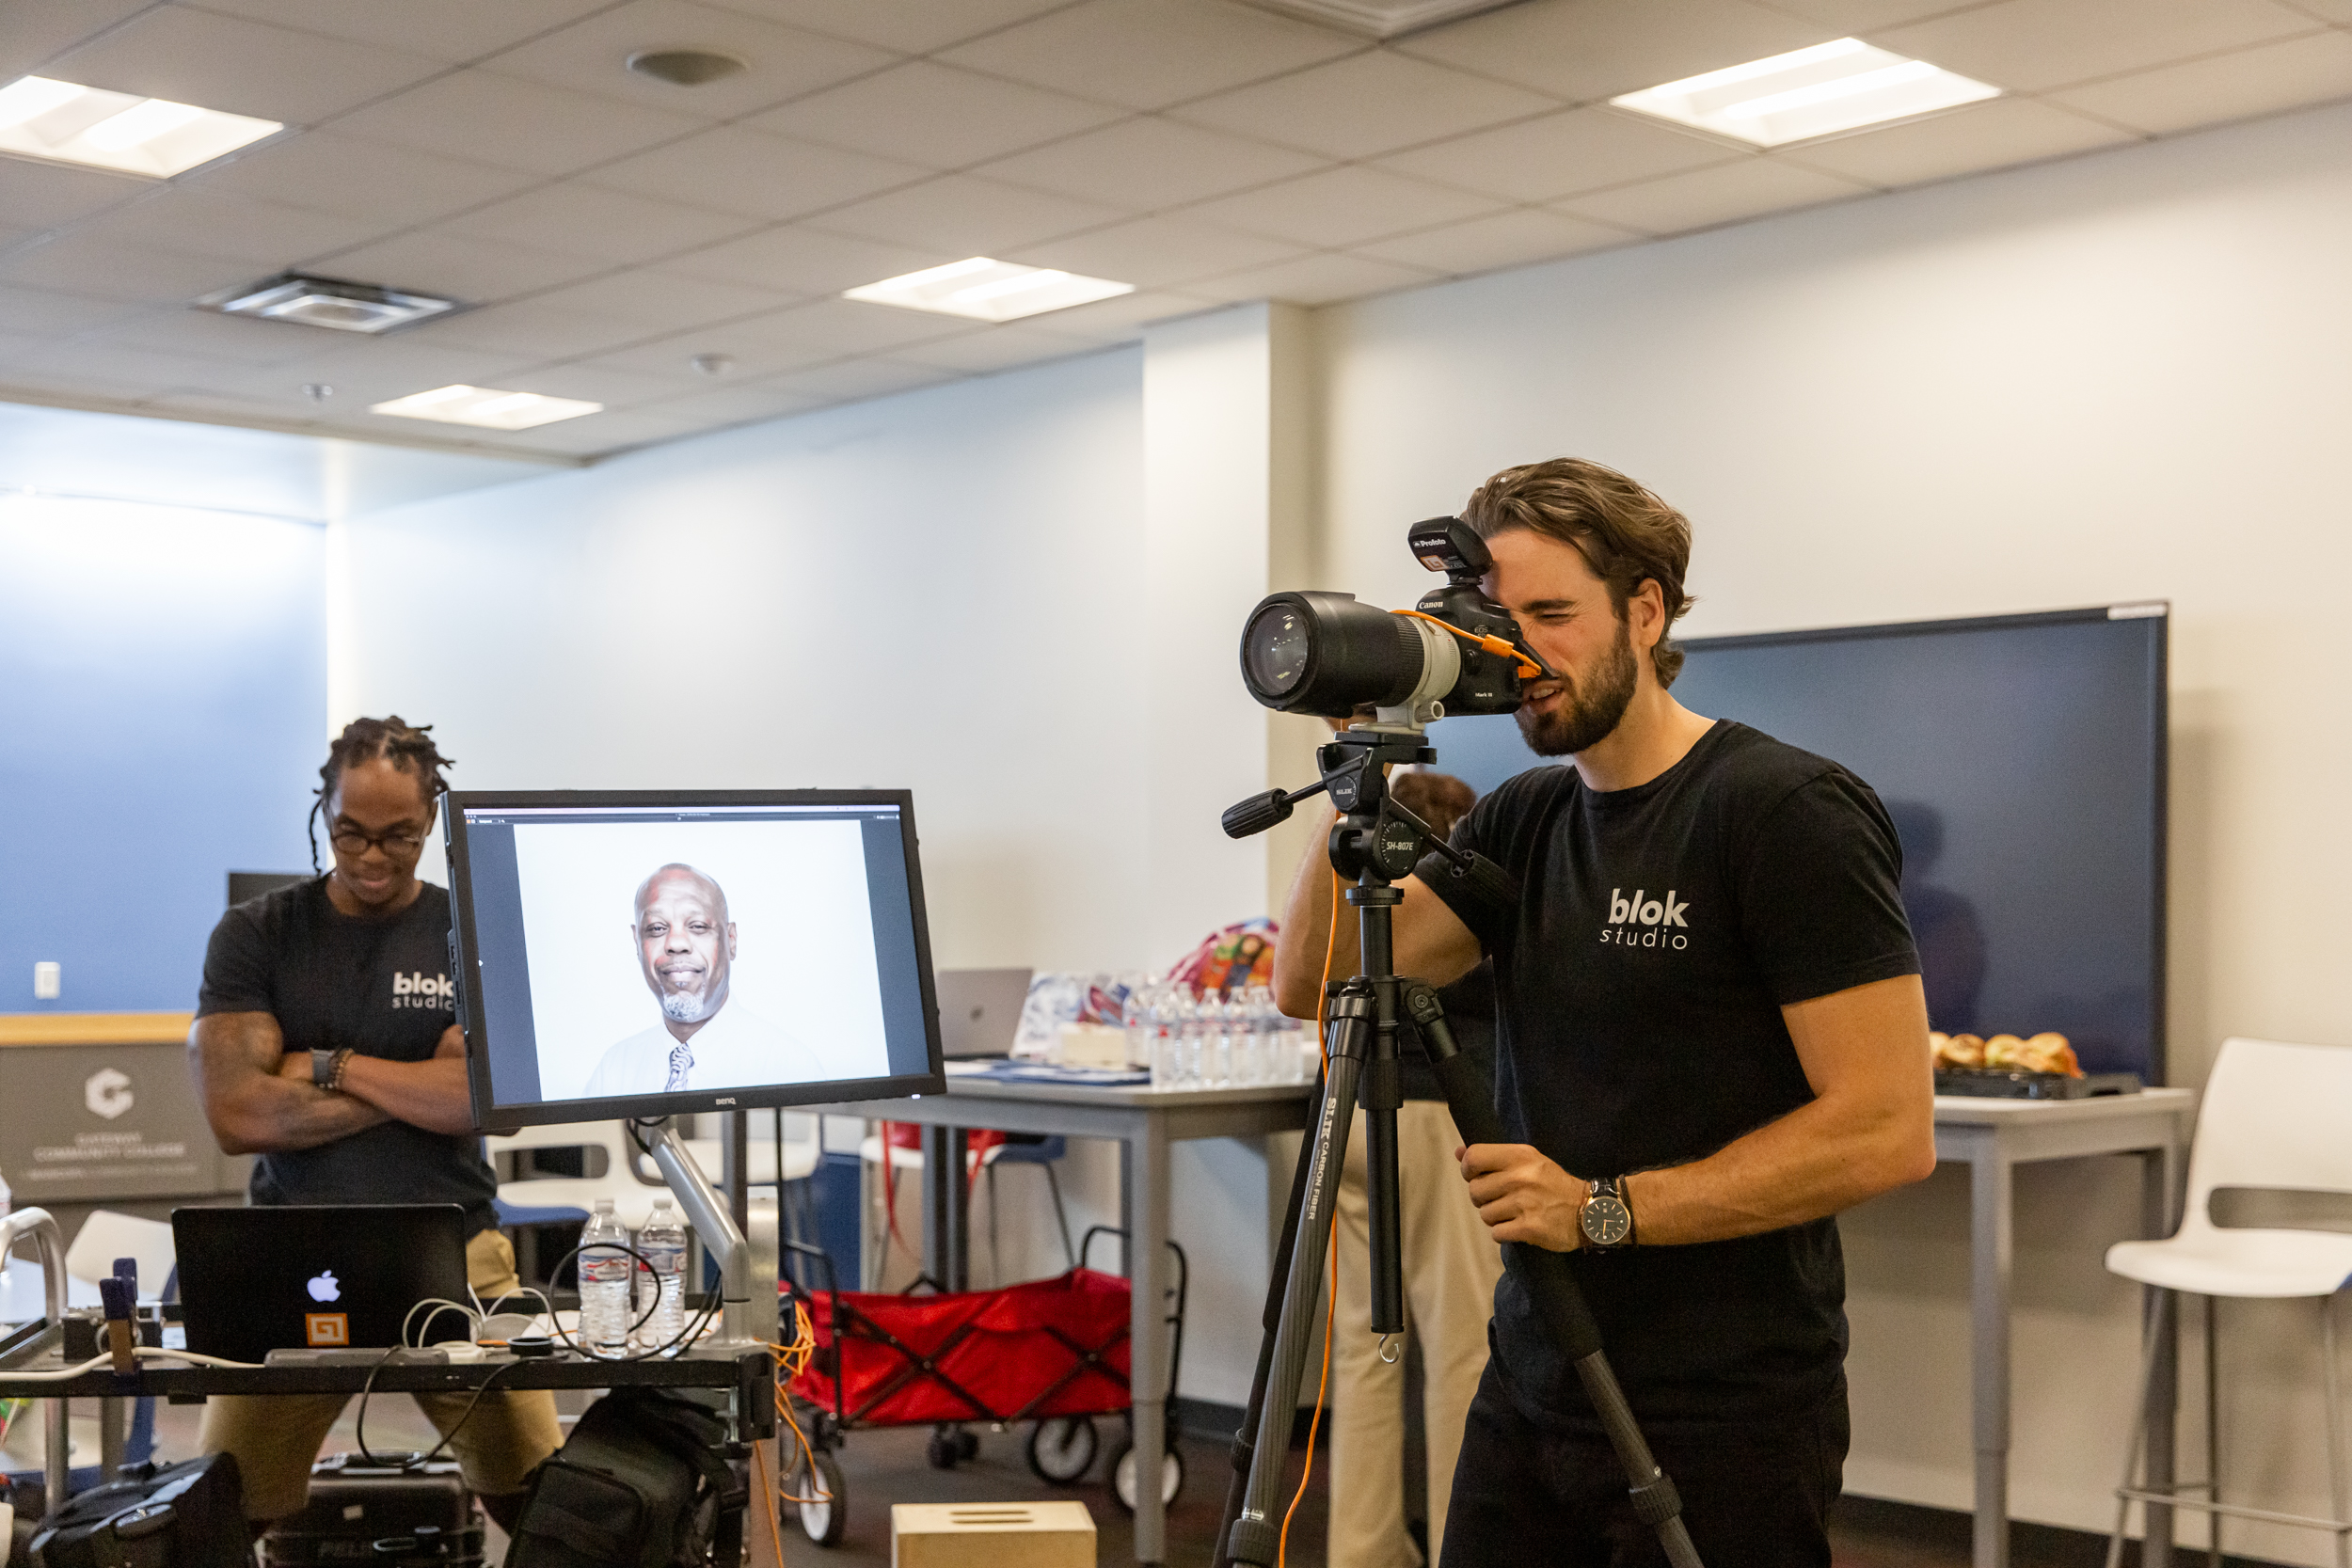
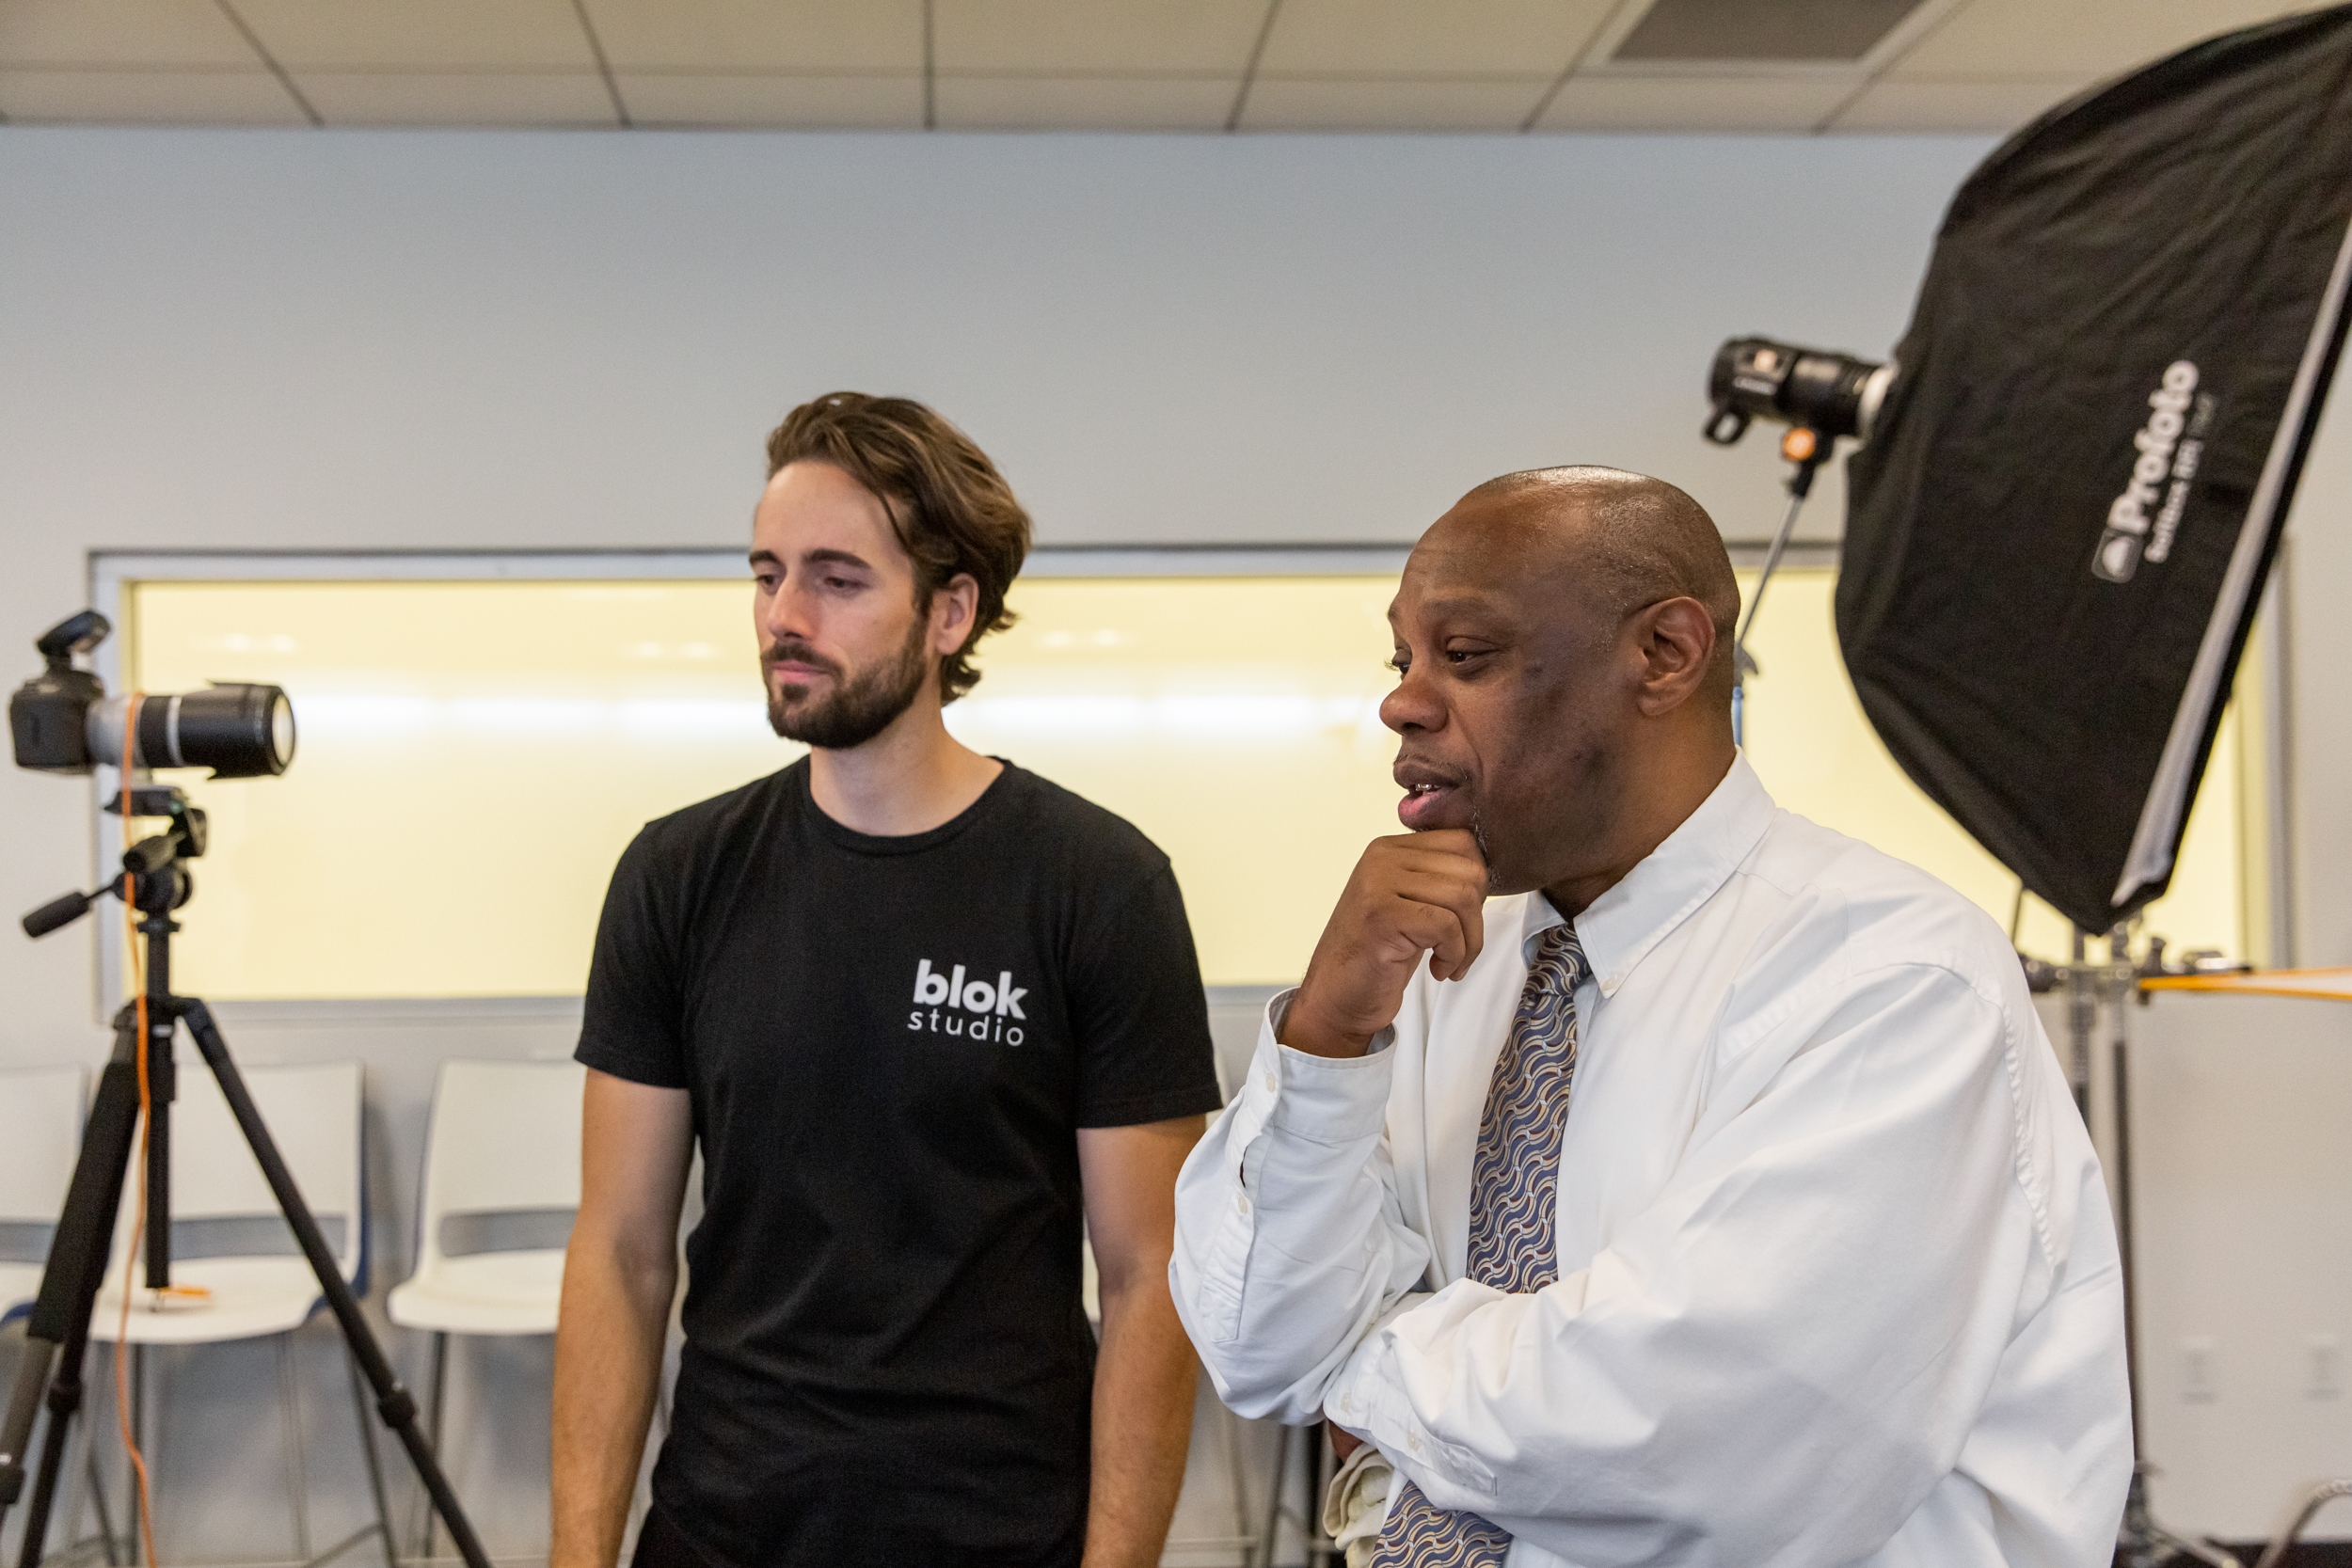
The power of a headshot can go a long way with employers. It gives a personality and a face to their profile. It makes them a real person and not just another application. We were thrilled to offer our photography services to this cause, especially when we learned that a professional headshot can increase the chances of employment by 36 percent. With this information, we knew the best way for us to help the participants was by providing them with a professional image they could use for their resumes and profiles. In this digital age we often take for granted services like photography, but for many individuals this is still an unaffordable luxury. We wanted to change this for the Fast Track members. Our crew set up a full headshot station, complete with viewing monitors so they could see their images instantly. We photographed 10 members going through the program, and each of them were hesitant to step in front of the camera. Many of them were either shy, uncomfortable, or wanted to “get this over with”. Before we started shooting we would break the ice with an introduction and a conversation. We then would pull reluctant smiles out of each one, with a few jokes or light hearted remarks about how we won’t let them leave without at least one shot of them smiling. Once we got the shot, they would walk over to the monitor to review their images. Each of the 10 gentlemen would stare at their image on the screen. For every single one of them this was the first headshot they had ever had. Seeing themselves on the screen, they had a new air of self-determination and hope. The look in their eyes is hard to put into words, but that’s what a photograph is for, right?
Through this experience we learned about the real impact a photograph can have on a person’s life. We work with photographers and models every day, but when these men got their first professional headshot it brought a new meaning to what we do. We realized how much we can help people with the skills and tools we have. Each one of these men were so grateful for the opportunity Fast Track and these photos are going to give them. An opportunity to make a change and take control of their life. We are so proud to be a part of their journey back into the workforce.
We can all help in our own way. It doesn’t always mean donating money or clothes, sometimes it’s your time or services. These are our community members, our friends and neighbors. When we can help individuals grow, we can help our communities grow.
If you would like to help St. Joseph the Worker with their mission please go to their website for volunteer opportunities!


Benefits of The Pre-Light

Not all productions are created equal and time is always of the essence. If you've worked on any major (or minor) commercial project, you most certainly understand how important the schedule is, especially when tied into a budget. With so many different crews working, variables to consider and decisions to make, it's relatively easy to fall behind schedule and the amount of time you'll have for problem-solving is limited. The last thing you'll want to hear as a photographer is, "How much more time do you need." This is why Pre-Lighting is essential.
Pre-Lighting is to light your set or scene before the start of the official shoot. It's usually just you and your crew onset, staging, and testing lighting, working through problems and discussing the workflow. That lighting concept you had in mind may not be suitable for this scenario; maybe there's a distracting shadow or glare that you didn't foresee occurring, maybe the setup needs to be modified to be more safer onset. Each shoot comes with its own set of problems, pre-lighting allows you to identify and eliminate these problems when time is less of a priority.


Not all jobs will accommodate a pre-light day, nor is one necessary for all situations. Sometimes you get a whole day, other times you get a few hours, a lot of the time even less. A pre-light will allow everyone to reach maximum potential during the most crucial parts of the production and you'll have more time to focus on your subject, and getting the shots needed.
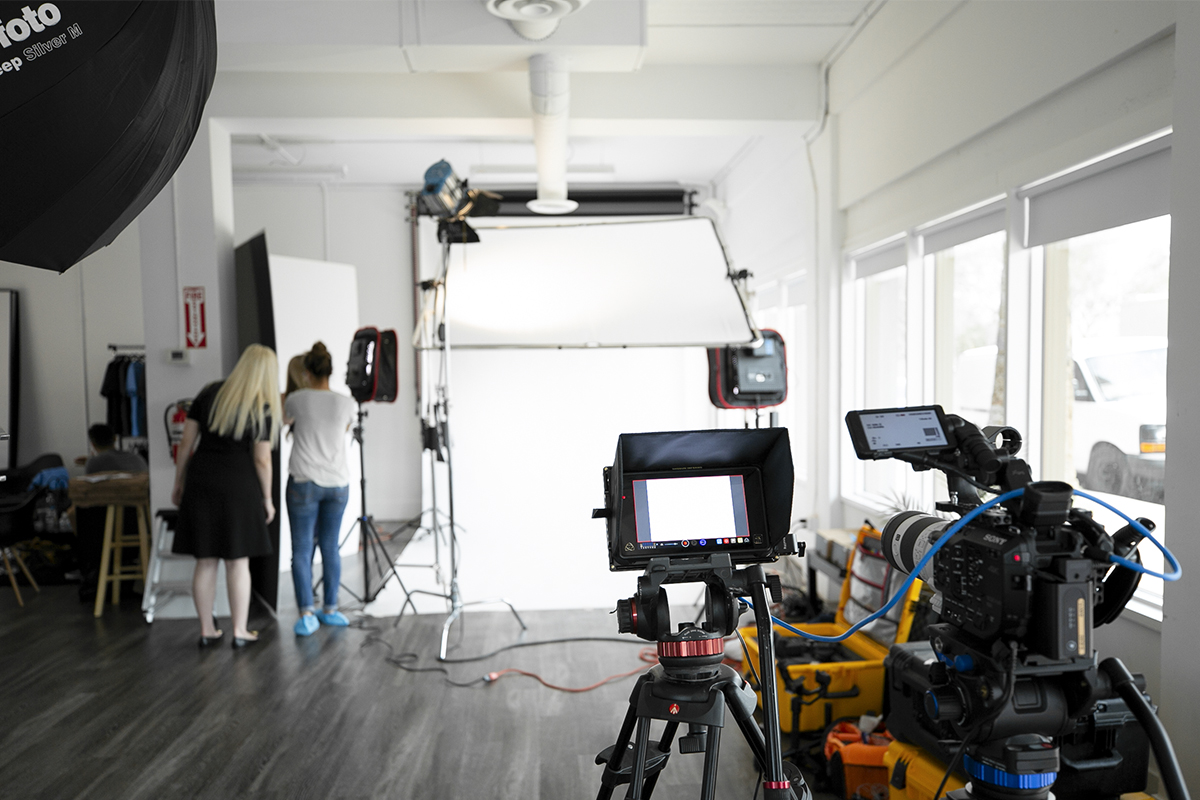
To help, we’ve included a checklist that includes things we consider while working through a pre-light day.If you’re interested in expanding your skillset on lighting, please see details about our upcoming lighting class.
Pre-Light Checklist:
✔️Are my strobes powerful enough for the results I need? Things to consider power output, recycle time, battery life, flash duration.
✔️Do I have supplemental gear to in case we need to add light to specific areas?
✔️Do I need to add gels to manage color?
✔️Do I have all the lighting modifiers I need? Consider the desired quality of light, hard, soft, directional.
✔️Do I need any grids or additional diffusion to control the light even more?
✔️Are my modifiers right for the effect I need?
✔️Do I have flags, cutters, and fill cards to add and block light?
✔️Do I have enough grip to build my set up?
✔️Does this lighting align with the art direction?
✔️Does the lighting meet the needs of post-production?
✔️Can this setup be manageable on shoot day?
✔️What is the power requirements for my setup, and will I have enough onset?
✔️Test all camera gear to ensure everything is operating correctly.
✔️Do I have enough batteries and sufficient charging capabilities for all devices? Laptops, Triggers, Cameras, Light meters, etc
✔️Create 1-2 contingency plans for lighting.

Hard vs Soft Light: A Beginners Guide.

Choosing a light modifier can be a daunting task when you're faced with so many options. Beauty dish, ring flash, umbrella, softbox, grids, scrims, flags; things can get overwhelming fast. The type of modifier you should use will depend on the results you're looking to achieve in a shoot, as each light modifier produces either soft light or hard light. In this article, we'll review the difference between hard and soft light as well as a few basic things to consider when determining which light is right for your project.
Hard Light vs Soft Light
All modifiers can be placed into hard or soft light categories. The size of the light source relative to your subject will also determine which effect is achieved.
Soft light tends to come from a large source in which the light "wraps" around the subject. The shadows are diffused with very soft edges, perfect if you're looking to minimize or soften the shadows in your image. Soft light is also great as a fill light source as it can reduce existing shadows without creating additional ones. It produces less contrast and works for reducing the appearance of wrinkles and making the skin look more youthful. Softboxes, octaboxes, umbrella softboxes and shoot through umbrellas are all considered soft light modifiers.
Hard light comes from a small source and is more focused and controlled. The shadows are more dramatic, have harder edges and produce more contrast. Hard light is useful for creating edgy looks or adding more drama to a shot. Some outdoor situations may require hard light when attempting to overpower the sun or balance ambient and natural light. It's often used in sports, action, and fitness photography as well as some product photography. Beauty dish, narrow/wide reflectors, ring light or magnum reflectors are all considered hard light modifiers.
Things To Consider When Choosing a Modifier
What's the creative direction or desired mood of the shoot?
You won't know how to build your light if you don't have a good understanding of the shoot concept. Are you creating images with a happy, bright, airy mood? Or something more punchy and dramatic? The lighting style for a carefree lifestyle shoot would look very different from an aggressive fitness shoot.
What kind of light do you want to replicate?
Do you want to mimic 2 pm sun or a cloudy day? Matching the quality of natural light is a good rule of thumb if your mixing ambient light with strobes. For example, hard light conditions like the full sun can pair well with a hard light modifier such as a beauty dish or a softbox would look better on overcast days and early morning light.
What are the physical characteristics of your subject?
If photographing a person, what's the condition of the skin? Softlight tends to be more forgiving on a more textured skin or someone with more wrinkles. If shooting a product or object what are the characteristics of the surface? Is it highly reflective or has a matte finish? Hard lighting can make a matte surfaced product pop more.
These aren't hard, fast rules but good fundamental concepts to begin with. Our upcoming lighting 101 class covers this topic in depth. To learn more about what the course offers, click the button below.

Your brand identity is holding you back.
Hi, Thomas Ingersoll here. I'm a commercial and advertising photographer in Phoenix, Arizona. I am taking over Blok's blog this week and want to share something that has changed how I get clients, and how clients perceive me.
This week I want to talk about the importance of being a brand and having a strong identity. Now, this may seem like a no-brainer, but it is commonly overlooked in our industry. In today's climate, it is not enough to be a good photographer. The days of just having a strong portfolio are dead. A photographer must be a brand, an experience if you will. Our market praises brands that create an experience, consistent in their identity, and easily assessable on all platforms. This will garner trust and reliability with your audience; they know what they will get when they come to you. It also conveys that you are willing to put the time in to represent yourself and what you want to share with the world. So where do you start? I will break down the crucial aspects of developing a robust unified identity.
- Start with your work. Align your work with your brand's identity, make sure they compliment each other. If you are a lifestyle photographer, things like your design, font, color, logo, and voice should convey that message. This will help establish your persona before your audience even begins to browse your work.
- Establish what market you are after. Are you pursuing retail, commercial, editorial, etc.? You will want to articulate on your platforms who you are and the type of work you do. I market myself as an advertising and commercial photographer. I make sure on all platforms that I state that. I also make sure my SEO practices relate to those terms.
- Show people who you are. You're a photographer; you should have a beautiful photo of yourself. Keep a consistent biopic across all your platforms.
- Logo. This is usually people's first impression of the type of work you do. Spend some time and make sure your logo represents yourself well.
- Develop a brand color. This will help support your logo and design. People will start to associate your brand with a color, look at companies like H&R Block, McDonald's, Coca-Cola, and Air BnB.
After establishing your brand identity, apply this across your platforms.
Website
First is your website. This is the staple of your identity. This is where you want to drive traffic to. All marketing attempts should funnel people to your site. Your website should be an experience for your audience, and make it a pleasant and memorable one. Your identity should sing through your site, and make it easy to navigate damnit.

Social Media
Use this free form of marketing to establish your voice, identity and accessibility. Have a unified bio pic. Market yourself to a specific audience. Drive people to your website.
Consider what you post, make sure it relates to what you're photography.
Instagram is great for a personality. Share your BTS, technical info, and your portfolio. Don't be afraid to some personal experiences here.

This is a great space to share links and stories. Be involved in communities. Keep personal stuff to a personal account.

Great to find a network of professionals. Share your stories.

Use this platform to share BTS and links. Almost a mix of Instagram and Facebook.

Business cards and mailers
Don't ignore the world that exists outside of the internet. Print is still a very crucial aspect of marketing and identity. I love using leave behinds and business cards for more professional settings. Make sure that the design of your cards, print portfolio, and leave behinds are all an extension of your brand.


Conclusion
Throughout my presence I remain consistent. My branded color is a deep red white. My style is minimal with a slight modern touch. All my platforms look the same so my audience knows its me. I state that I'm an advertising/commercial photographer. Implementing a strong brand into my business structure has helped elevate the type of clients I get.
Take a look and ask yourself if you are a strong brand.
Resources
Website - Squarespace
Business Cards and Mailers - Moo
Also be sure to check out Agency Access. They have tons of insightful info on their blog, as well as a team of professionals that can help develop your brand.

Continuing to Live, Learn, and Light

As Blok Studio evolves and grows with our community, our goal is to provide a balance of inspiration and information. To support this purpose, the Blok blog will now be organized by the three words that are at the heart of who we are and what we stand for: live, learn, light.
Live is the Blok lifestyle. We’ll bring you curated playlists, travel highlights, creativity, imagination, and continue our artist profiles in our Around the Blok series.
Learn is founded on our drive to help and teach others that have a story to tell. We’ll share our industry knowledge, gear reviews and how-to’s, and Blok EDU classes. We do this because we believe in community over competition.
Light is the catalyst to life. It’s technical yet abstract, tangible yet elusive. We’ll investigate light in all its beautiful forms. We’ll share guides on lighting equipment and set-ups, cover essays on the philosophy of light, and show all the badass lighting inspiration we can find. Nothing electrifies us more than light.
Join the Blok community and stay tuned for our new content!

Photo Business Building Basics

Photography is one of the most accessible mediums to this day. Digital cameras and photo editing software are more affordable now than ever. There are tons of tutorials and workshops on the internet for practically any technique you could imagine. Seldomly do we think about the business aspect of photography when jumping in for the first time. To be fair, a lot of people getting into photography never have the intent to turn it into a business. For some, it starts as a hobby, then slowly evolves into a company; others have a clear intention of making photography their career.
Whether it's intentional or not, the way you do business as a photographer has a significant impact on our industry as a whole. In this article, we'll cover some basic things you should consider when developing your business model.
Pricing
Before you set your photography prices, you need first to understand your operating cost or the cost of providing your services to clients. The cost of providing any service typically falls into one of three categories; materials, overhead and labor cost.
Materials are the cost of goods used in providing your photography services. Photo or video equipment, computer hardware or software are examples of things necessary to create an image and are considered material cost.
Labor cost includes anyone you hire to provide a service. Photo assistant, Digital Tech or Retoucher are all examples of people you may need to hire and the wages you pay them are part of labor cost. Not all jobs will require a crew but typically the more significant the job, the higher the chances are of you needing hired help.
Overhead cost is the indirect cost to your business in providing services to your customers. Examples include studio/office rent, advertising, insurance, taxes, depreciation, office supplies, utilities, and mileage.
Once these things are determined, you will have a base amount of what it takes to run your business. At that point, you will need to factor in a realistic living salary and perform a markup to ensure you're making a profit for your business and also to compensate yourself. The National Press Photographers Association (NPPA) has an excellent cost of doing business calculator that can help calculate these things for you, all you do is plug in the numbers.
Invoice Basics
Invoices should always look professional and be easy to understand. The essential things you should include on every invoice is your contact information and mailing address, itemized breakdown of charges and your terms and conditions of doing business. The breakdown of costs is typically arranged as your professional fees first then production expenses after. Examples of professional fees are the photographer, creative, session, and usage fees. Examples of production expenses include crew member rates, gear rental or studio fees. A good habit to start is to create an invoice for every client, even for charitable or trade jobs and be descriptive as possible in explaining the details of the project. Programs such as Blinkbid, HoneyBook or Sprout Studio are great for keeping invoices organized and professional looking. A Photo Editor also does a beautiful job of breaking down real-world estimates.
Image Usage and Licensing
As a photographer, you own the rights to the images you create. A license is an agreement between you and the client as to how the image will be used (usage rights). When creating an image license for commercial use, it's imperative to have a clear understanding of what the intended use will be. Will the image be used for print (flyers, magazines, billboard) or web only? How long does the client plan to use the image? Will the image be used locally or internationally? How many photos does the client want to license? Is the client a small local retailer or a Fortune 500 company? These are all things you need to know when building and pricing your license. There is an excellent article on the ASMP website on how to draft a license and fstoppers has a great write up on how to price a license.
This article isn't intended to cover every business aspect; it's meant to provide you with some foundational knowledge to build upon and provide you with some excellent resources to help you along the way. The goal should be for you to optimize your business model as you become more experienced in the industry. Keep learning and growing. Cheers!


Lens Filter Benefits

Lens filters still serve many different purposes in this digital age and are widely used in photography. They can offer protection, reduce reflection, alter light and enhance colors. In this article, we'll talk about the filters we tend to use the most.
What Are Lens Filters
Lens filters are transparent or translucent glass, plastic, resin, polyester and polycarbonate material that attaches to the front of a lens. They come in circular, square and rectangular types. Circular (screw-in) filters connect directly to the front of the lens, square and rectangular (drop-in) filters utilize an adapter that attaches to the lens.
Lens Filter Types
- UV/Clear/Haze Filter
In the past, these filters were used to block UV light from hitting the film or camera sensor. But, with the advancement of digital photography, all DSLR cameras presently have built-in UV filters. Now, the primary purpose of the UV filter is to protect the front element of a lens from dust and scratches. Be sure to purchase a good quality UV Filter as lower quality versions could reduce image quality, increase reflections and flares in your images.
- Circular Polarizing (CPL) Filter
The primary purposes of the CPL filter are to reduce reflections, enhance colors, increase contrast and reduce haze. This filter is especially good if you want to darken the sky or lessen the intensity of reflective surfaces like water or windows. The effect and intensity of this filter changes dependent upon one's angle to the sun. Also, there is usually a loss of 1-2 stops of light when using this filter so be mindful of your camera settings when using this.
Neutral Density (ND) Filter
ND filters reduce the amount of light entering the camera lens thus allowing you to decrease shutter speed and increase exposure time. These filters are useful when you want to shoot with a wider aperture on a bright day or shoot with a slower shutter speed with moving water to create that "foggy" effect. They also allow you to shoot with wider apertures in studio photography. ND filters also come in hard
These three options are popular amongst our photography community but they are not the only options available. Other filter types include Hard-Edge Graduated Neutral Density (GND) Filter, Soft-Edge Graduated Neutral Density (GND) Filter, Reverse Graduated Neutral Density (GND) Filter, Color/Warming/Cooling Filter, and Special Effects Filter. These all have their intended purposes and we encourage you to research them. Happy shooting!

THREE Reasons Why You Need a Wacom Tablet.

Here we go ladies and gentlemen, the great debate! I've had the privilege of meeting so many amazing photographers coming through the doors of Blok and I constantly leave with tons of great conversations, but one particular conversation seems to happen more often than none... *Shakespeare voice* To tablet or not to tablet, THAT is the question! All jokes aside though, this is a very important part of your workflow that you should consider if you haven't already done so.
I've met photographers who prefer to retouch with a mouse and others who SWEAR by the tablet. I had a friend of mine say verbatim, "If the tablet didn't exist, I wouldn't be a photographer". His seriousness in which he stated this information made me do my homework because at the time I'd only been shooting for a couple months and my idea of retouching was simply moving sliders (We all have to start somewhere #amirite) left and right.
Two years later and hours upon hours of retouching, my verdict here is simple -- Wacom tablets are an essential part of retouching and should be owned by anyone who is serious about their work. We all know photography can be expensive at times, from camera bodies, lenses, lighting, and overall accessories it takes to complete the task at hand. However, this item is on the more cost-effective side of photography. Today, I'd like to give you three reasons why you need a Wacom tablet!
1.) Precision.
Using a mouse can be very difficult if you're looking to make precise changes to an image because it's sensitive to the slightest move causing you to potentially make an error. Working with a mouse can be very tedious because of the flatness of your wrist and you'll need to drag along to make quick changes to your image. Using a tablet will streamline the entire editing process because these tablets come with a pen and they are generally much easier to use since they are much comfortable in your hand.
2.) Time Saving.
When using a mouse you'll often need to drag and click commands, which does require time when retouching your photo. The Wacom pen will eliminate the dragging process each time and many of the commands can be controlled through the actual pen and tablet itself. Since the Wacom tablet allows you to point at any point of the screen very fast, you can retouch comfortably and faster as well.
3.) Your Wrist.
Compared to the mouse, using a tablet is similar to using a pen for writing or drawing. Your hand is more relaxed when you use it. While the mouse is used in one hand position that put some strain on it, and can get your hand cramped if used for a long time.The strain on your hand, and using it for editing can cause you some issues like RSI & tennis elbow. If you must use the mouse, make sure you take regular breaks while editing.
Here's a Wacom tablet we'd recommend! Cheers!
Wacom Intuos Art Pen & Touch Small Tablet.($99)

Four Things to Consider When Building Your Light Setup

Mood
Light direction, quality, and color help shape the story and create the mood of your images. Having a solid understanding of the concept and mood of your shoot will help you make better decisions on which light modifiers to use. For example, if the concept calls for soft lighting, then you would know to consider a softbox and if it's hard lighting then maybe a beauty dish or reflector would be a better choice for the job.
Ambient Light
The proper balance of ambient and artificial light can make a beautiful portrait. When shooting on-location, it's essential to have a good balance between the two. Camera shutter speed controls ambient light, a slower speed allows for more ambient, and a faster speed deduces it. It primarily depends on the concept and mood you want to portray.
Lighting Style
Wheather you're using strobes to photograph people, products or places, there will always be a lighting style that is more flattering based on the characteristics of the subject. For example, broad lighting can be used to make narrow faces look fuller and short lighting is ideal for slimming the face out. Having a good understanding of the various lighting styles and knowing when to use them is vital to taking quality portraits.
Fill Light
Fill light can be used to brighten up shadows and make an image more interesting. If the shadows are too dark, try adding white foam core or a soft modified light source to the shadow side of the face to brighten them up. A white/silver reflector or soft modified light can also add beautiful catchlights in your subject's eyes, making a more interesting photo.
Join us in our LIGHTING 101 class to learn more about these concepts.