

Productivity.

People often assume that being more productive is simply about getting more done in less time. If you are a productive person, you definitely accomplish more in months than many people do in years, but productivity is more of a way of being. You could be doing less and at the same time, be more productive. What do you think of when you think about ‘being more productive in your life’?
Here are a few tips to make sure you're getting the most out of your day.
Wake Up Early!
Decide what you’d like to accomplish each morning, and build your morning routine off of that. The mornings are a fresh start, peaceful and free of ringing phones and constant email notifications. If you get your most important things done in the morning, the rest of the day is a breeze.
Declutter your workspace!
The decluttering your workspace part of it is simply to remove all extra distractions, on your desk and on your computer. If you’ve got a clean workspace, you can better focus on the task at hand. We often believe we can efficiently multitask, which is false. Work on that one task, and work on it with concentrated focus until you are done. This ensures you are giving your best efforts.
Make a productivity playlist!
Create a playlist that includes lyric-free music and that plays at a medium volume. This can help you stay on task and can even enhance your focus on the task at hand.
Do the tough tasks before lunch!
The task you've been putting off the most is usually the one you should tackle first and we all know which tasks those are. Often when you put things off, they end up being things you don’t really want to do. But sometimes they are things you just gotta do. If you can do them first thing in the morning even better!

Mixing Ambient Light With Strobes.

Image by Thomas Ingersoll
Blending ambient light with strobes can be deceivingly tricky. In this post, commercial photographer, Thomas Ingersoll shares some helpful tips.
Find Your Ambient Light First
The first thing you should do is evaluate your scene. Study where your ambient light is coming from. This is crucial to understanding where to add your strobes. I will try to utilize the ambient light as much as I can, I want the ambient light to do most the work for my scene. I will meter for the ambient light then slightly underexpose the subject. This makes sure the ambient light is providing my scene with the proper fill light that is needed, and once I add the strobes they will give me the sharpness and control that I desire. Also, make sure there is enough ambient light. I usually won’t mix the two if I have to shoot above ISO800.
Add One Light At A Time
Whenever using strobes, you want to add one light at a time. Your overall look will determine the number of strobes you need, but always add one at a time and make sure each strobe has a function. First was the ambient light. Now you will start to add strobes into the scene. When mixing ambient light with strobes I will use 1 or 2 strobes; I don’t find myself needing more than two strobes.
Match Light Direction
Matching the light direction is essential. I will assess where the ambient light is coming from and use my strobes to compliment it. So if I have a big window on the left, I will put my key light on the left as well. Then if I need a fill light (to fill in the shadows) it will be on the right or behind me. This will make your scene much more believable and natural.
Use Strobes Subtly
When combining strobes and ambient light you want to ask yourself how will strobes benefit the scene. My goal is to make the scene look almost as if it was just natural light. I try to use strobes almost as a fill light. Use the strobes at a very low power. I see a lot of photographers go wrong here. They will crank up the power on the strobes and lose most of the ambient light. It’s also important to have strobes that will go low enough in power for these types of shoots. This is why I love the Profoto B1X’s and D2’s. They go low enough in power to seamlessly blend the two worlds.

Light Color
It’s important to match the color of your ambient light with the strobes. I will use gels to match my strobes color temperature to the ambients color temperature.
Use Soft Modifiers
Using softer modifiers will also make the image look less strobed. Remember bigger modifiers means softer light. Softer light blends much easier than harsh light. I often use two lights to make sure the strobes are soft and transition nicely between each other and the ambient light. My favorite modifier right now for soft light is a Profoto large deep white umbrella with the diffusion. This thing is creamy soft and has the most beautiful light fall off I’ve seen in a modifier. For a fill, I will use a large white V-flat or a 6x6’ scrim. Bouncing light off walls or surfaces is another great way to subtly add more light into your scene.
Harmonize the Lights
The strobes and ambient light should compliment each other. You have to find that balance and let each side do its job. The light direction, color, and softness all need to match between the ambient and the strobes.


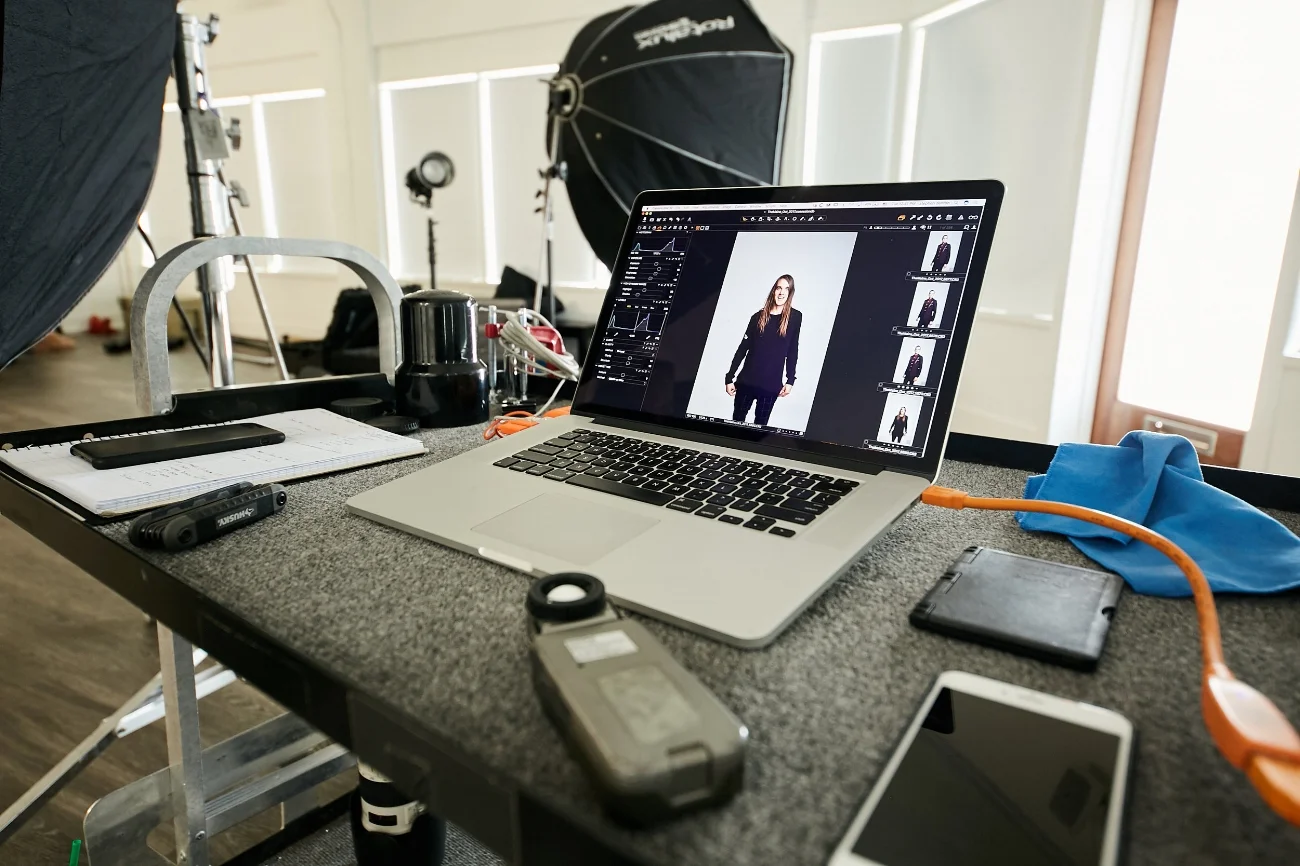
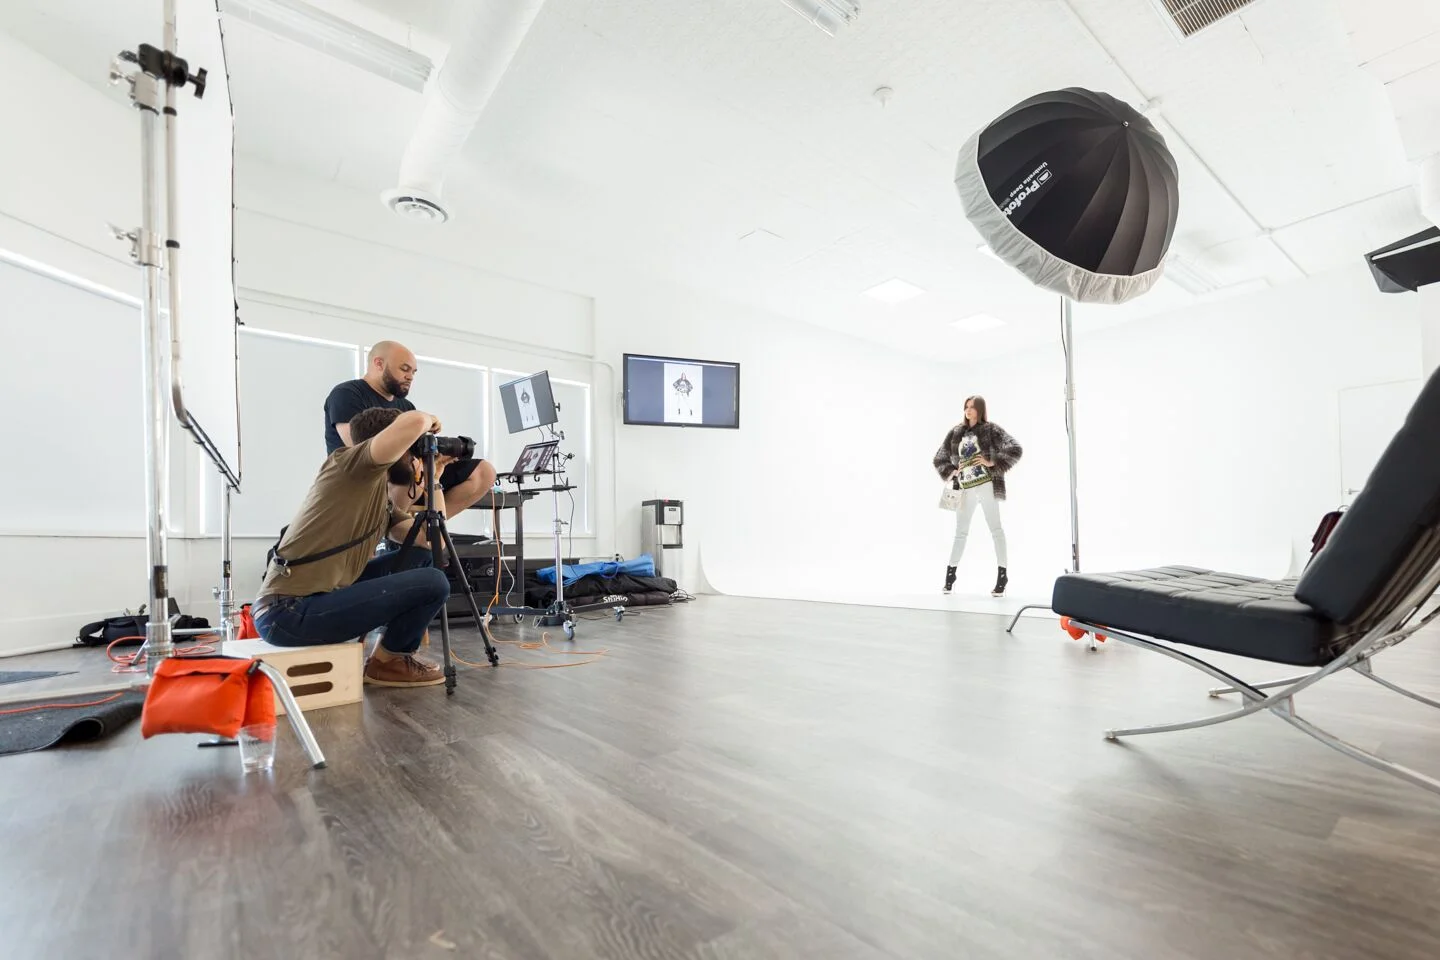
Introduction To Shooting Tethered.

If you are a photographer, you have had the experience of taking a photo, looking at it on the back of the camera and being happy that you nailed the shot. But then you get home, upload your images, and realize that it’s a bit out of focus, or simply notice objects in the background that may be distracting. Shooting tethered to a computer can alleviate problems like this, as well as provide other added benefits.
It Could Save Time.
The ability to see exactly what you're getting from your raw image ultimately saves you time. You can confirm when you have the "shot." When shooting tethered, there's a good chance you are taking fewer photos which also less to cull through.
Everyone On The Same Accord.
When working with a team of people tethering is crucial. When I shoot portrait work, I often need a make-up artist, hair stylist, and a wardrobe stylist to produce my vision. Allowing my team to see exactly what's being captured gives everyone the confidence that we are headed in the same direction. This also provides the opportunity for my team to catch things I may have missed ( hair in the face, pieces of a garment that may need to be tucked, touching up the make-up). The model can also see what poses work best and you can give a bit more direction.
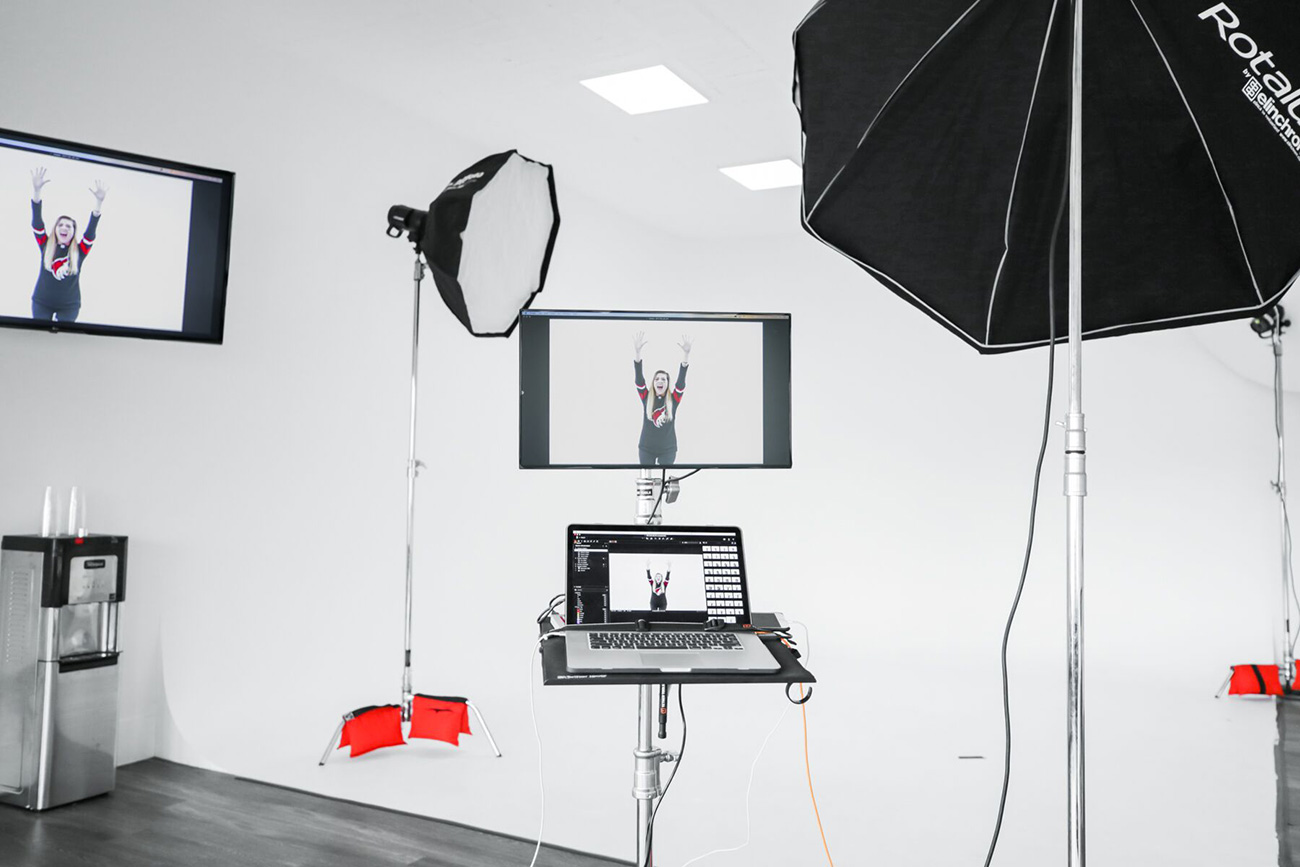
3.2″ LCD Screen vs 15″ Retina Screen
The tiny little LCD screen on the back of the camera is about 1 megapixel. Most cameras shoot somewhere between 20-50MP. That’s a lot of detail you aren’t seeing. Sure, it's better than nothing at all, but it gives a minimal view of the overall image. The tonal range of the camera’s LCD screen isn’t incredibly accurate either, especially in the shadows and highlights. The exact balance of light, critical focus, distracting elements, blinking eyes, etc., are all difficult to spot quickly during a fast-paced shoot on the on-camera screen. Add in environmental factors like bright sunlight and it can become a guessing game.
Visit our friends over at TetherTools to get started on tethering!

Why Monitor Calibration Is Important and How To Use It.
If there's one thing that’s certain about photos on the internet, it’s that nobody sees the same thing as you. In general, most monitors are too bright, and the color profiles vary by manufacturer. As the monitor gets old, the colors tend to change also. It’s more of an issue with older bulb light monitors, and less so with LED, but still, these colors change over time. This tool is especially useful when you use multiple monitors or print your work.
In this video, Aaron Nace of Phlearn examines the topic of color calibration and why this is an especially important issue for photographers.
Why You Should Be Using A Tripod.
Thomas Ingersoll at Blok Studio's Pierce location.
I'll admit when I started taking photographs I thought tripods were cumbersome. I wanted to move freely while shooting and initially felt tripods would slow down my workflow. Being that photography (Camera, lenses, accessories) can be very expensive, especially when you first start out, I couldn't wrap my mind around spending hundreds of dollars on a tripod. I did what most newbies would do and purchased a cheap tripod that had decent reviews on Amazon. It wasn't long after as my kit grew that I started to realize the importance of having a GOOD tripod. Think about it - you're putting expensive camera gear that you spent your hard earned money on. Outside of making sure you can set your camera up and walk away with confidence, here are a few other benefits for using a tripod.
Low Light Situations.
Tripods are an absolute necessity in low light situations. When you find yourself in a low light situation, you will need to reduce the shutter speed in order to increase light. Unfortunately, reducing the shutter speed means that your camera will be susceptible to camera shake. To ensure that you avoid the blur that may be introduced by your hand movement, a tripod will be essential.
Landscapes.
Landscape photography is one of the most popular types of photography. However, this type of photography typically requires that you use an aperture of at least f/8 and up to f/16 for most of your shots in order to ensure you achieve a wide depth of field that will put everything into clear focus. When you use these aperture settings, they narrow the amount of light coming in. To correct this, you will need either to increase the ISO or reduce the shutter speed so you can get the right exposure for the shot. Be aware that increasing ISO will introduce noise to the image so a good option will be to reduce the shutter speed. Placing your camera on a tripod will ensure you are getting the sharpest images possible by avoiding camera shake.
MACRO PHOTOGRAPHY.
As a food and cocktail photographer, I often take photos that are in close range, any movement in the camera is amplified and much harder to control when holding in your hand. When using my favorite lens the Canon 100mm 2.8 L the depth of field is very thin at its widest apertures, so it’s helpful to use narrower apertures — meaning your shutter speed goes down. In most cases, a tripod is essential in food photography to keep your image in focus and your aperture closed down enough that the whole subject is sharp.
Why You Should Start Attending Photography Workshops In 2017.

Make New Friends.
Photography is an activity often associated with independent initiative, but the rewards to be gained from participating in a workshop are many. The energy and dynamics created when you bring together a group of like minded individuals with a common goal. There are the many opportunities to share knowledge and experience that may even spark new ideas. A group of people working together to build something special promotes camaraderie. You often leave workshops with a group of new friends.
Learn from an expert while developing your own style.
A good workshop leader will ensure that every participant gets the level of support they need and will be on hand to offer help as needed. An experienced instructor will help you master technical skills while providing ample time for participants to explore their own vision. With expert guidance, your creative insight becomes keen, allowing you to develop your own personal style.
Get Inspired. Be Inspired. Inspire Others.
It can be difficult at times to stay motivated and inspired to go out shooting on a regular basis. However, we need to shoot on a regular basis to improve our photography. It's a lot like exercise for our bodies. Getting into, and staying in, some kind of routine is important. Missing a day or two here and there isn't a big deal, but if a day or two turns into a week or two, then a month or two, we lose a lot of the physical fitness (or photography fitness, as the case may be) that we've worked so hard to build. Workshops can definitely help get the creative juices flowing! That same momentum will inspire you to improve your overall photography skills and create new projects.
You can find all the updates on our workshops and education classes HERE!
WORK-LIFE BALANCE.

In today's busy world, prioritizing between your work and your personal life can be a huge challenge. Poor work-life balance can result in high levels of stress, unhappiness, and even reduced productivity. Here are a few tips to help you stay balanced.
Taking Time for Yourself.
Taking a little time for yourself refreshes and re-energizes you. It allows you to think more clearly and make better decisions. If you take part in something you enjoy during your personal time-out, be sure that you use your time for leisurely activities. Do not push yourself to complete anything. Simply enjoy the time. Other benefits include the ability to sleep better, less anxiety, and less tension overall.
Become self-disciplined.
Self-discipline is the ability to do what you know you should do, whether you feel like it or not. It's the most important quality for any person who is juggling daily task. Without it, we struggle between the forces of doing what is necessary and what is fun. Fortunately, self-discipline is a skill that can be developed. Focus on the task at hand, and avoid multitasking.
REGULARLY COMMUNICATE WHAT’S WORKING AND WHAT IS NOT.
People who are good at staying on task make a conscious choice to continually talk to the important people in their lives about what is working or not, and make decisions to change direction if needed. While life happens and situations change, they avoid ending up in a place they didn’t want to because of their clear intentions.
MAKE DELIBERATE CHOICES ABOUT WHAT YOU WANT IN LIFE.
People who achieve work-life balance make deliberate choices about what they want from life and how they want to spend their time. It’s critical to have that conversation with the people around you to properly communicate your priorities.

5 Ways To Get Inspired!

Photo By: Matt Martian
As creatives, we are constantly seeking inspiration to continue the work we do. Occasionally, we all run into that day where the ideas just aren’t flowing how you’d like them to. These 5 tips are simply tools that can help you when you need them or even support them in your current day-to-day.
1.) Take a trip.
Taking a trip could mean visiting a new place, such as coffee shop you’ve been meaning to check out or even visiting a new city. The trip is less about the distance and more about the experience. If you’re driving to a location, you may even want to take a new route to your destination. My personal favorite is to take a long walk around my neighborhood. Fresh air and new surroundings typically incite inspiration.
2.) Meditate.
Meditation is a great way to clear the mind and allow new ideas to flow through seamlessly. Often as creatives, we are constantly pushing the limits of our mind and it’s very important to reset your thoughts in a proper manner. I’ve personally picked up the practice of mindfulness which has become the cornerstone of my day. You can find a very helpful app called HeadSpace HERE.
3.) Create a vision board.
Vision boards are a great way to organize current ideas and even spark new ones. You can create a vision board in your workspace by simply printing or drawing items/people/places that inspire you. If you’re like myself who prefers a digital vision board, Pinterest is a great place to create a digital vision board for on-the-go inspiration.
4.) Exercise.
There are many studies that support exercise on a daily basis can improve overall creativity. Having this creative avenue often leads to inspiration. Exercise also creates a great platform for problem-solving. If you are going through a bit of a creative rut, exercise is a great place to start. If you need an extra push to get active, reach out to a friend! Group fitness is a great way to keep yourself motivated.
5.) Surround yourself with other creative people.
They often say, "You are the sum of who you spend your time with”. It’s important that you are directly involved with people who lift you, inspire you, and motivate you to do and be more. When you’re surrounded by creative people, you’re surrounded by passionate people, which ultimately will inspire you to create! This sense of community makes creative challenges much more manageable. You’ll have others who can show empathy and remind you that you are not alone.

Importance of Strobe Lighting
Yesterday we announced the launch of blok EDU and made our first course available for sign up. Within a few hours all the available seats were filled and we couldn't have been anymore excited about the reaction! As mentioned before our goal for this program is to empower, build knowledge and inspire. In this post, we feature some insight from lighting class instructor, Thomas Ingersoll, about the importance of strobe lighting. Enjoy!
Three reasons why learning about strobes is vital
1. Lighting shapes photography, it's the very essence of a photograph.
Light controls every aspect of photography; shape, contrast, color, exposure, mood, etc. Learning how to control light will fundamentally change the way you shoot. Although there is an art in capturing available light, there is an even greater reward in being able to control any environment you find yourself shooting in. Using strobes is another tool on the knowledge belt, just as conquering available light is a tool, and to be a well rounded photographer you should have and master both tools. I don’t approach every shoot wanting or needing to use strobes, but more often than not I find myself wanting to control the light using strobes.
This stairwell was very poorly lit and the florescent lights looked terrible on the model’s face. To overcome this I used 2 strobes. One B800 with an orange gel pointed at the ceiling to give a nice even fill light for the whole image, and one B800 with a beauty dish and a grid as a key light to isolate the model.

2. You are only as strong as your weakest link, don’t let that be lighting.
Even if you are an avid natural light shooter, gaining some basic knowledge about strobes can be extremely advantageous. Sometimes a subtle fill or rim light can make or break an image. Using strobes does not mean that you have to use them all the time or change your style of shooting, it simply means you can have more control over the outcome of your image. There are times when strobes can be the focus of your image or help you balance light in a poorly lit condition. Mastering strobes can help you overcome any situation and deliver the best to your clients.
Using strobes in a studio doesn’t have to be boring. Learn how to use different modifiers to control and shape your light.


3. Show your clients that you can overcome anything.
Whether you shoot weddings, fashion, commercial, sports, etc., learning how to use strobes can show your clients that you can always deliver, no matter the environment. Take your photography to the next level by learning all that you can about light. Learn and master how to use natural light, strobes, a scrim/reflectors, and to bounce light and nothing will stand in your way. Start learning now, even if it’s buying and learning how to use a cheap speedlite. Grow outside your comfort zone and have no limitations.
Adding strobes can create depth to on location shots. Learn how to blend ambient light with strobes and you can create more dramatic images.


I am constantly broadening my horizons with lighting knowledge. I seek out different lighting methods and unique ways to utilize light constantly. Peppered throughout my portfolio are shots using strobes, natural light, and reflectors. Control the light, don't let the light control you.

blok EDU Launch

Well folks, the moment is here. We've officially launched our education program!
We curated this program with the intent to bring a unique learning experience to the community. Courses will cover a range of genres and topics within the creative realm. Free Photoshop and Lightroom lessons will be offered as well as seminars designed to inspire. As if that isn't enough awesomeness, we have some incredible giveaways from great sponsors. A calendar of these courses will be found here. Sign up for our mailing list or follow us on instagram and facebook to stay updated on new courses as we will be adding them frequently.
Tomorrow we'll be featuring a guest post from one of our instructors, Thomas Ingersoll, that ties into our first class. He will also be leading the monthly Photoshop and Lightroom lessons. Thomas has a deep passion for photography and teaching. He's done some phenomenal work around the state. You can check out his work here.